|
|
Word’s AutoCorrect feature—not just for “errors”The AutoCorrect dialogThe AutoCorrect dialog in Word is accessed as follows:
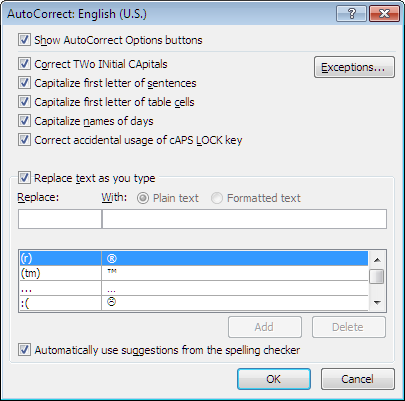
Regardless of how it is accessed, the dialog looks pretty much the same in every version, as shown in Figure 1.
Figure 1. The AutoCorrect dialog in Word 2010 Standard AutoCorrect featuresMany users think of Word’s AutoCorrect feature as just a crutch for poor spellers and clumsy typists or the source of maddening and unwanted changes in the text they enter. For some, especially those who have left the option to “Automatically use suggestions from the spelling checker” enabled (as it is by default), it is a source of either entertainment or embarrassment, depending on whether or not they catch the “corrections” before the document is printed or distributed. The core of AutoCorrect is a built-in list of frequently misspelled or mistyped words. When you type a space or punctuation mark following the text in the “Replace” box, it is automatically replaced by the text in the “With” box. For example, if you often type “teh” for “the,” you may not even notice that Word is silently correcting this for you, and you almost certainly won’t mind—except in the rare instances (as in this sentence) when you actually want to type “teh.” You may notice that the title bar of the dialog shown above says “AutoCorrect: English (U.S.).” That's because there are separate AutoCorrect entries for every language. If you have a different language applied to the text at the insertion point when you open the dialog, you'll get a different list. For more about language-specific AutoCorrect files, see below. Although the built-in AutoCorrect list is extensive, it is just the tip of the iceberg. You can make AutoCorrect do so much more. To begin with, you can add your own personal typing/spelling bugaboos. This is especially easy to do (in versions before Word 2013) if you’re using Word’s “Check spelling as you type” option. To enable this option, check the box at this location:
With this option enabled, when Word marks a word as misspelled, right-click on it. Instead of choosing the correct spelling from the list at the top of the shortcut menu, choose AutoCorrect instead, then choose the word from the list in that submenu. The correction will be added to the AutoCorrect list, and you’ll never have to make the correction manually again.
If you want to add several AutoCorrect entries at one time, you can, of course, type the “Replace” and “With” text manually, but you can still save time by selecting text in the document. If you do, note the following general behavior:
There are, of course, exceptions; if you (as recommended below) select something like “;word” as your “Replace” text, you'll find it in the “With” box. For more on creating custom AutoCorrect entries, see below. Beyond spelling correctionAutoCorrect is more than just spelling correction. Used correctly, it can fantastically increase your productivity. Word has already given you a head start in this direction by including some helpful built-in AutoCorrect features that you can use or not use at your discretion. As you can see from Figure 1 above, these include the ability to automatically capitalize the beginnings of sentences (or what Word interprets as sentences) and correct other anomalies in capitalization.
Beyond error correctionBut there’s still more! AutoCorrect can do more than correct misspelling or mistyping. It can also expand abbreviations. Suppose you are typing a long report in which the company name “Consolidated International Automated Widgets, Inc.” is repeated very frequently. This gets old in a hurry, especially since any text that involves a lot of capitals and punctuation tends to break your typing rhythm. So create an AutoCorrect entry to insert this phrase for you. Here’s how:
From now on, whenever you type “ciaw,” Word will insert “Consolidated International Automated Widgets, Inc.” The text will be inserted with the formatting at the insertion point; for example, if you are typing in a Heading 1 paragraph, “Consolidated International Automated Widgets, Inc.” will be inserted with Heading 1 font formatting. Formatted AutoCorrect entriesIf your replacement text contains characters that are not part of the basic character set, you will need to designate your AutoCorrect entry as “formatted text.” For example, if you select “First‑Class Widget Sales” (using a nonbreaking hyphen in “First‑Class”), you will see that the text appears in the “With” box as “First*Class Widget Sales.” Click the radio button for “Formatted text,” and you’ll see the nonbreaking hyphen. You can also use “formatted text” for entries with direct font formatting. For example, I have an entry “wsj” that is expanded into The Wall Street Journal (in italics). “Formatted text” entries will still adapt to their surroundings except for the specific font formatting directly applied to the entry. So if you want to save an italic or bold entry, make sure that the font of the selection is otherwise the Default Paragraph Font (that is, you haven’t changed the font itself or the point size). The sky is really the limit for formatted AutoCorrect: although there is a limit of 255 characters for unformatted AutoCorrect entries, formatted ones can contain pretty much anything you can save as an AutoText entry, and insertion is triggered automatically by typing the prompt text so that you could, for example, insert an entire formatted table by typing “;table” or a picture just by typing a few letters. Ad hoc AutoCorrect entriesYou can easily set up AutoCorrect entries for a specific document and then remove them later. If you’re careful to maintain the list in this way, you can get away with some abbreviations that might not otherwise be suitable. For example, in one novel I was typing, there were characters named John T. and C‑Boy (using a nonbreaking space in one and a nonbreaking hyphen in the other); I entered these as “jt” and “cb.” Long after I finished the book, my husband was using my computer and couldn’t understand what was happening when he typed “CB.” I’d neglected to delete those AutoCorrect entries! Used correctly, AutoCorrect can make you more productive not only by keeping you from having to correct your common typing errors but also by saving you from repetitive typing of frequently used long words and phrases. Where AutoCorrect entries are storedUnformatted AutoCorrect entries are stored in *.acl files by language. The name of each file has the syntax MSOLanguage ID Number.acl, where “Language ID Number” is a the “Locale ID” (LCID) corresponding to the specific language. For example, the AutoCorrect file for English (U.S.) is MSO1033.acl. You can find a list of LCIDs here. These files are stored in the user profile; the default path on Windows XP is C:\Documents and Settings\username\Application Data\Microsoft\Office; for Windows 7 it is C:\Users\username\AppData\Roaming\Microsoft\Office; for Windows 10 and 11 it is C:\Users\username\AppData\Roaming\Microsoft\Office. Formatted AutoCorrect entries are stored in the Normal template (Normal.dot or Normal.dotm). If you need to move AutoCorrect entries (both formatted and unformatted) from one computer to another, you can use the AutoCorrect.dotm template that can be downloaded here. This template contains macros to back up and restore your AutoCorrect entries. (An older version, for Word 2003 and earlier, can be found here.) AutoCorrect in Word 2007AutoCorrect assumed new importance in Word 2007 because in that version AutoComplete is no longer available for AutoText entries. However, as noted above, formatted AutoCorrect entries can contain pretty much anything you can save as an AutoText entry, and insertion is triggered automatically by typing the prompt text, making them actually even easier to use. Fortunately, AutoComplete for AutoText was restored in Word 2010. This article copyright © 2002, 2008, 2014, 2023 by Suzanne S. Barnhill. |