|
|
How to detach an envelope from a documentWord makes it easy to create envelopes for the letters you write.
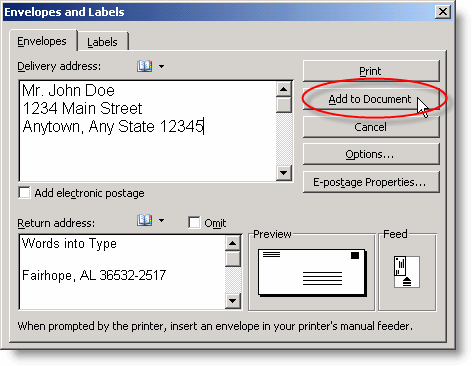
When you open this dialog and (if necessary) select the Envelopes tab, the Inside Address in your letter may already be inserted, especially if you have selected it before opening the dialog. If not, you can use Ctrl+C to copy the address and Ctrl+V to paste it into the dialog. Or, if you have access to an Address Book that works with Word, you can click on the Insert Address button to insert the address. Word’s Help topic “Create and print a single envelope” explains how to do all this, and if you use the “Ask a question” box to search for “envelope,” you will find many other helpful Help topics. When you have pasted in the delivery address, added a return address, and selected the other required options (as described in the Help topic), you can print the envelope immediately, or you can click the Add to Document button to attach the envelope to your letter (see Figure 1).
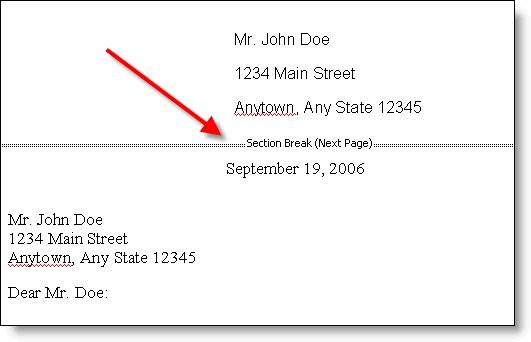
Figure 1. Envelopes and Labels dialog showing Add to Document button. This is where a lot of users get into trouble. They may want to print the envelope with the document and then remove the envelope, saving only the letter, or they may have created an envelope attached to a blank document, in order to print multiple envelopes (SASEs, for example), and want to remove the blank page and save just the envelope. Here’s how to do both: Remove the envelopeThis is the easier of the two problems. Word inserts the envelope as a separate section (Section 1, page 0). If you view the document in Normal view (Draft view in Word 2007 and above), you will be able to see the section break clearly (Figure 2).
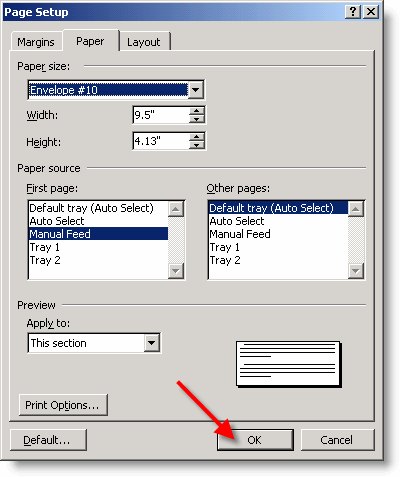
Figure 2. Document viewed in Normal/Draft view showing section break. Select everything from the beginning of the document up to and including the section break and press Delete. You’ll be back where you started, with just the letter. Remove the “letter”This one is a little more complicated but not at all difficult. If you know anything about working with sections, you know that a section break stores information about the paper size and orientation, margins, etc. These same settings are stored in the final paragraph mark of the last section of a document. Your Letter + Envelope document contains two sections. Section 1 is an envelope (probably in Landscape orientation, with an envelope paper size), and Section 2 is a “letter” (a Letter or A4-sized page). If you try to delete the “letter” portion of your document (which may be just a blank page), including the section break, you’ll end up turning your envelope into a “letter.” You don’t want that! The trick is to turn the “letter” into an envelope. When you delete the section break, Section 1 is going to take on the formatting of Section 2, so what you want to do is make Section 2 the same as Section 1. Here’s how:
Figure 3. The Page Setup dialog
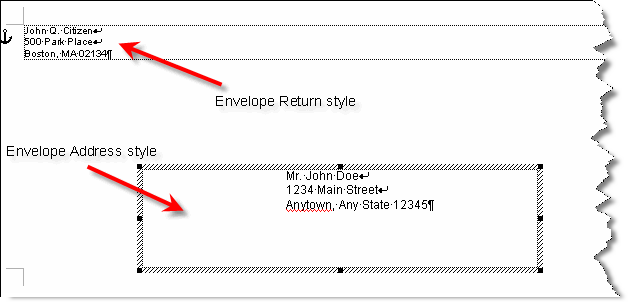
Another way to create envelopesOften you need to print multiple copies of an envelope or save it for reuse. Attaching an envelope to a blank document is not the only way to create such an envelope. You can also do this by starting from scratch.
The above is just a bare outline of the steps required to create a custom envelope. For more on this subject see the articles “Modifying the appearance of your envelopes” and “Changing Word envelope layouts.” You can learn more about how to include graphics in your return address in “Using alternative return addresses on envelopes from the Envelope/Label Wizard.” Graham Mayor also has sample envelope templates on his download page. This article copyright © 2006, 2008, 2011, 2014, 2018 by Suzanne S. Barnhill. |