|
|
Display, Use, and Manage Styles in Word
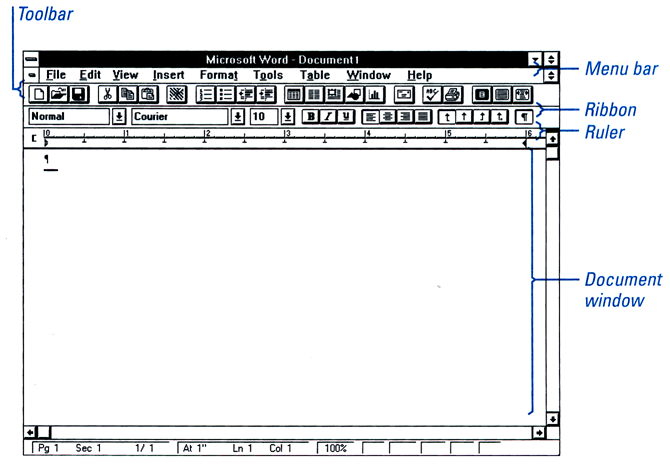
IntroductionStyles have always been an important part of Word, a feature that distinguished it from other word processors, and the earliest versions of Windows made styles easy to find. My 848-page (!) manual for Microsoft Word for Windows 2.0 (© 1991) shows the Word window with a Menu Bar and a Ruler. Between them are two toolbars labeled Toolbar and Ribbon (perhaps you thought that name was new?). With the addition of more toolbars in Word 6.0, the Toolbar and Ribbon were renamed the Standard and Formatting toolbars, and the Ribbon didn’t reappear till Word 2007.
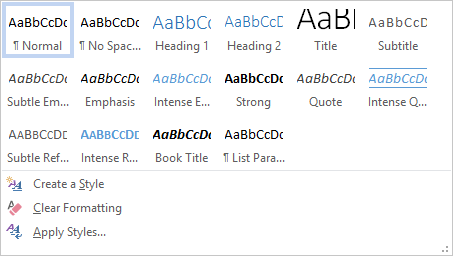
Figure 1. Word 2 window Many of the buttons and menus you see today on the Home tab of the (new) Ribbon—such as buttons for applying font and paragraph formatting, dropdown boxes to change the font and font size—were already present on the original Ribbon (or Formatting toolbar) in earlier versions of Word. There was also a dropdown box to display styles to choose from. Word’s toolbars remained largely unchanged through Word 2000. Word 2002 introduced the Styles and Formatting task pane, giving users two ways to view and select styles. The current Ribbon, introduced in Word 2007, substituted the Quick Style Gallery for the Style dropdown and introduced other new ways to view and manage styles. This article will discuss those various ways, with their pros and cons. Quick Style GalleryWhen you first open a Word document, the Home tab of the Ribbon is displayed. This tab contains the tools Microsoft thinks users will need most often, including tools for formatting text (font and paragraph formatting). At the right side of the Ribbon is the Quick Style Gallery, which displays a number of styles—how many depends on the width of your screen and the width of the Word window. By default, these are Normal, No Spacing, Heading 1, Heading 2, Title, and Subtitle, followed by Subtle Emphasis, Emphasis, Intense Emphasis, Strong, Quote, Intense Quote, Subtle Reference, Intense Reference, Book Title, and List Paragraph. For a description of these “essential styles,” see this rather snarky analysis. You may debate whether these are the styles you would use most often, but, as we shall see later, you can change which styles are displayed.
Figure 2. Basic Quick Style Gallery If you click the arrow on the right (the one in the green square) to expand the gallery, it will display all 16 styles. You also have commands to Create a Style, Clear Formatting, and Apply Styles…
Figure 3. Expanded Quick Style Gallery The Create a Style and Apply Styles options will be discussed later, but a word about Clear Formatting is in order. The SuperToolTip for this command say, “Remove all formatting from the selection, leaving only the normal, unformatted text.” This is somewhat misleading. There are two commands in Word that actually do what this suggests:
These are not what Clear Formatting does. What it does is apply the Normal style, using its default font and paragraph formatting. If this is not what you want, choose one or both of the other commands instead. If you right-click on one of these styles, you will get the following menu, which will be discussed later.
Figure 4. Quick Style Gallery menu Note the command to Add Gallery to Quick Access Toolbar. Clicking on this adds a single button to the QAT; clicking that button opens the entire gallery (the same as clicking the arrow to open the gallery on the Home tab). This makes the gallery accessible even when the Home tab is not active and also (provided the QAT is displayed below the Ribbon) puts it marginally closer to the document.
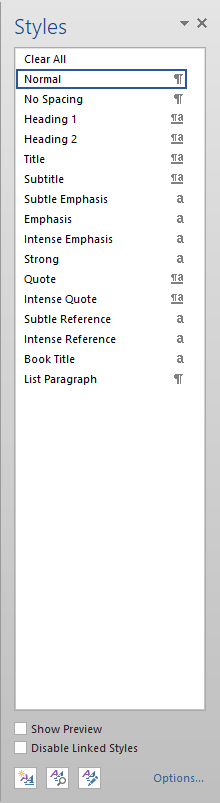
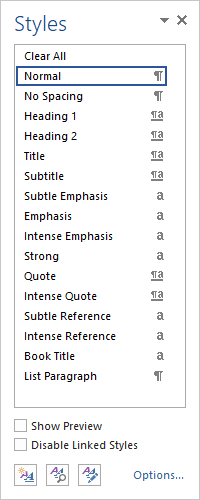
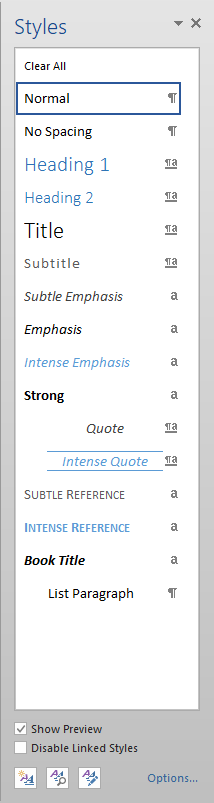
Styles paneIf you click the “dialog launcher” in the Quick Style Gallery (the small arrow in the bottom right corner, circled in Figure 2), or if you press Alt+Ctrl+Shift+S, you will open the Styles pane.
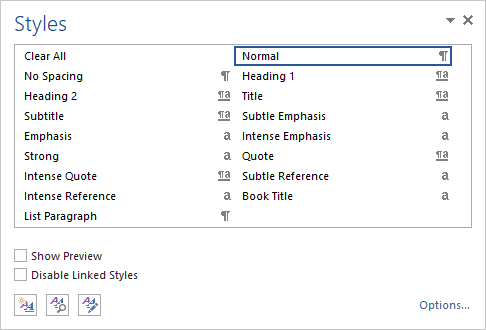
Figure 5. The default Styles pane You will see that, by default, the Styles pane displays the same styles, in the same order, as the Quick Style Gallery. (Clear All is the equivalent of Clear Formatting in the Style Gallery menu, and the same caveats apply.) You don’t have to settle for the defaults, however. You have numerous options for displaying the Styles pane, including both its appearance and its content. Styles pane appearanceBy default, the Styles pane is docked on the right side of the Word window. If you prefer to have it on the left, you can move it there: mouse over the title of the pane until the mouse pointer becomes a four-headed arrow (Move handle) and drag the pane to the left as if you were trying to drag it out of the Word window. If it doesn’t snap to the left side, double-click on the title bar to dock it. Alternatively, you can drag the Styles pane into the window and leave it “floating.”
Figure 6. Floating Styles pane In this configuration, you can resize it as you desire. You can even make it wider and shorter to force it to display two columns.
Figure 7. Floating Styles pane in two columns The width of the docked Styles pane can also be adjusted, and it will also display two columns when the list includes more styles than can be displayed in a single column. If you have very long style names and extra horizontal screen real estate, you may find this helpful.
You will note that there is a check box for Show Preview. Check that box, and Word will show you the actual formatting of the styles just as the Quick Style Gallery does.
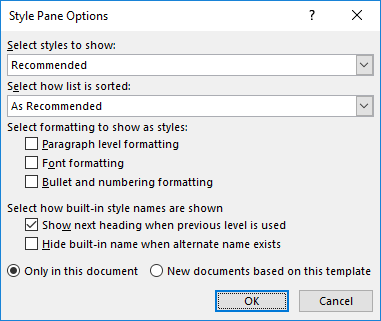
Figure 8. Styles pane with preview You will note that this list is not as efficient vertically as the plain-text list; if you want to show more styles, you should omit the preview. Styles pane contentIn the bottom right corner of the Styles pane is the Options… button. Click on that to open the Style Pane Options dialog.
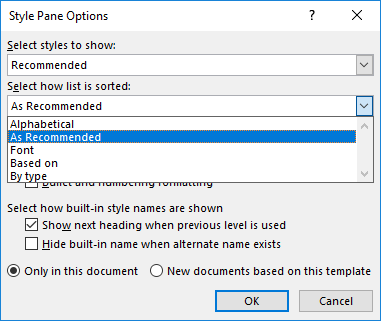
Figure 9. Style Pane Options dialog You have several choices of which styles to show and in what order.
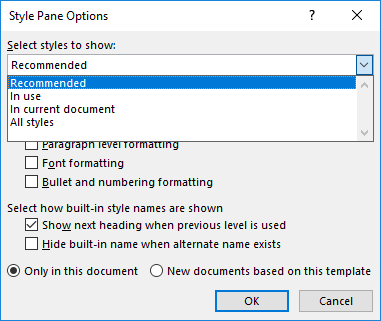
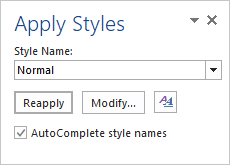
Figure 10. Options for styles to show and sort order As you can see, the default is to show the “Recommended” styles in the order of their priority (“As Recommended”). Later we’ll see how to change that. For now, if you want to see every style there is (including ones you have created), you can select “All styles” and sort them in Alphabetical order. You may also want to experiment with “In use” and “In current document” to see if you can figure out what these actually mean in a practical sense. (At least in theory, styles “In use” are those that are applied to some text in the active document. Styles “In current document” are those inherited from the document’s base template.) Be sure to clear the check boxes below “Select formatting to show as styles” if you don’t want your list of “styles” cluttered up with “formatting,” such as “Heading 1 + Bold.” This type of display is useful mainly when you are trying to find and eliminate direct paragraph or font formatting. The “Show next heading” check box is useful. By default, Word displays only Heading 1 and Heading 2, but if you use Heading 2, then Heading 3 will appear in the style list (and the Quick Style Gallery); use Heading 3 to display Heading 4, and so on. Apply Styles toolbarThe expanded Quick Style Gallery in Figure 3 shows an Apply Styles… entry. Click on that (or press Ctrl+Shift+S) to open the floating Apply Styles toolbar.
Figure 11. Apply Styles toolbar This toolbar is pretty much unique in current versions of Word. In older versions of Word, any toolbar could be torn off and made to “float”; in current versions, only task panes have that behavior, and in fact, under the hood, Apply Styles is a task pane: if you double-click the title bar, it will dock on one side of the window. But that would be a huge waste of screen real estate. The main advantage of this toolbar is that it is small enough to be tucked out of the way somewhere while you work. The list displayed by the Apply Styles toolbar is dependent on the display chosen in the Style Pane Options. If you have elected to display “All styles” in the Styles pane, then the Apply Styles list will display all styles, but by default it displays the “Recommended” styles. When the box for “AutoComplete style names” is checked, only the styles on the list are completed automatically. If you know the name of another style that is not currently listed, you can type it in, and it will be accepted, but it won’t be AutoCompleted. In addition to the styles displayed in the Styles pane, the Apply Styles list includes all the table styles, which is an amazingly long list. Fortunately, they’re listed below the “Recommended” styles in the default list. The list always displays the styles as plain text; there is no option for displaying them with a preview.
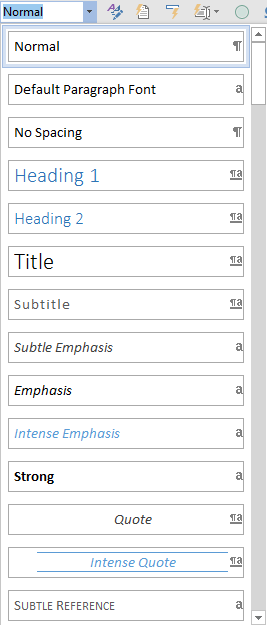
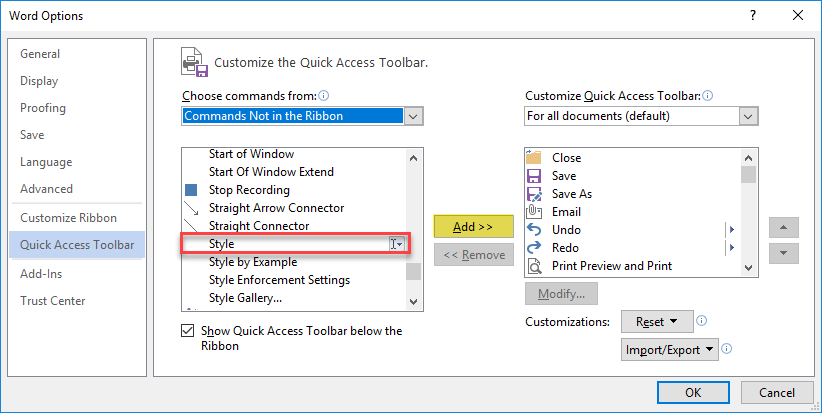
The Style dropdownWe said that the Quick Style Gallery replaced the Style dropdown on the Ribbon, but you can add the classic Style dropdown to the Quick Access Toolbar, and there are certain benefits to doing so. As long as you have the Home tab of the Ribbon displayed, you have access to the limited styles in the Quick Style Gallery. If you also have the Styles pane displayed, you can see another subset of styles (or “All styles” if you’ve chosen that option). If the style at the insertion point happens to be in the part of the list currently being displayed, it is outlined in the list (see the Normal style in Figure 5); but if the list contains more styles than can be displayed without scrolling, you may need to scroll to see what style is applied to the current paragraph. The Apply Styles toolbar always shows the style at the insertion point, so it is more helpful in this regard, and, since it floats, it is always visible, but you may sometimes find that it gets in the way. The Style dropdown, when added to the QAT, is always visible. Like the Apply Styles toolbar, it lists the styles that are currently listed in the Styles pane, plus all the table styles, but, unlike the Apply Styles toolbar, it shows them with a preview (formatted), which is actually a plus for the table styles.
Figure 12. Style dropdown and Style dropdown with tables The greatest benefit of the Style dropdown is that, even if the Styles pane (and hence the Apply Styles toolbar) are displaying a subset of styles (“Recommended” or “In use” or “In this document”), you can force the Style dropdown to display all styles by pressing Shift while clicking the arrow beside it. If this is a feature you think you would like, here’s how to add the dropdown.
Figure 13. Customize QAT One drawback of the Style dropdown in Word 2007 and above compared to earlier versions is that it is not resizable, so long style names may be cut off, but you should be able to read them when you click to open the dropdown. Comparison of ways to view stylesAll four of the above methods offer some utility in displaying and using styles. The table below clarifies some of their features.
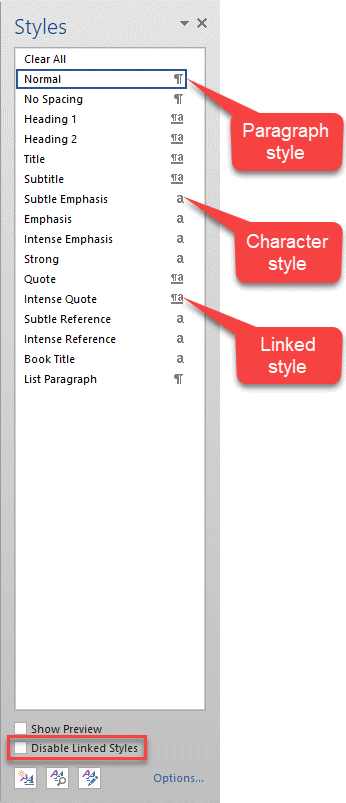
Using stylesTypes of stylesWord has several types of styles. List styles and table styles, which are outside the scope of this article, are never shown in the Styles pane, but the pane does provide examples of the other three types.
Figure 14. Styles pane showing style types
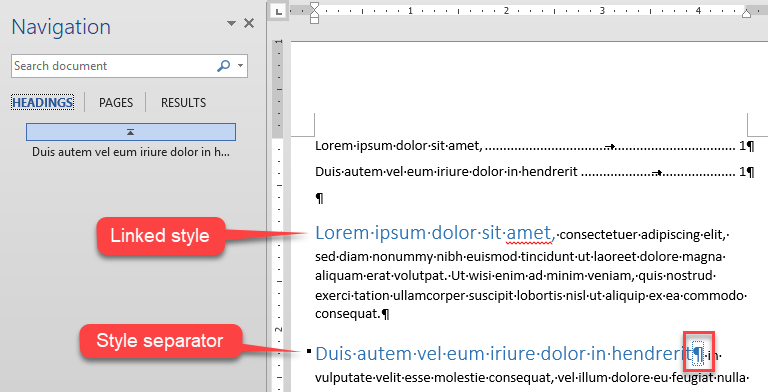
Linked styles were introduced in Word 2007. In Word 2003 and earlier, you could apply any paragraph style as a character style, and the font properties of that style would be applied to only the selected text. If you applied a heading style to text at the beginning of a paragraph, not only would the selected text take on the font properties of the heading style, but the selected text would appear in the table of contents. This was called “lead-in emphasis” and was a way to achieve “run-in sideheads.” In Word 2007 and above, only linked styles (which include headings) can be used this way, but the result is the same: apply a heading style to a portion of text at the beginning of a paragraph, and it becomes a heading. Sort of. The drawback to this approach is that, while the “heading” text will be included in a table of contents that includes its level (by default, Levels 1–3), these “headings” are not displayed in the Navigation pane (similarly, in Word 2003 and earlier, they are not displayed in the Document Map). So if your intent is to be able to view the outline of your document by viewing headings in the Navigation pane, this type of “heading” is not satisfactory. There is another and better way to accomplish the same thing: use a style separator. Figure 15 shows the difference. You can see that while both “headings” appear in the TOC, the first, created by applying a linked style, does not appear in the Navigation pane while the second, created using a style separator (the unusual symbol outlined in red), does.
Figure 15. Linked style vs. style separator You will note that the Styles pane has a check box for “Disable linked styles.” You may want to check this box to prevent inadvertently applying a linked style to only a portion of a paragraph, which can result in confusion. Apply a styleOnce you know how to find a given style, applying it is simple. With the insertion point in the paragraph to which you want to apply the style, just click on the style in the Quick Style Gallery, Styles task pane, Apply Styles dialog, or Style dropdown. Any one of those will work.
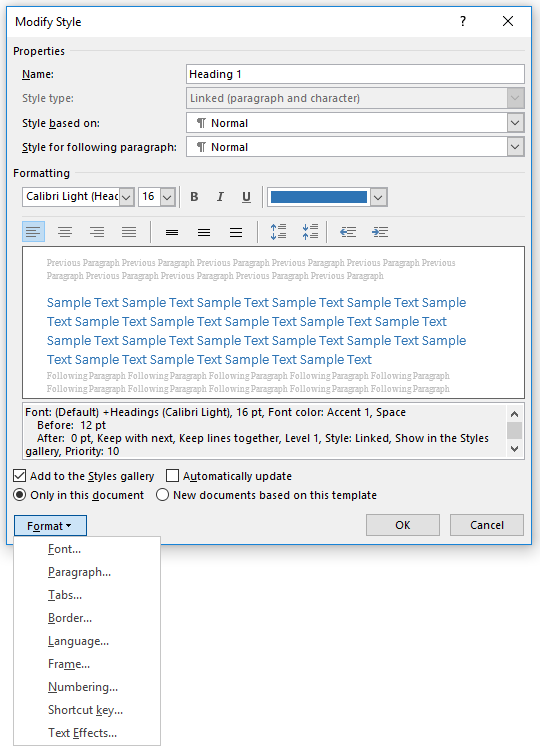
Modify a styleThere are several ways to modify a style. The Style dropdown is the only style display that doesn’t provide a path. Right-click on a style in the Quick Style Gallery (see Figure 4) or Styles pane (see Figure 17) and Modify… will be one of the menu options. The Apply Styles toolbar has a dedicated Modify… button. Any one of these will open the Modify Style dialog.
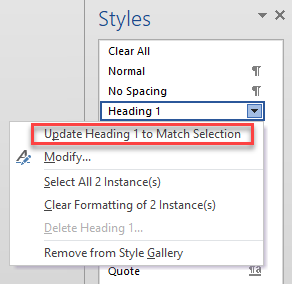
Figure 16. Modify Style dialog showing formatting options Obviously, this is the Cadillac of options. Here you can select all the formatting options shown, specify which style will take effect when you press Enter (“Style for following paragraph”), and choose whether you want the modified style to be saved just in the current document or in the attached template. But there is a much easier way to start when you’ve already done a lot of work on formatting and want it to be applied to the style. There are two possible scenarios here: Scenario 1Say you know you want a given paragraph to be a heading and you’ve applied the Heading 1 style to it, but you don’t like the default formatting of the style. So you’ve changed the font and font size and font color, maybe changed the paragraph spacing as well. How can you make these changes permanent and have them apply to all other Heading 1 paragraphs? In the Styles pane, right-click on Heading 1 and choose Update Heading 1 to Match Selection.
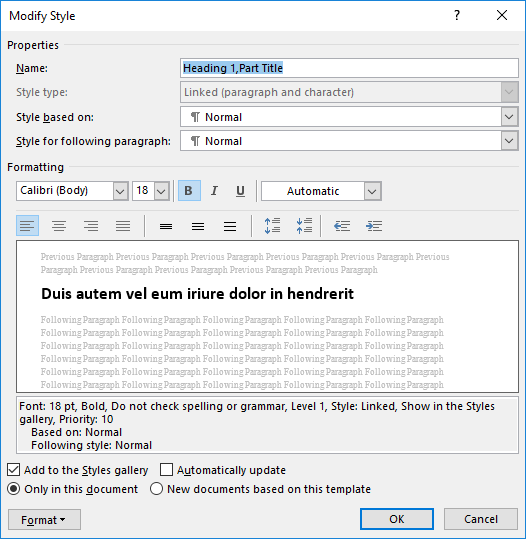
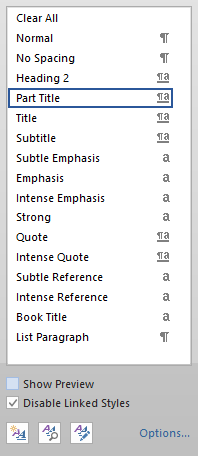
Figure 17. Styles pane style menu Scenario 2The second scenario is even more convenient. You’ve created your entire document in the Normal style. You’ve applied formatting to some paragraphs that you want to treat as headings. Now you realize you should have applied heading styles to them (there are numerous good reasons for this, but one might be that you want them included in a table of contents or the Navigation pane). Select your formatted Normal paragraph. In the Styles pane, scroll till you can see Heading 1. Right-click on it and choose Update Heading 1 to Match Selection. Heading 1 will miraculously acquire all the properties of your formatted Normal paragraph and automatically be applied to that paragraph. If you have formatted other paragraphs similarly, you’ll have to go back and apply Heading 1 to them manually, but this really is amazingly simple. Once you have used the Update to Match Selection method, you will probably still want to open the Modify Style dialog for some fine tuning, especially if you want to save your style to the template, but this is a very quick way to start. Create a new styleAs a general rule, it’s preferable to use Word’s built-in styles insofar as possible. If you display “All styles,” you’ll see that there are hierarchies of Body Text, List Number, List Bullet, List Continue, and other styles for almost every purpose. Some of these styles—Header, Footer, Footnote/Endnote Text, Envelope Address, Envelope Return, TOC and Index styles—are used automatically for the implied purposes, but you can modify their formatting to suit you, just as you can modify any style. If you think that you will not remember what a style is for if it has a generic name such as Body Text First Indent, then you can give it an alias. As an example, the built-in heading styles have special properties that custom styles do not have, so it is advisable to use them when you can. Suppose you want your top-level heading to be used for part titles. Instead of creating a custom Part Title style, in the Modify Style dialog, add “Part Title” as an alias.
Figure 18. Adding an alias to a style In the Style Pane Options dialog (Figure 9), check the box for “Hide built-in name when alternate name exists,” and you will see this in the Styles pane:
Figure 19. Styles pane showing alias So reinventing the wheel is not recommended. But if you insist on creating a style, you can do so.
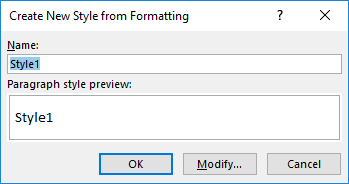
There are two paths to creating a style: From the Quick Style GalleryAs shown in Figure 3, one of the commands on the Quick Style menu is Create a Style. If you click on that, you get this dialog:
Figure 20. Create New Style from Formatting (mini dialog) This assumes that you’ve already applied the desired formatting to a paragraph and want to create a style based on that formatting. All you have to do is give it a name. This is very quick and convenient, but you may find you need to visit the Modify Style dialog to fine-tune the formatting and choose where to save it. If you want to do that before clicking OK, there is a Modify… button in the dialog.
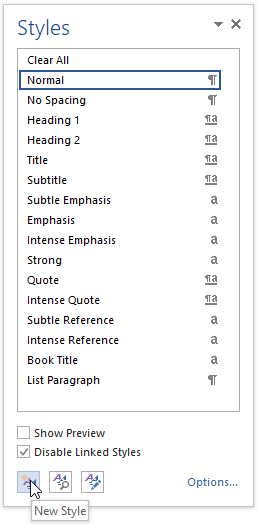
From the Styles paneThe farthest left button at the bottom of the Styles pane is New Style.
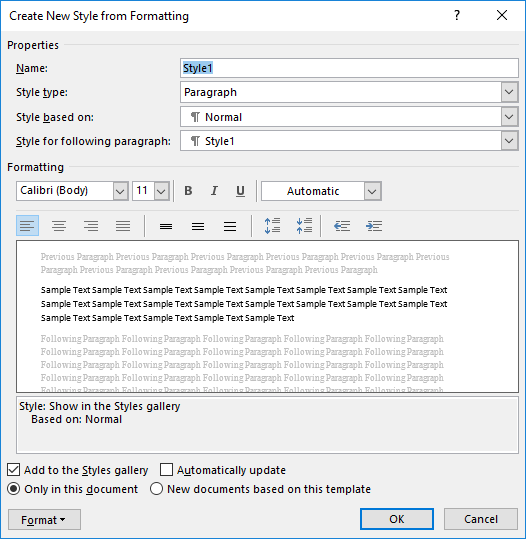
Figure 21. Styles pane showing New Style button This button opens the full Create New Style from Formatting dialog.
Figure 22. Create New Style from Formatting (full dialog) If you’ve used the Modify Style dialog, you’ll recognize this interface, as it’s exactly the same except that you have to name the new style. As the title implies, this dialog assumes that you have already formatted the paragraph the way you want it, but you can start from scratch if needed.
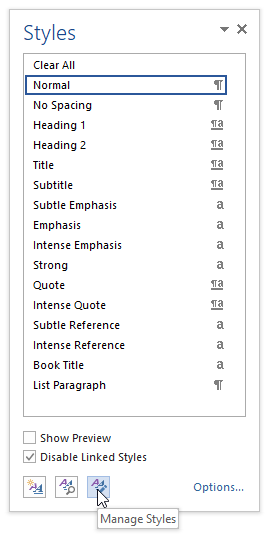
Customizing the Quick Style GalleryAs noted above, the styles Microsoft includes in the Quick Style Gallery may not be the styles you want most readily available, but it is easy to change that. When you right-click on a style in the gallery (see Figure 4), one of the options is “Remove from Style Gallery.” You will get the same option if you right-click on one of these styles in the Styles pane. But if you right-click on a style in the Styles pane that isn’t already in the gallery, you have the option to “Add to Style Gallery.” Regardless of how you have the styles in the Styles pane sorted, the order in the Style Gallery is always “As recommended,” so you may find that a style you have added will be at the bottom of the gallery. While changing the complement of styles included in the gallery is easy, changing their order is more complex and requires the use of the Manage Styles dialog. The Manage Styles dialogThe rightmost of the three buttons in the bottom left corner of the Styles pane opens the Manage Styles dialog.
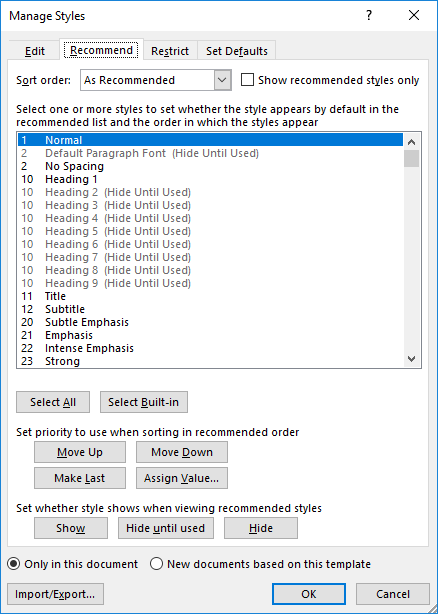
Figure 23. Styles pane showing Manage Styles button A brief glance at the Edit tab of this dialog will show that it displays all the styles provided in Word, including table and list styles, and that almost all of them are dimmed and marked as “Hide Until Used.” The ones that are shown in black are the “Recommended” styles that you see in the Styles pane by default. So how do you “recommend” styles? To do that, you have to use the Recommend tab of the dialog. This tab also lists all the styles, in “As Recommended” order by default. You’ll see that the order mirrors that in the Quick Style Gallery and the Styles pane, and you can see that the reason for this is the numbers assigned to the styles, which determine their priority. You can change this priority.
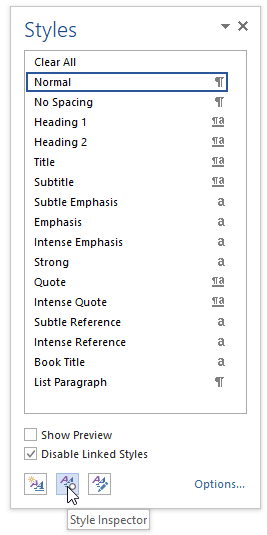
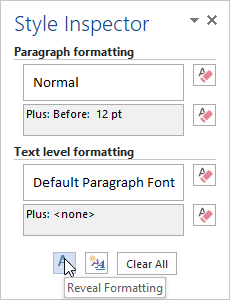
Figure 24. Recommend tab of Manage Styles dialog In my experience, it requires a good bit of trial and error to get just the right order, but you can start by selecting styles you are sure you will never use and clicking the Make Last button to dump them at the bottom of the list. Then you can use Move Up, Move Down, or (more efficiently) Assign Value to set the priority of each of the styles you plan to use. Making a list ahead of time to plan the desired order will help; you can choose nonsequential numbers to allow spaces for other styles you may want to add as an afterthought (note the spaces already available between 2 and 10, between 12 and 20, and so on). One hint to keep in mind is that styles at the same level will be ordered alphabetically. This means that the built-in heading styles, even with the same priority, follow each other in order. It’s not a bad idea to leave all the headings except Heading 1 set to “Hide Until Used.” The next-level heading will be displayed automatically provided you have checked the box for “Show next heading when previous level is used” in the Style Pane Options dialog (see Figure 9). To make your chosen styles appear in the Styles pane, you have to click Show for each one. To make them appear in the Quick Style Gallery, you will have to select each one in the Styles pane and click “Add to Style Gallery” (after removing the unwanted styles from the gallery). Style priority and Quick Style Gallery settings are stored in both documents and templates, so you can create templates with custom styles and custom Quick Style Gallery and Styles pane settings. Although there is some work required to set these up, the time you can save by having your most-used styles readily available is well worth the effort. Solving style mysteriesWord offers two additional features that are useful for finding out what styles are responsible for the appearance of “mystery text.” These are the Style Inspector and the Reveal Formatting pane. The Style InspectorThe center button at the bottom of the Styles pane opens the Style Inspector dialog.
Figure 25. Styles pane showing Style Inspector button To get an idea of how this works, let’s look at a selection in a sample of “mystery text.”
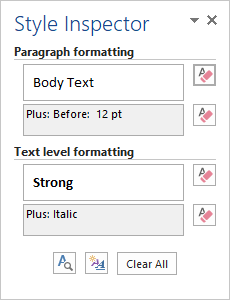
Figure 26. Text with “mystery” formatting If you click in most of this paragraph, the Styles pane will show Body Text; click in the opening phrase, and it will show Strong. The Strong character style has been applied to part of the paragraph. Some additional formatting has been applied to both the paragraph and the selected text. This is what the Style Inspector will show.
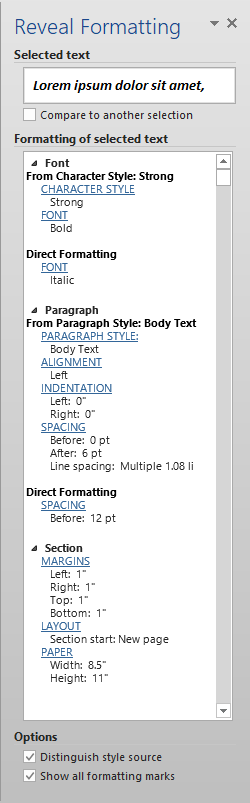
Figure 27. The Style Inspector The Style Inspector shows that the underlying paragraph style is Body Text, which has been modified by adding some Spacing Before. In addition, the Strong style has been added as character formatting, with italics added as direct font formatting. The eraser button beside each item can be used to remove this formatting selectively. The buttons are labeled Reset to Normal Paragraph Style, Clear Paragraph Formatting, Clear Character Style, and Clear Character Formatting. Although Ctrl+Q can be used to reset the paragraph to the underlying paragraph style formatting, and Ctrl+Spacebar can be used to return text to the Default Paragraph Font, the Style Inspector is the only way to remove direct font formatting without removing a character style. The example above is actually a pretty easy case because it is obvious that the opening text has different formatting. Where the Style Inspector can be especially helpful is when a character style has been applied to an entire paragraph. All the style displays mentioned above will display only the character style. A common example is a hyperlinked table of contents: all the entries will show the Hyperlink style rather than TOC 1, TOC 2, etc.; only the Style Inspector will show the underlying paragraph style. The Reveal Formatting task paneThe Reveal Formatting task pane, though often overlooked, is one of Word’s most powerful features for figuring out formatting. There is actually a button in the Style Inspector dialog to open it, though you can also open it at any time by pressing Ctrl+F1.
Figure 28. The Style Inspector dialog showing the Reveal Formatting button As you can see from Figure 29, the Reveal Formatting task pane, especially if you check the box for “Distinguish style source,” shows a wealth of information about not only the selected text but also the entire document or section.
Figure 29. The Reveal Formatting task pane You can check the box for “Compare to another selection” to figure out why text that should look the same is showing discrepancies. Using all the tools described above, you should become a master of styles! This article copyright © 2018, 2021 by Suzanne S. Barnhill. I am grateful to fellow Word MVP Jay Freedman for several suggestions that greatly improved this article; in some cases I have used his wording verbatim. |


.png)
.png)