|
|
|
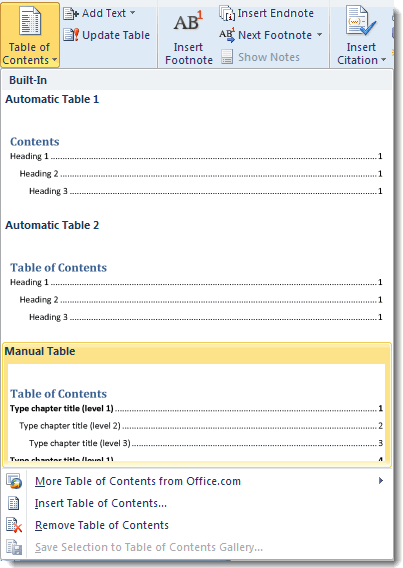
This article applies to Word 2007 and above. Word makes it so easy to create a table of contents (TOC) automatically that you might wonder why you would ever want to create one manually. I can speak only for my own experience, but there are some documents where I still do this. In most cases, they are “yearbooks” or directories for various organizations. The content (and pagination) remains largely unchanged from year to year, and the variety of the content makes it impractical to use specific heading styles systematically. The TOC is very simple, with all entries at the same level (regardless of the level of heading used on the page), and not all headings are included. In such a situation, a manual TOC is more practical. In previous versions of Word, creating a manual TOC required starting entirely from scratch. The manual TOC shown at the beginning of Demo: Let Word create your table of contents (the demo video is no longer available) is a worst-case scenario: the user has typed in the titles and then pressed the period key to get a row of leader dots, stopping at an approximate location to type in the page number. Even in Word 2003 and earlier, you can do better than this, setting a right-aligned tab stop with a period leader (as explained in my article on number alignment). You can even use the built-in TOC styles (TOC 1, TOC 2, and so on), modified to your preference. Word 2007 and above, however, offer what at least appears to be a simpler approach. On the References tab, in the Table of Contents group, click the button for Table of Contents. This opens a dropdown menu/gallery that includes two “Automatic Table” options and one “Manual Table” (see Figure 1).
Figure 1. The Table of Contents dropdown If you choose “Manual Table,” you will get the result shown in Figure 2.
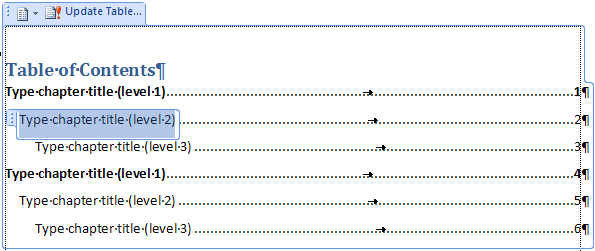
Figure 2. Manual table of contents inserted by Word As you can see, the TOC is inserted as a content control. It includes a title (“Table of Contents”), which you can manually edit or delete if desired. Each entry is also a content control, which means that you can easily replace the default text just by clicking in the control and typing; the content control is overwritten when you type in it, so that your title entry becomes plain text. Page numbers can be selected and changed manually. Adding entriesAs you can see, the TOC includes two series of entries at three levels. These entries use the default TOC styles: TOC 1, TOC 2, and TOC 3. Filling in the existing entries is fairly simple. What is far from obvious is how to get additional entries. There are (at least) two ways to go about this: Cut and pasteYou can select an entry at any level and paste it to create more entries at the same level, but this is a little tricky to do, as you will find if you experiment. There are (so far as I am able to determine) only two right ways to do it:
While this method is a bit tricky, it is the only one I can really recommend to novices. Once you read the next section, I think you’ll see why. If you have many new entries to create, you may want to display the Office Clipboard (click the dialog launcher in the bottom right corner of the Clipboard group on the Home tab) in order to collect all three TOC levels for pasting as needed.
Apply TOC styles manuallyAs noted, if you press Enter at the end of any of the TOC entries, the paragraph that is created is in the Normal style. In order to create a new TOC entry, you must apply the appropriate TOC style (TOC 1, TOC 2, or TOC 3). This is also the method you will have to use if you want to add levels (apply TOC 4, for example). Unfortunately, not only are the TOC styles difficult to access, applying them does not accomplish what you might expect. Although the TOC styles are designated as Quick Styles, they
are also coded as “Hide until used.” This means that they are hidden until
you use them. Consequently, you need to open either the Styles pane
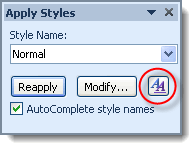
or the floating Apply Styles toolbar. You can easily open the latter with
Ctrl+Shift+S, and when it is open, you can click on the
Figure 3. The Apply Styles toolbar You can also open the Styles pane with Alt+Ctrl+Shift+S or by clicking the dialog launcher in the Styles group on the Home tab. The styles displayed in the Apply Styles toolbar list will be the same ones displayed in the Styles pane. (For more on different ways to display and access styles, see “Display Document Styles.”) You can click Options… in the Styles pane to select which styles are displayed. Because the TOC styles are designated as “Hide until used,” you will have to select “All styles” initially. Once you have actually applied the styles, they should be displayed with “In use” or “In current document” selected, and they will also be displayed in the Quick Styles gallery. Once you can see the TOC styles in the Apply Styles list or the Styles pane or the Quick Styles gallery, you can select the desired level to apply to your new paragraph. Unfortunately, applying the TOC styles is disappointing. By default, the TOC styles do not have a tab stop for the page number. This makes sense because a tab stop set for the default page margins would be in the wrong place if you change the margins. When you create an automatic TOC, either by using the content controls in the Table of Contents gallery or by using the Insert Table of Contents dialog, Word automatically sets a right-aligned tab stop, with period leader, to be just inside the right margin (if your line length is 6.5″, for example, Word will set the tab stop at 6.49″). My expectation in using this Manual Table content control was that the same thing would happen: the TOC styles would be updated to match the current margin settings. Certainly the default entries in the TOC do work this way. My expectation was that I would apply a TOC style to my paragraph, type the title manually, then press Tab to get to the tab stop where I would type in the page number. But this is not how it works. When you apply the TOC styles to new paragraphs in this content control, they have the default out-of-the-box formatting, with no tab stop. You can add a tab stop, either through the Tabs dialog or by clicking on the ruler, and you can add a period leader through the Tabs dialog, but this is extra work. Moreover, the Level 1 entries in the Manual Table content control are formatted as bold; yet when you apply TOC 1 to a new paragraph, it is not bold. TOC styles are set to update automatically, so you can format your TOC 1 paragraph as bold, and that will update the style. But that’s still more work. Worse still, you’d think that you might be able to update the TOC styles to match the entries in the content control. Nope! If you select a Level 1 heading, right-click and choose Styles, then Update TOC 1 to Match Selection, what actually happens is that the default TOC 1 style is applied to the Level 1 entries in the TOC. This is disastrous and absurd. So why use the Manual Table contents control?Good question. The only advantage to this would be to have the TOC styles automatically configured for your margins, but they are not. So in the long run, once you know how to access and modify the TOC styles, you would probably do just as well to insert a TOC from scratch just as you would have done in previous versions of Word. This article copyright © 2012, 2023 by Suzanne S. Barnhill. |