|
|
|
Many users become frustrated by Word’s proofing tools, especially the spelling checker. It doesn’t recognize words they know are right, or it insists on recognizing U.S. spellings when they want U.K. spellings, or they want Word to ignore certain kinds of text that aren’t really words at all. They become understandably exasperated with Word’s know-it-all attitude. Who’s in charge here, anyway? The question is, who is to be master,* and it is possible to get the upper hand!
Shortcut: start hereWhat follows is a detailed explanation of how Word’s spelling checker works and how to solve specific problems. In most cases, however, this is all you need to know:
How Word’s spelling checker works
Problems with the custom dictionary:
How Word checks spellingLet’s start with an explanation of how Word’s spelling checker works. It is not really very sophisticated. Essentially, Word has a very large (but not infinite) list of words to which it compares each “word” you type. If it doesn’t find a match, it tells you that the word is misspelled. In compounding languages such as German or Dutch, Word's lexicon contains possible components of compound words, and the spelling checker verifies these individual components in much the same way that the English spelling checker looks at the separate parts of hyphenated words. The lists used by the spelling checker are in “lexicons” (files with the .lex extension) identified by language. For example, Mssp3en.lex is the lexicon for most varieties of English; there is a separate lexicon for Australian English, Mssp3ena.lex. These files are in a proprietary format and cannot be read or edited by users. The importance of languageThe lexicon Word uses depends on what language you have selected for the text. By default, the English edition of Word comes with proofing tools (spelling and grammar checkers, a thesaurus, and a hyphenation file) for English, French, and Spanish (several flavors of each). Other languages are included in other editions. If you want to check spelling and grammar in a language not included with your edition, you must purchase the Office Proofing Tools package for your version of Office. These are usually available from Microsoft only for the most recent version of Office, but currently (2025) it appears to be possible to get them for both Office 2013 and Office 2016. For Office 2013, they can be downloaded free here. For Office 2016, get them here. Recent versions of Word, including Word Word 2016, 2019, and 2021 as well as Word in Microsoft 365, make it easy to get proofing tools, through File | Options | Language. See here for more information.
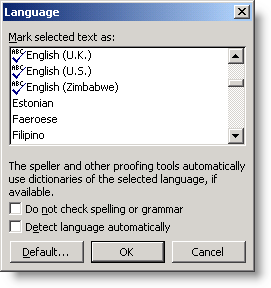
Figure 1. The Language dialog The language applied to text is selected in the Language dialog. Access it as follows:
In Figure 1, note that you can tell from the list in this dialog which languages have proofing tools installed (those with the ABC+check icon). In this example, you could format your text as Estonian, but you would not be able to check spelling or grammar because the proofing tools for Estonian are not available.
If the language of your text doesn’t match the language of the proofing tools being used, then obviously you won’t get very good results. A common complaint of British users is that Word insists on using U.S. English instead of U.K. English, even though they have selected U.K. English as the default. There are two issues here:
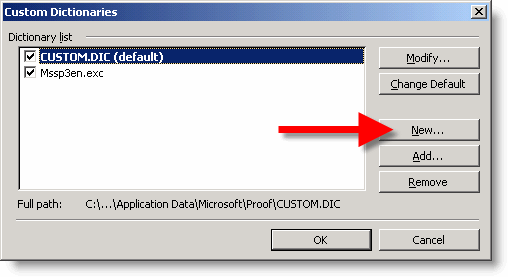
Custom dictionariesIn addition to the built-in “lexicon” in a given language, Word can use user-defined “dictionaries,” to which you can add words of your choice. The default user or custom dictionary is the Custom.dic file. When you right-click on a “misspelled” word and choose Add to Dictionary, this is the file to which it is added. It’s a simple text file that you can edit. For all practical purposes, you can have as many custom dictionaries as you like (although there is a maximum number, it is very unlikely that you will exceed it). For example, you might have a number of specific technical terms that you use only for certain documents. You could create a separate dictionary for these terms and load it as needed. To create such a new dictionary, follow these instructions:
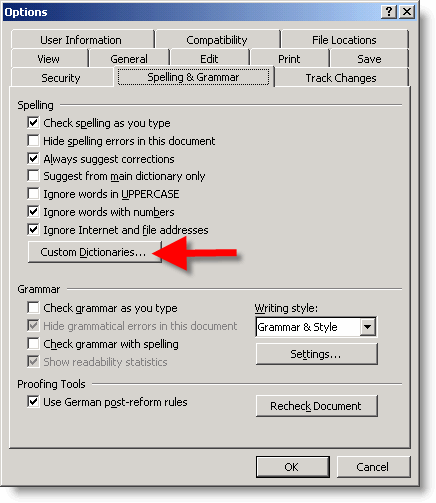
Figure 2a. The Spelling & Grammar Options dialog in Word 2003
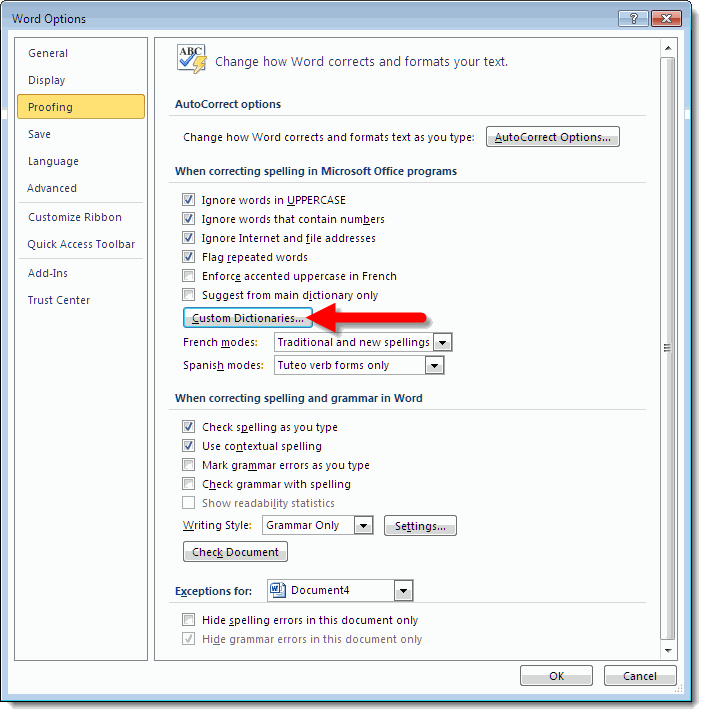
Figure 2b. The Proofing Options dialog in Word 2010
Figure 3a. The Custom Dictionaries dialog in Word 2003
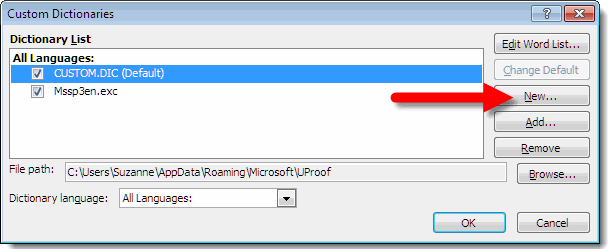
Figure 3b. The Custom Dictionaries dialog in Word 2010
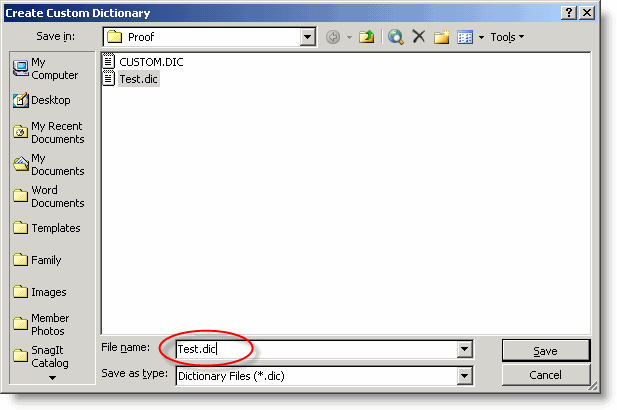
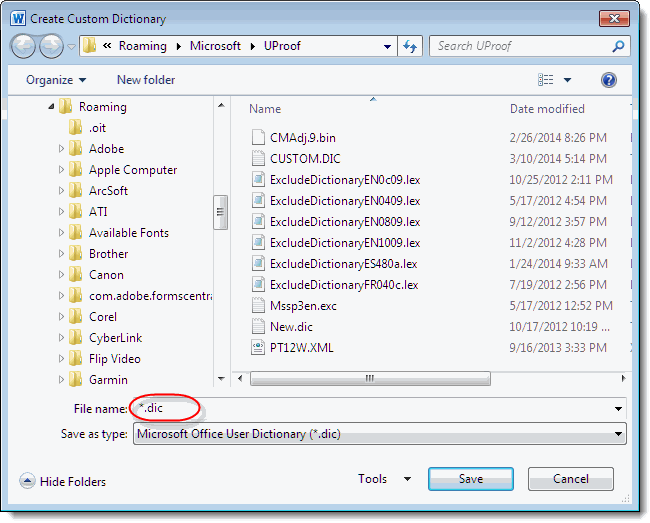
Figure 4a. The Create Custom Dictionary dialog in Word 2003
Figure 4b. The Create Custom Dictionary dialog in Word 2010
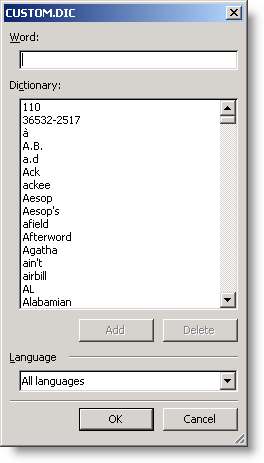
Figure 5. A custom dictionary opened for modification Some add-in dictionaries, such as dictionaries of medical and legal terms, are available for purchase. You can add such a dictionary by clicking Add in the Custom Dictionaries dialog, navigating to its location on your hard drive, selecting it, and clicking OK in the Add Custom Dictionary dialog. If you have created an exclusion dictionary, you can use this method to add it to the Custom Dictionaries list to make it more easily accessible for adding or removing entries. (Note that exclusion dictionaries are unfortunately not displayed in the Custom Dictionaries dialog in Word 2007 and above.)
Figure 6. The Add Custom Dictionary dialog Changing the way misspelled words are markedBy default, Word uses a wavy underline to indicate misspelled words. By default, this underline is red. (Other colors are used for grammar and contextual spelling errors.) My friend and fellow forum moderator Charles Kenyon has reminded me that (in Word 2007 and above) it is possible to change the colors used for these marking. This may be of interest to those who suffer from color blindness. It does require editing the Windows Registry, but complete instructions are given in the article “How to customize the color of the spelling and grammar checker underlines in Microsoft Word.” Solving spell check problemsToo little spell checkingIn recent versions of Word you have a number of options about how Word checks spelling. If you have “Check spelling as you type” checked in the Spelling & Grammar Options or Proofing Options dialog (see Figure 2), Word will put a wavy red underline under words it doesn’t recognize. If you opt not to check spelling as you type, you can still run the spelling checker explicitly by pressing F7 or through the menu or Ribbon as follows:
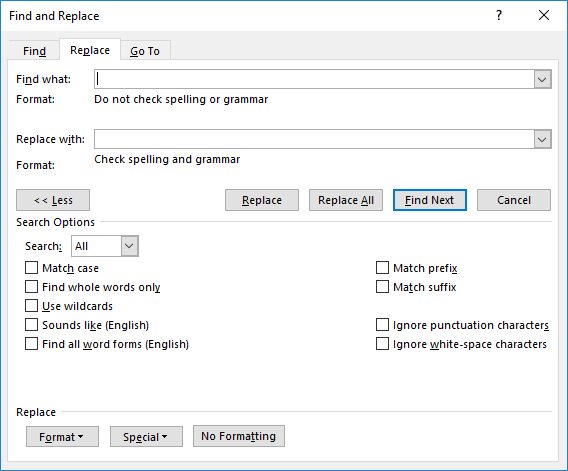
Nothing marked as misspelledIf no words are being marked as misspelled, even though you have “Check spelling as you type” enabled, it may be that you are an extremely good speller and not using any words that Word doesn’t recognize. More likely, there is something wrong. Check the Spelling & Grammar Options or Proofing Options to make sure that “Hide spelling errors in this document” is not checked (see Figure 2). If it is not, the usual problem is that the text has been formatted as “Do not check spelling or grammar” (see Figure 1). To correct this, select the entire document (Ctrl+A), apply the desired language to it, and clear the check box for “Do not check spelling and grammar” in the Language dialog.
While clearing the check box for “Do not check spelling and grammar” for all the text in the document will provide a solution for the currently selected text, there are two caveats to be aware of:
If you have Word 2007 or above and find that the spelling checker just does not work at all—that is, it doesn't mark any words as misspelled, and running the spelling checker with F7 doesn't find any errors—there are two more steps you can try:
Misspelled words skippedSometimes, even though “Check spelling as you type” is enabled and some words are marked as misspelled, you will type or see a word that you know is misspelled, but Word does not mark it or find it when you run the spelling checker. The usual reason for this is that that portion of the text has been formatted as “Do not check spelling or grammar.” You may even get a message from the spelling checker that “The spelling and grammar check is complete. Text marked with ‘Do not check spelling or grammar’ was skipped.” Remember that language is a character format that can affect even small selected portions of your text. Although most of your document may have the correct language applied, it’s possible for certain portions of it to be formatted as “Do not check spelling or grammar.” You can use this to your advantage, but when you do want it checked, select the problem text (or the entire document) and clear the check box for “Do not check spelling or grammar” in the Language dialog.
Rechecking ignored wordsOccasionally you will right-click on a misspelled word and choose Ignore All, then later think better of it. Once you’ve told Word to ignore the word, though, how do you get it to see the word as misspelled again? Go to:
and click Recheck Document. You will get the message box shown in Figure 7. Answer Yes and your ignored word will again be marked as misspelled.
Figure 7. Recheck Document message box Marking correctly spelled words as misspelledSometimes you would like Word to call attention to a word that you frequently type when you intend to type a different, similar word. For example, suppose you often type “abut” when you mean “about.” “Abut” is an actual word, so it isn’t misspelled, but chances are that in most cases it’s a typo. You could add “abut > about” as an AutoCorrect entry, but there may be times when you would actually have a use for the word “abut,” so you don’t want to burn your bridges—just make sure that you have some warning that you may have used the wrong word. You can accomplish this by adding the word to an “exclusion dictionary.” This is also an effective way to deal with variant spellings that, while they may be generally accepted as correct, you prefer not to use. If you have Word 2007 or above, you will probably find you have less need for an exclusion dictionary, as the contextual spelling checker in that version will handle many of the “errors” that you would have added to an exclusion dictionary in previous versions. Too much spell checkingEverything marked as misspelledThis should be an easy one to troubleshoot: clearly the language of the text doesn’t match the language of the proofing tools. If you’re typing in French and spell-checking in English, there may be a few words that will overlap, but for the most part you’ll have “misspellings.” Press Ctrl+A to select the entire document; then, in the Tools | Language | Set Language dialog (Review | Proofing | Set Language in Word 2007; Review | Language | Language | Set Proofing Language in Word 2010), select the correct language if proofing tools are available. If you don’t have proofing tools for the language installed, you can hide the spelling errors. Correct words marked as misspelledThere are at least four possible reasons for a word to be marked as a misspelling even though you think (or know) it is spelled correctly:
Hiding spelling errorsThere are times when you don’t want to see spelling errors in your document, or you don’t want others to see them. There are several approaches to this problem, with varying effect on other documents and systems. The options can be summarized as follows:
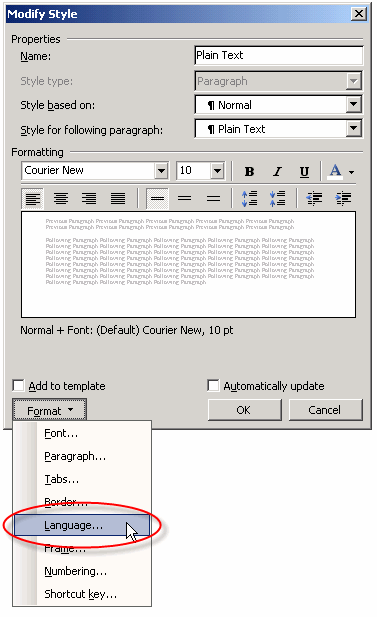
Exempting specific text from spell checkingSometimes you will have a document in which certain kinds of text will always be “misspelled.” Even if you have exempted words in UPPERCASE, words with numbers, and Internet and file addresses (see Figure 2), there will still be text that the spelling checker will mark because it is in another language (for which you don’t have proofing tools) or because it is not a real language (programming code, for example, or equations that don’t contain numbers). This is an issue, for example, for an author writing a book about programming who must include code snippets. Or the issue may be just a lot of unusual names, a common situation for authors who write fantasy and science fiction. The solution to this problem is to format the text as “Do not check spelling or grammar.” Remember that we said that the language applied to text (and this includes the “(no proofing)” language) is a character format. It can be applied to a unit as small as a single letter, so it can certainly be applied to specific words or paragraphs. The easiest way to apply this formatting is to apply a style that is formatted as “Do not check spelling or grammar.” If the text of this type will be complete paragraphs, this can be a paragraph style; if the text will be included in paragraphs of ordinary text, a character style can be used. To add the “Do not check spelling or grammar” property to an existing paragraph style (such as Plain Text, often used for code snippets), in the Modify Style dialog, click Format | Language and check the box for “Do not check spelling or grammar.”
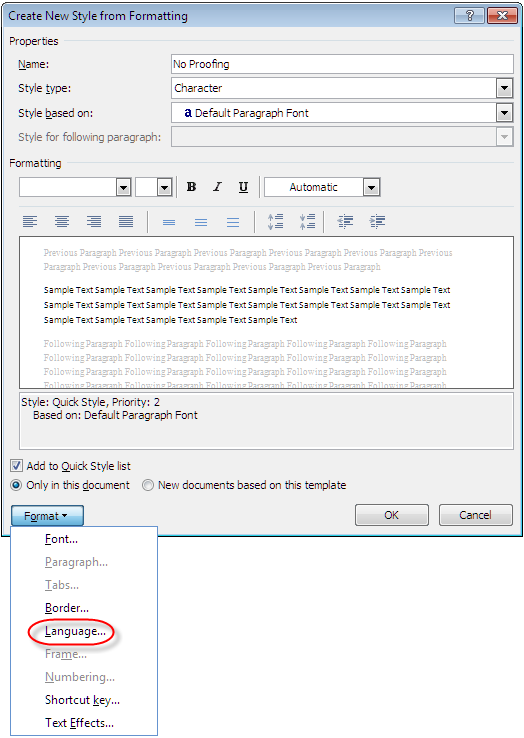
Figure 8. The Modify Style dialog box Often you will want to create a “no proofing” character style to apply to selected text. Such a style should be based on “Default Paragraph Font” so that you can apply it to any style of text without changing the font formatting.
Figure 9. The Create New Style from Formatting dialog to create a character style
Problems with the custom dictionaryFailure to recognize variant formsWord’s built-in proofing tools have the ability to recognize all tense forms of an included verb, plurals and possessives of nouns, and any combination of caps and lowercase. Custom dictionaries don’t have this ability. If you add a noun all in lowercase, Word will recognize it when capitalized, but if you capitalize it in the custom dictionary, it will not be recognized when lowercased. Nor will it be recognized if you make it plural or possessive; you must add all these variant forms individually. Word added in errorTo remove a word from a custom dictionary, open the Custom Dictionaries dialog, select the appropriate dictionary, and click Modify. Select the incorrect word, click Delete, then click OK. Word not addedIf you right-click on a “misspelled” word and choose Add to Dictionary and get the error message, “The custom dictionary is full. The word was not added,” this can indicate that the dictionary is corrupt or the spelling checker files are damaged; see this Microsoft Knowledge Base article. In no case does the message actually mean that the custom dictionary is full—at least not in recent versions of Word (there is a maximum size of 64 KB, but it's unlikely you’ll reach that, though you might experience performance issues if the dictionary becomes very large). If, however, the Add to Dictionary command is unavailable (dimmed on the shortcut menu), this indicates that the language of the default dictionary differs from the language applied to the word you’re trying to add. By default, Custom.dic is set to All Languages; if you change it to, say, French, you will not be able to add an English word. This error might easily arise if you had created an additional custom dictionary for specific terms, set the language to something other than All Languages, set it as the default temporarily, and forgotten to reselect Custom.dic as the default.
__________________ *Astute readers will recognize the allusion to this passage from Lewis Carroll’s Through the Looking-Glass:
This article copyright © 2007, 2008, 2009, 2011, 2014, 2016, 2019, 2023, 2024, 2025 by Suzanne S. Barnhill. I am grateful to Stefanie Schiller, Thierry Fontenelle, and Lisa Decrozant of Microsoft's Natural Language Group, whose comments helped me make this article more accurate. Any errors that remain are my own. Thanks also to Word MVP Doug Robbins for his sleuthing to discover the problem discussed under “Misspelled words skipped.” |