|
|
Word’s nonprinting formatting marksOccasionally a new user of Word is alarmed to discover that his previously pristine document is full of strange symbols—dots, arrows, paragraphs marks, and the like. For experienced users, the usual reaction of such a user seems almost comical because experienced users know how invaluable the display of these symbols can be both in formatting and in troubleshooting documents. The symbols that Microsoft now calls “formatting marks” were previously referred to as “nonprinting characters.” By either name, they are characters that take up space or have a formatting function but do not appear on the printed page: spaces, tab characters, paragraph breaks, and the like. Even if you prefer to work most of the time without seeing them, you should know how to display them and what they mean. The important thing to know is that they do not print (you will not see them in Print Preview). The display of nonprinting characters may be toggled in either of two ways:
Whether you use the shortcut key or the button, what you are toggling between is display of all nonprinting characters and whatever specific ones you have chosen to display as an alternative. Here’s where to find the settings:
Figure 1. View Options in Word 2003
Figure 2. Display Options in Word 2010 (similar in Word 2007 and 2013) Note that there are six or seven check boxes under “Formatting marks.” The last one of these is “All” or “Show all formatting marks.” When you toggle the toolbar/Ribbon button on and off (or use the keyboard shortcut), this box is checked and unchecked. When it is unchecked, you will still see the nonprinting characters represented by whichever of the other check boxes you have checked. Usually this is none, but there might be times when, for example, you would want to see just Hidden text or just paragraph marks and none of the others. (Note that “Paragraph marks” includes line breaks and text-wrapping breaks, discussed below.)
So what do all these marks represent? Paragraph marksThe paragraph mark or pilcrow (¶) represents a paragraph break. You should see one at the end of each paragraph (if there is not one, you'll likely find that you have a problem). Ordinarily you should not see one anywhere else. By this I mean that you should not be ending lines with paragraph breaks, nor should you be using “empty paragraphs” to create “blank lines” between paragraphs (in most cases this is better accomplished with Space Before or After).¶ Here’s a “horrible example” of a worst-case scenario: a user who, not knowing how to double-space, pressed Enter at the end of every line:
Figure 3. Excessive use of paragraph breaks The ¶ contains all the paragraph formatting. You can select it, copy it, and paste it onto another paragraph to copy and paste formatting (though there are other ways to do this as well). The last ¶ in the document contains formatting for the entire document (header/footer and margin information, for example) or for the last section if there are more than one.¶ Line breaks
A right-angle arrow pointing to the left
A right-angle arrow between two vertical lines Style separatorAnother type of break, introduced in Word 2002, is the
style separator. The article “How can I include
just part of a paragraph in my table of contents?” describes the situation
in which this is useful, and the linked article “How
to use outline levels to create a table of contents (TOC) in Word 2003 and in
Word 2002” (despite the title, the content applies to Word 2002 and above;
the section “More Information About Style Separators” explains that the style
separator is essentially the same thing as a hidden paragraph mark). In text, a
style separator appears as a paragraph mark inside a dotted rectangle. At high
Zoom levels, it can be seen to have the dotted underline indicating Hidden text: Pagination breaksMore obvious in their meaning are manual column, page, and section breaks. To delete these, you can simply select them and press the Delete key (or you can use Find and Replace). The examples below show how they appear in Word 2003 and earlier; the display is a little different (but still recognizable) in Word 2007 and above.
■ Finally, you will sometimes see a small black bullet ■ in the margin next to a paragraph. This indicates that the paragraph is formatted with the “Keep with next,” “Keep lines together,” “Page break before,” or “Suppress line numbers” property. These settings are found on the Line and Page Breaks tab of the Paragraph dialog; if you double-click on the “bullet” itself, you will bring up this dialog with the Line and Page Breaks tab selected. Word's built-in Heading styles by default are formatted as “Keep with next,” so you will always see these bullets next to them. To access the Paragraph dialog:
Spaces
In most fonts, and certainly all Windows “core
fonts”, a∙ small∙ raised∙ dot∙ represents∙ an∙
ordinary∙ space∙ (some∙ fonts,∙
such∙ as∙ Arial Special G1, don't include a character to represent a
space; Be sure you don't have space ∙ ∙ characters ∙ ∙ where ∙ ∙ they are ∙ ∙ not ∙ ∙ needed. If you are tidy-minded, for example, you won't want a string of them at the end of a paragraph where your thumbs relaxed on the spacebar while you stopped to think.∙ ∙ ∙ ∙ ∙ ∙ ∙ ∙ ∙ ∙ ∙ ∙ ∙ A degree symbol ° represents a nonbreaking space (Ctrl+Shift+Spacebar), which you can use to prevent words from being separated at the end of a line.
This is useful for keeping dates together (so you
don't end up with September En and em spaces (on the Special Characters tab of the Symbol dialog, shown below) are also represented by the degree symbol, but there is extra space to the left of the symbol for an en space °and extra space both left and right for an em ° space.
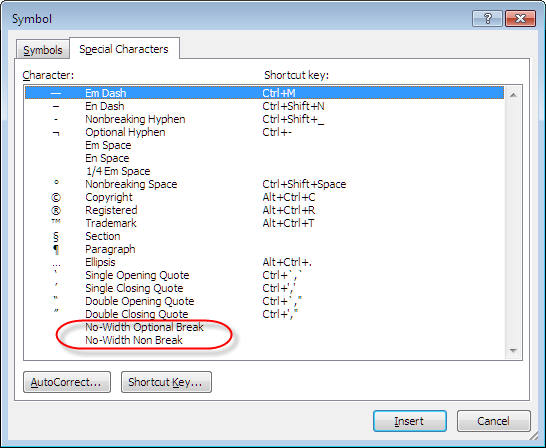
Special Characters tab of the Symbol dialog The characters circled on the Special Characters tab in the screen shot above produce symbols that may be puzzling.
Tab charactersAn arrow pointing to the right → represents a tab character, where you have pressed the Tab key. As explained in the article on setting tabs, in a well-formatted document you should not see more than one of these in a row. → → → HyphensA conditional hyphen (one that is printed only if it falls at a line break, entered with Ctrl+Hyphen) is shown as ¬. A nonbreaking hyphen (Ctrl+Shift+Hyphen), which is useful for phone numbers and any hyphenated compound you don't want to break at the end of a line, is displayed as a dash whose length is intermediate between an en (–) dash and an em (—) dash. This is one of the most confusing symbols because it is very difficult to tell, with nonprinting characters displayed, whether you have actually entered a nonbreaking hyphen or a dash. Cell markersIn tables you will see one additional character, the universal monetary symbol, Unicode character 00A4 (¤), which displays variously at various point sizes and magnifications but upon close inspection is seen to be a circle with four lines radiating from the corners. ¤
One other type of “nonprinting character” that is
toggled by the Show/Hide button is Hidden text.
Even when it is displayed, Hidden text is not printed unless you choose to do so:
There are a number of clever formatting tricks you can do by formatting text (especially paragraph breaks) as Hidden, but you must hide it in order to see how the document will look when printed.
Colored underlinesIn addition to the dotted underline indicating hidden text, Word uses a variety of different types of colored underlines—solid, dotted, and wavy—to give information about the text. The Help topic “What do the underlines in my document mean?” explains the meaning of these underlines in Word 2003 and earlier. The most commonly seen are red wavy underlines to flag words identified as misspelled, green wavy underlines for grammatical errors, and blue wavy underlines to indicate formatting inconsistencies. In each case, specific options must be enabled before these are seen (“Check spelling as you type,” “Check grammar as you type,” “Keep track of formatting/Mark formatting inconsistencies”). Word 2007 and above use the wavy blue line to flag problems detected by the contextual spelling checker in addition to indicating formatting inconsistencies but otherwise use the same color scheme. Object anchors
Another very important nonprinting character is
the
anchor symbol – when working with
floating objects it's often crucial to know where these are In Word 2003 and earlier, display of object anchors is not toggled with the “Show/Hide ¶” button (see Figure 1), but in Word 2007 and above, this check box has been added to the list of “formatting marks.” There are two other types of nonprinting characters that are not (usually) toggled with the Show/Hide ¶ button: Field codesA field is a set of codes that instructs Microsoft Word to insert text, graphics, page numbers, and other material into a document automatically. For example, the DATE field inserts the current date. Ordinarily Word displays the result of a field (the date, page number, number of pages, number of words, etc.), but if you press Alt+F9 or select Toggle Fields on the shortcut menu, you will see the code itself, enclosed in curly braces, such as { DATE \@ "dddd, MMMM d" }. As mentioned above, there are two types of field codes that are toggled with the Show/Hide ¶ button rather than the Toggle Fields command. Both TC (table of contents entry) and XE (index entry) fields are formatted as Hidden text; when you insert either type of field, the display of nonprinting characters is toggled on by default so that you can see these codes. BookmarksWhen the display of bookmarks is enabled, user-defined bookmarks are indicated by heavy square gray brackets. A single-point bookmark has the brackets reversed so that it looks like a capital I.
To enable the display of bookmarks:
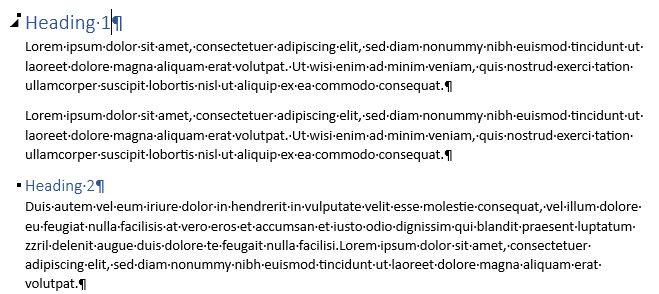
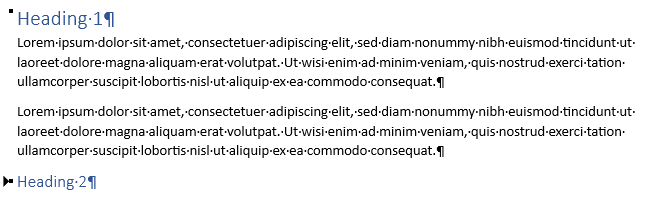
Expand/Collapse ArrowsIn Word 2013 and above, you may see triangles in the left margin of a document beside paragraphs that are in any of the built-in headings styles or have an outline level other than Body Text. These Expand/Collapse arrows allow you to focus on the outline of a document without switching to Outline view. For example, here's a sample of a document with a Heading 1 and a Heading 2.
If you click on the black triangle beside Heading 1, all the content between this Heading 1 and the next Heading 1 will be hidden (but not deleted):
If you click on the triangle beside the heading, the content will be redisplayed. You can also collapse just lower levels. In the example below, just Level 2 has been collapsed, leaving the Level 1 heading and content, but hiding everything up to the next Level 2 or Level 1 paragraph. Again, clicking on the triangle will restore the lower-level content.
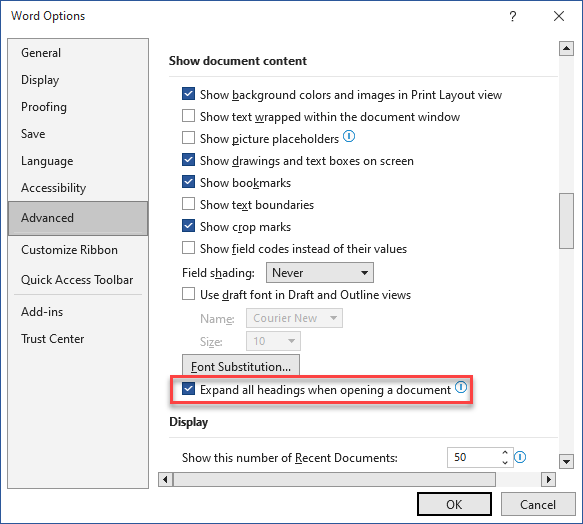
If you want headings never to be collapsed (barring an inadvertent click that collapses them), you can assure this by enabling this setting in Word’s Options:
Use of Nonprinting CharactersEven if you choose to keep nonprinting characters hidden most of the time, displaying them can be very helpful in troubleshooting obstreperous documents. If your pages are not breaking as you like, perhaps it is because you have too many (or the wrong) paragraphs set as “Keep with next.” If your printer is adding a blank page at the end of your document, it could be that you have a string of empty paragraphs at the end that are forcing an extra page. Accidentally deleting the paragraph break before a manual page break or Section Break can cause very peculiar problems. And if an automatic number insists on being bold even though you have applied bold formatting to only a part of the numbered paragraph, it could be that you need to select the paragraph mark and unbold it, since automatic bullets and numbering take on the formatting of the paragraph mark. All of these problems are much easier to diagnose if you can see what you're dealing with.
In general, it's
best to proofread your documents twice; once for content, with nonprinting
characters off (as they can be distracting when reading); and a second time with
nonprinting∙ characters ∙ visible, ∙ so ∙ that ∙ you ∙ can ∙ check ∙ for
redundant This article copyright © 2001, 2014, 2017, 2023 by Suzanne S. Barnhill. This article is a revised version of an article at the Word MVP FAQ site that was greatly enhanced by the editing and embellishment (especially with screen shots) of Dave Rado. |