How to add a command or macro to the Quick Access Toolbar
This article is for Word 2007 and above. The techniques
described below are not available in toolbar versions (Word 2003 and earlier); for
those versions, see my article on “Customizing Toolbars.”
Ribbon versions of Word offer varying degrees of
customization. In Word 2007, the Ribbon cannot be customized through the UI;
this facility was added in Word 2010. In all versions, however, the simplest way
to customize Word is to add frequently used commands to the Quick Access Toolbar
(QAT).
Positioning the QAT
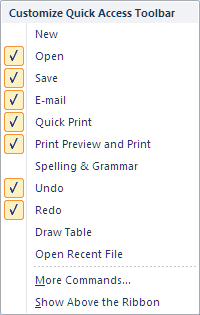
When you first start Word, the QAT is above the Ribbon and
has only three buttons: Save, Undo, and Redo/Repeat. You
may wonder why those particular three were chosen, but you will almost certainly
want to add more. Before you add very many, however, you will want to move the
QAT.
Default QAT in Word 2010
Because the QAT, when it is displayed above the Ribbon,
shares the title bar, the more buttons you add, the less space there is to
display the document’s filename. This is especially crucial in Word 2013 and
above, where the QAT buttons are bigger. If you display the QAT below the Ribbon,
it does take up a little more vertical space, but it is also easier to reach
with the mouse. To move it, right-click anywhere on the QAT, or click on the
arrow at the right end, and choose Show Quick Access Toolbar Below the Ribbon.


Quick Access Toolbar above the Ribbon in Word 2007,
Word 2010, and Word 2013
Adding buttons
Now you can start adding buttons. There are three ways to do
this:
-
From the QAT itself: When you click on the arrow at the
end of the QAT, you get a menu of popular commands; you can click on any one
to add it.
-
From the Ribbon: You can right-click on most buttons on
the Ribbon and choose Add to Quick Access Toolbar.
-
From the Customize the Quick Access Toolbar
dialog: To access the dialog:
-
Word
2007: Click Office Button | Word Options and choose the
Customize tab.
-
Word
2010 and above: Click File | Options and choose the Quick
Access Toolbar tab.
-
Any
version: Click on the arrow at the right end of the QAT and choose
More Commands…
Using the dialog
The screen shot below shows the Customize the Quick
Access Toolbar dialog in Word 2010 (it looks similar in all versions). The
screen shot shows it reduced to the smallest size that will display all the
options, but you can drag the bottom right corner to expand it to show much more
of the lists of available commands and QAT buttons.
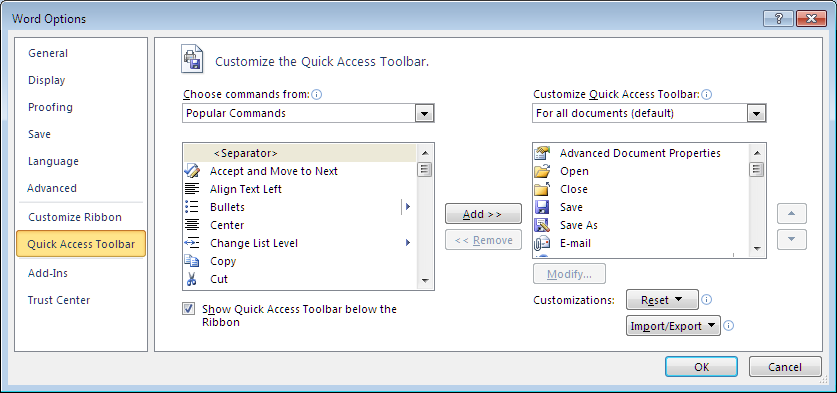
Where to save customizations
One reason you may prefer to use the dialog instead of
methods 1 or 2 is to change the customization context. Note in the top
right corner the dropdown that says “For all documents (default).” As far as I
can ascertain, this dropdown never provides more than two choices. The default
choice is to save the customizations in the Normal template, where they are
available to all documents. Alternatively, as shown in the screen show below,
you can select the current document. If you want customizations to be available
only to documents based on a specific template, then you must have that template
open for editing; it will then be the second option.

Finding the needed command
Having decided where you want to save your customization,
you need to find the desired button or macro in the Choose commands from
list. By default, the list shows Popular Commands, but, as shown in the
screen shot below, there are many other choices. If you haven’t been able to
find the button you wanted on the Ribbon, you may want to start looking in the
Commands Not in the Ribbon list, or you can go directly to All
Commands, which is a very exhaustive list.
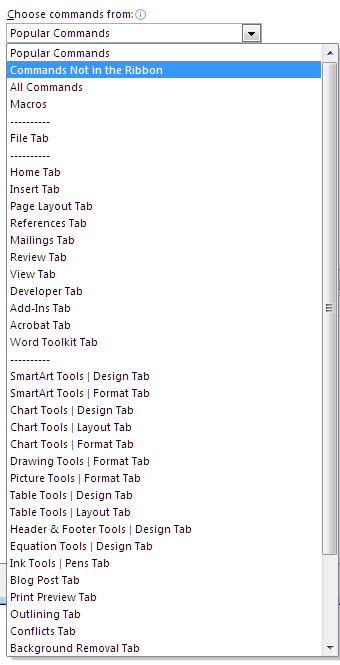
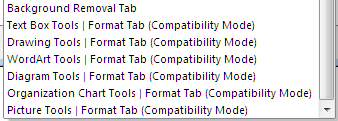
If you frequently deal with documents created in earlier
versions (which open in Compatibility Mode), you may be looking for commands
specifically for working with them. Those command groups are at the bottom of
the list, below Background Removal Tab, the last item shown when you open
the list.
Types of commands
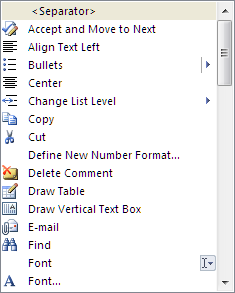
Note that the commands listed are of several kinds:
-
Those
with no icon on the right will execute a command or (if the command listed
ends with an ellipsis) open a dialog.
-
Those
with an arrow (Change List Level in the screen shot above) will open
a menu.
-
Those
with a bar and an arrow (Bullets in the screen shot) will open a
gallery.
-
Those
with an I-beam and down arrow (Font in the screen shot) will open a
combo box, which has a dropdown menu, but you can also type into the box.
Sometimes there will be more than one listing with the same
name; in the screen shot, Font… will open the Font dialog; Font
with the bar and arrow will drop down the font menu. You can also get a clue
about what the button will do by hovering over it; the ScreenTip will show where
the command is located in the Ribbon.
Once you have located and selected the command you want to
add to the QAT, click the Add>> button.
If you want to group the buttons by having some space
between certain buttons and others, you can use the <Separator> item,
which will add a short bar between the buttons on either side of it.
Order of buttons
By default, the new button will be added at the bottom of
the list, that is, at the right end of the QAT. You can change its position by
clicking the up arrow. Using the up and down arrows is the only way to change
the order of the buttons (unlike in Word 2003 and earlier, where toolbar buttons
can be moved by dragging), but you can save yourself some work if you insert the
button where you want it in the first place. Select the command you want it to
the right of, and the new button will be added below that command in the list.
Button icons
Many of the listed commands do not have icons. If you add
one of those to the QAT, it will display the default icon, which is a green ball
in Word 2007 and 2010, a shaded circle in Word 2013 and above. There is no way to
change this through the UI; if you’re a programmer, or just adventurous, you can
find instructions for changing the button faces in Greg Maxey’s article “Modify/Customize
QAT Icons, Labels or add Supertip text.”
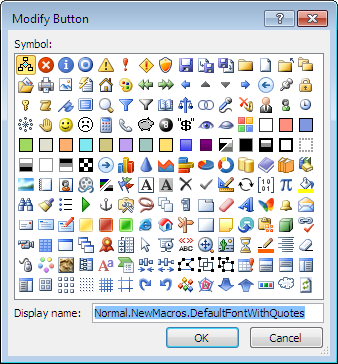
There is one slight exception to this restriction. Although
the default icon for all macros is the same, when you add a macro to the QAT,
the Modify… button becomes enabled for that button. As shown in the
screen shot below, the choice of images is somewhat whimsical, but you may be
able to find an icon that suits your purpose.
Removing buttons
As you have doubtless figured out, if you change your mind
about a button on the QAT, select it in the list and click <<Remove.
Related articles
How to add a command or macro to a menu (Word 2003 and
earlier)
How to add a command or
macro to a toolbar (Word 2003 and earlier)
How to assign a keyboard shortcut to a command or macro (all
versions)
This article copyright © 2016 by
Suzanne S. Barnhill. | 


