Keeping a table together on one page
This article answers the following question:
I’m starting a table near the bottom of a page, so
I’d rather have the entire table on the next page instead of being broken
over two pages (it’s not too long to all fit on one page). Is there any way
to do that without inserting a manual page break?
After reading this article, you may want to read its sequel,
“Controlling Page Breaks in Tables.”
General principles of controlling text flow
It’s best to avoid manual page breaks in documents wherever
possible, and luckily this is usually easy to do with paragraph formatting. The
relevant settings are found in the Paragraph dialog.
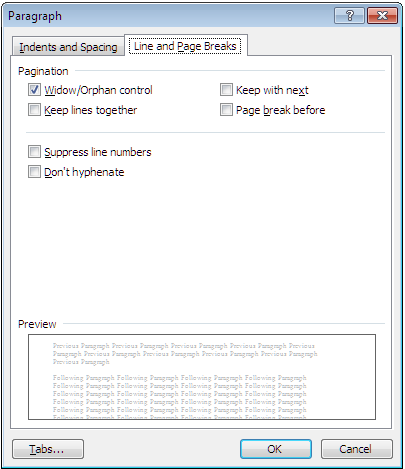
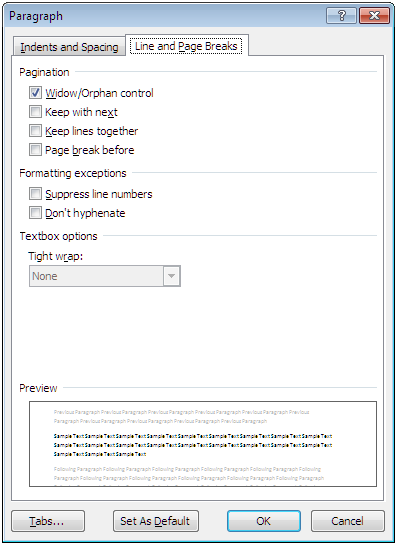
On the Line and Page Breaks tab of the Paragraph
dialog are several options that control text flow:
-
“Widow/Orphan
control” prevents a single line of a paragraph from being left alone at the
top or bottom of a page. This property is enabled by default for all styles
in Word.
-
“Keep lines
together,” as the name implies, keeps all the lines of a paragraph together.
That is, it keeps a single paragraph from being split across two pages.
-
“Keep with
next” keeps a given paragraph with the following one. That is, it prevents
the two paragraphs from being separated across two pages. In Word 2003 and
earlier, this property is
assigned by default to Word's built-in Heading 1–Heading 4 styles to ensure
that headings stay with following text. It really should logically be
applied to all heading styles if they’re actually being used for headings,
and this oversight is corrected in Word 2007 and above.
Important
Note: You might expect that “Keep with next” would ensure that at least
two lines of a paragraph would “stick to” the following paragraph over a
page break. After all, there is no reason to keep the whole paragraph
together unless “Keep lines together” is also enabled. This is not always the
case: When two paragraphs are “glued together” this way, the second
paragraph is allowed to span a page break provided at least two lines remain
on the first page, and the first paragraph can remain split if it is already
split, but if the first paragraph is entirely on the first page, it is not
allowed to split: the
entire paragraph will move to the next page, often leaving a large blank
space at the bottom of the first page.
-
“Page break
before” causes a page break before the paragraph. Unlike a manual page break
inserted using Ctrl+Enter, however, it is not represented visually in
the document and does not inherit the properties of the following paragraph.
By judicious application of the first three properties, you
can usually maneuver Word into putting a page break where you want it without
having to insert a manual page break or use “Page break before.”
Helpful Tip: Whenever you have “Keep with next,”
“Keep lines together,” “Page break before,” or “Suppress line numbering”
enabled for a given paragraph, you will see a small black square bullet in
the left margin. If you double-click on this bullet, you will open the
Paragraph dialog with the Line and Page Breaks tab displayed.*
Controlling text flow in tables
Things work a little differently in tables, however. In a
table, the “Keep lines together” and “Widow/Orphan control” properties have no
effect at all. To keep a table together on one page, you must perform two
actions:
-
Prevent rows from breaking internally. The relevant
setting (“Allow row to break across pages”) is found on the Row tab of the
Table Properties dialog.
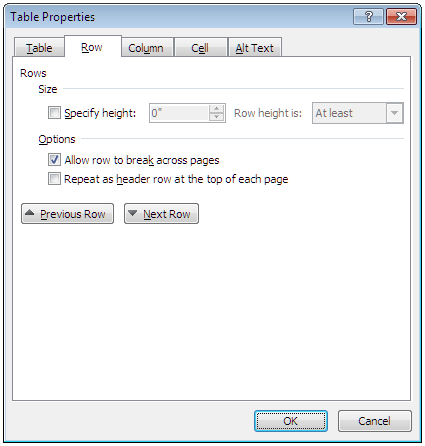
To open this dialog:
-
Word 2003 and earlier: On the Table menu,
click Table Properties.
-
Word 2007–Word 2016: On the Table Tools |
Layout tab of the Ribbon, in the Table group, click Properties.
-
Word 2019 and above: On the contextual Layout
tab of the Ribbon (not the Layout tab that replaced Page Layout
but the contextual tab shown only when the insertion point is in a table),
in the Table group, click Properties.
-
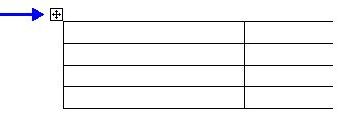
Any version: Right-click on the table handle (see
below) and select Table Properties… from the context menu.
Important Note: The choice of whether rows
are allowed to break is strictly an either/or proposition. If you do allow a
row to break, it can break anywhere; as mentioned, “Widow/Orphan control”
and “Keep lines together” are ignored, so the only way to force a table to
break only between paragraphs is to make sure each paragraph is in a
separate row.
-
Keep rows together. Select the entire row and enable the
“Keep with next” property. Do this for every row of the table except the
last.
Although it is not relevant to a one-page table, note that
“Page break before,” when applied to a table row, does not split a table as a
manual page break (inserted with Ctrl+Enter) does. This means that
repeating heading rows will continue to be repeated and the table can continue
to be treated as a single table. For information on controlling page breaks in
tables longer than a page, see “How
do I control where the page breaks will fall in a table that extends over
several pages?”
_______________
*For an easier way to
apply these properties to paragraphs, you can (in Word 2003 and earlier) add
toolbar buttons for them. Unfortunately, these buttons by default have no button
icon. For an add-in that contains these buttons with attractive icons, see “Custom
Toolbar Buttons.” These buttons have the advantage that they are toggles, so
you can easily tell whether a property is ON or OFF when you click in a given
paragraph.
There is no way to change the
button images in Word 2007 and above, though you can import custom toolbars you
have created in earlier versions; see “Use
Word 2000/3 Toolbars in Word 2007 and later versions.” These versions do
have an icon (if you can call it that) for “Keep with next”—a checkbox that is
checked when you apply the property; the problem is that the button includes a
text label, consuming valuable toolbar real estate. If you want to use this
button, find it under “Commands Not in the Ribbon” as ParaKeepWithNext.
As an alternative, you can
assign keyboard shortcuts to these commands, which you can find under All
Commands as ParaKeepLinesTogether, ParaKeepWithNext, and
ParaPageBreakBefore.
This article copyright © 2000, 2018,
2023 by
Suzanne S. Barnhill. |


