|
|
|
One of the most powerful but also the most confusing aspects of Word is that there are so many different ways to accomplish the same task. For example, most commands may be accessed from the Ribbon, from the Quick Access Toolbar (if you have added them), from the right-click (shortcut, context) menu, or via keyboard shortcuts. “Drawing lines” in Word is one of the tasks that can be done in many ways, and the way you choose will depend partly on the end result needed and partly on personal preference. This article describes several ways to “draw lines” for printed forms; some of the methods can also be adapted to machine-fillable forms that use legacy form fields or content controls. The article assumes you have basic knowledge of how to use tabs, tables, and borders. Click here to cut to the chase and go straight to the instructions. The use case*In today’s world, forms abound. Many forms are designed to be printed out and filled in by hand or using a typewriter. But as typewriters become more rare and handwriting is almost a lost art, most users expect a form to be machine fillable. This type of form is sometimes called an “online” form, which is misleading because it has nothing to do with the Internet; “on-screen” might be more accurate. Machine-fillable forms can be created in Word in a number of ways. The simplest forms use MacroButton fields that can be typed over. Even the oldest versions of Word support legacy form fields. And Word 2007 and above allow users to input form data using content controls. Information on these types of forms is available in the linked articles. If you have access to Adobe Acrobat, you can create a simple form in Word (with lines and check boxes to be printed) and let Acrobat convert it into a machine-fillable PDF; this is often the best option since some users will not have access to Word (but see Note below). But there are also many instances where a printed form is required: the petition that you take around your neighborhood on a clipboard; those annoyingly redundant forms that your doctor’s office makes you fill out every time you visit, the raffle entry form that you fill out and drop in a box at your grocery store. This article describes several ways to create lines to indicate blanks in forms, both printed and (in some cases) machine-fillable. Types of linesHere are some methods of “drawing lines” in order of increasing complexity but also satisfactoriness. Typed underlineThis is the quick-and-dirty solution and for most users probably the method of first resort. If your first “word processor” was a typewriter, your first impulse is probably to type a series of underline characters (inserted with Shift+Hyphen) to create a line. There is nothing intrinsically wrong with this method. If your form is one that will only ever be used in printed form, underline characters provide considerable flexibility when mixed with text, spaces, and tab characters. If you have several lines of text containing multiple blanks, and you want those blanks to start at the same place on each line, it will be helpful to set a left-aligned tab stop where you want the lines to begin. One major drawback to using underline characters, is that, when using proportional fonts, it can be difficult to make blanks created with underline characters end in the same place. For this you need to use the precision of tab stops, as described in the next section. If you ever want to convert the document to a machine-fillable form, however, typed underlines will need to be replaced because users cannot type on top of them except by overwriting them. Tab with underline leaderThis method provides more precision in placement, which can be valuable if you are creating a form that requires several lines of text with blanks that end in the same place.
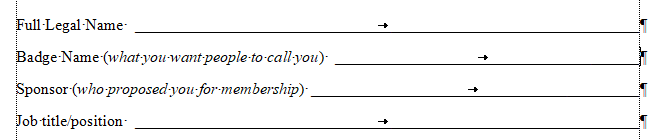
Figure 1. Blanks with different starting points but the same end point In addition, although setting the tab stops requires a little extra work on the front end, pressing Tab one time is certainly more efficient than typing a counted number of underline characters.
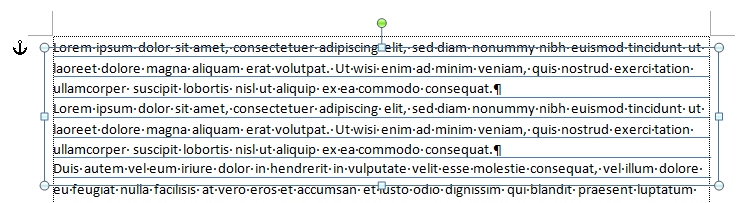
Figure 2. Form with multiple aligned tabs The screen shots below show the ruler display and Tabs dialog setup for these tab stops, which alternate between underline and no leader.
Figure 3a. Ruler display for tab stops in Figure 1
Figure 3b. Tabs dialog for a tab stop with underline leader
Figure 3c. Tabs dialog for a tab stop with no leader Since the leader character is the same underline that you can type from the keyboard, you can mix and match these leader tabs with short lines typed in directly using underline characters. The screen shot below shows a line in a form that has two blanks created with typed underlines and one tab with underline leader.
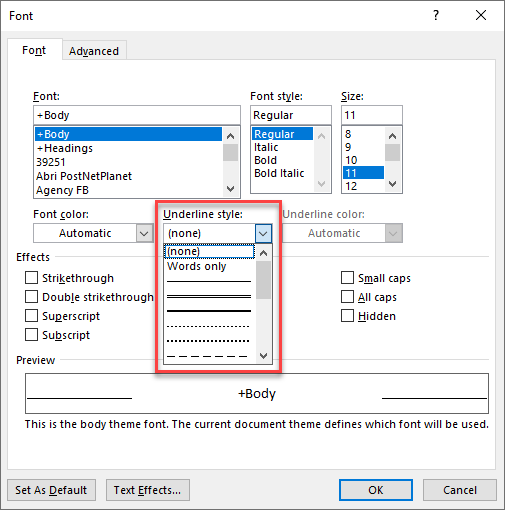
Figure 4. Form with underline characters and tab with underline leader One disadvantage of this type of line is that, because it is created with fixed-width characters, although the ending point will be precise (the point where the tab stop is set), the beginning point can be rather unpredictable, especially in justified lines; this is not a fatal flaw, since you will usually insert some space between the form text and the blank line anyway. Like the typed underline, this type of blank is not useful in a machine-fillable form. Typing on the line will either overwrite the tab (if you are in Overtype mode) or push it to the right, either of which will wreak havoc on the layout. Underlined tabA subtly different approach from the leader tab is an underlined tab character: that is, press the Tab key, select the Tab character you’ve just entered, and format it as underlined. The two features that make this different from the tab with underline leader are that (a) the tab does not have to be a right-aligned tab—any kind will do—and (b) the underline may not be the same weight or at the same level as the underline character; it will be the same weight and in the same position as the underline of underlined text. Moreover, given that recent versions of Word permit a variety of different underline styles, it doesn’t have to be just a plain line.
Figure 5. Some underline styles If you just want the default underline, however, this type of line is more efficient because it doesn’t require a trip to the Tabs dialog; just press Ctrl+U or use the Underline button in the Font group on the Home tab of the Ribbon or in the Mini Toolbar that pops up when you right click in selected text. In Print Layout view, the extent of an underlined tab may appear more precise than that of the tab with underline leader. Compare the two lines in the screen shot below. The first is an underlined tab character; the second is a tab with an underline leader. As you can see, the underlined tab extends all the way to the left margin. This is primarily a display issue, however; those two lines will actually print exactly the same.
Figure 6. Two lines created differently
Figure 7. A two-column form
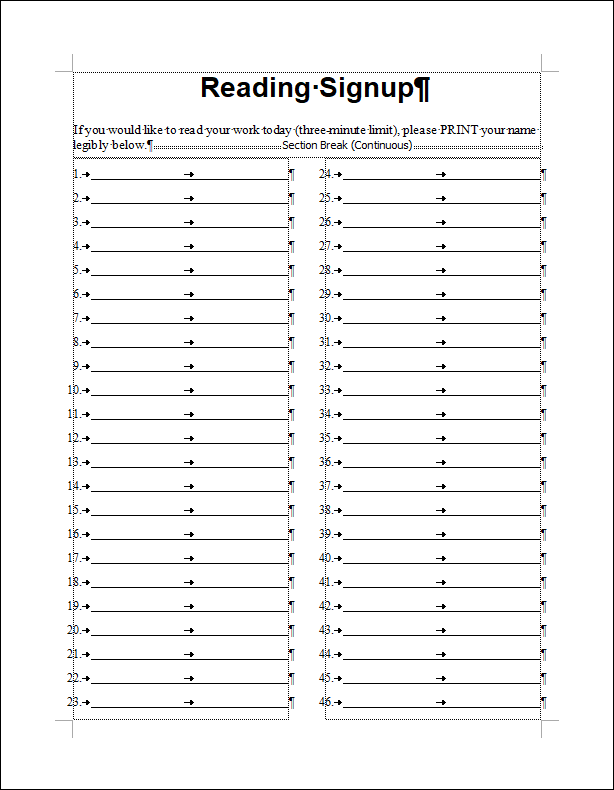
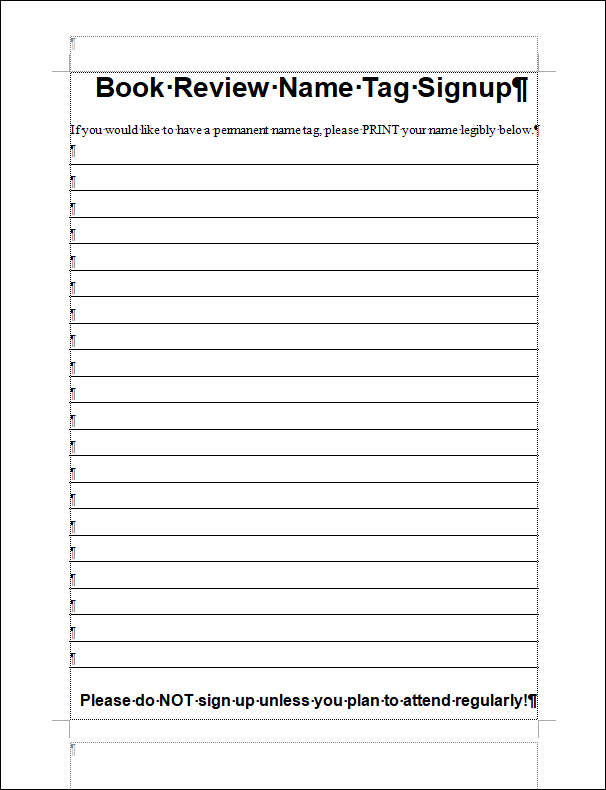
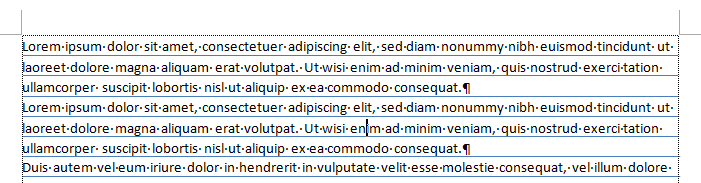
This type of line can be used (with some care) in a form to be filled out on screen because the underline will match that of underlined text, so if a user enters underlined text, the result will have the appearance of text typed on the line. Paragraph borderAnother easy way to make a line is to use a paragraph border. This technique is best suited to a situation where you need multiple full-width lines. An example would be the sign-up sheet shown in the screen shot below.
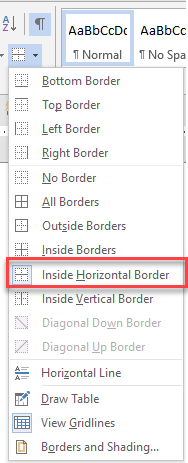
Figure 8. A form created using paragraph borders To create these lines, apply an Inside Horizontal Border to an empty paragraph using the button on the Borders menu in the Paragraph group on the Home tab.
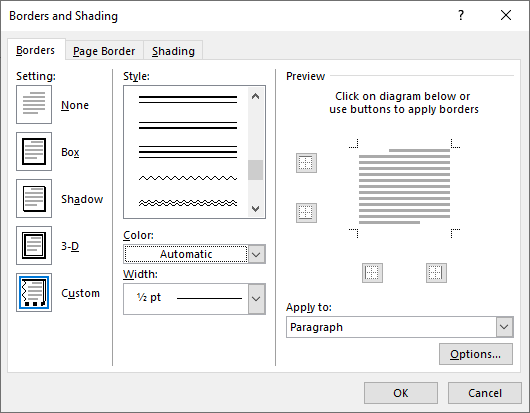
Figure 9. The Borders menu showing the Inside Horizontal Border You might think that what you need is a Bottom Border, but Word interprets “bottom” very literally and will apply a border to only the last paragraph with this formatting. If you open the Borders and Shading dialog, you will see that, like underlines, borders can be very fancy, with a large selection of styles, colors, and weights, though it’s hard to think of a situation when you would want anything other than a single solid line for a fill-in-the-blank line. (For more on using borders, see “Using Borders in Word.”)
Figure 10. Borders dialog showing some fancy borders Once you have added the desired border, press Enter as many times as required to fill the page. The spacing between lines can be adjusted by changing the paragraph line spacing (in the Paragraph dialog) or by changing the “Distance from text” in the Border Options dialog (click Options… in the Borders and Shading dialog).
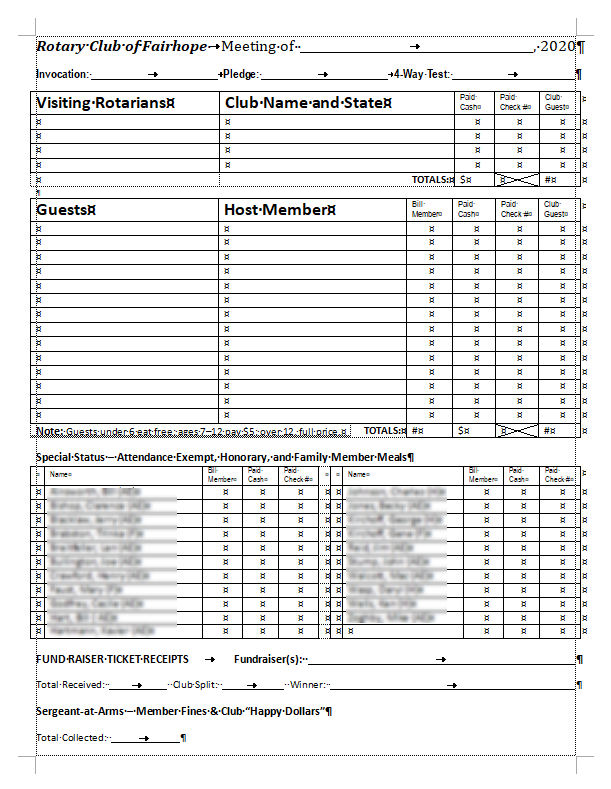
In normal text, this option can be used only when there will be no static form text on the same line, since everything in the paragraph will be “underlined.” As will be shown below, however, paragraph borders can also be used in tables. Table cell borderThe conventional wisdom is that the best way to create a complex form (with or without some type of form fields) is with a table. By default, tables have borders around all cells, and a useful printed form can be created this way. The form below, although designed to be filled in by hand, could (in large part) equally well be filled in onscreen because the data entry fields are table cells.
Figure 11. A form created using tables
More often you will want the form to have cell borders just where you want fill-in blanks. The screen shots below show how empty columns and rows can be used to separate blanks that appear in (what otherwise would be) adjacent columns.
Figure 12a. “Fill in the blanks” lines created using cell borders
Figure 12b. With table gridlines displayed, you can see how borderless cells were used to create the effect. You can achieve a similar effect, without the dummy cells, using paragraph borders, as shown below. In the Borders and Shading dialog, with a specific cell selected, change the “Apply to” setting from “Cell” to “Paragraph.”
Figure 13a. A table similar to those in Figure 12 but this time using paragraph borders to produce the lines beneath the text
Figure 13b. The same table shown with table gridlines displayed.
If this technique is to be used in a machine-fillable form, there are spacing considerations that are addressed in the original article here. Graphic lineYou can draw a line using the Line tool from the Shapes menu in the Illustrations group on the Insert tab. If you hold down the Shift key while drawing it, it will be constrained to the horizontal or vertical.
Although drawn lines can be rather labor-intensive, they can be useful in a form that will be filled out online and then printed because the “fill-in-the-blanks” lines are not affected by users’ typing in answers. The exact position of the line can be specified relative to the paragraph it is anchored to, and this is what can make drawn lines especially useful. A frequent requirement of form makers is to create a printed form that provides multiple blank lines to be written on with continuous text. For example, the form may contain an “essay question” that requires a free-form answer, such as “Please tell us why you want this job and what value you believe you can bring to the company.” But the form maker also wants the form to be machine fillable, and frequently the requirement is for the machine-fillable form to look exactly the same, meaning that it needs to have the same lines, but they must be able to be typed on, and the user must be able to type multiple lines of continuous text. (This is, of course, an unreasonable requirement, but government bureaucracies are often not amenable to reason.) Neither a paragraph border nor a table border will meet this requirement. You can type several lines of text in a table cell, but the cell border will remain at the bottom of the cell. You can create several rows of cells with bottom borders, but the text will not flow from one cell to the next. But if you draw multiple lines at uniform intervals, all anchored to the same text paragraph, grouped, and with wrapping set to Behind Text, and format the line spacing of the paragraph to exactly match the distance between the lines, it will be possible to type “on” the lines. Considerable trial and error may be required to ascertain the exact placement of the lines, but the result will be worth it if you face this type of draconian requirement. In my experiments, for example, I found that spacing of 0.2″ between lines will match paragraph line spacing of 14.5 points pretty well. As long as all the lines are anchored to the first paragraph, the user can press Enter to start a new paragraph without affecting the lines. If you allow spacing between paragraphs, it will need to equal the space of a line.
Figure 14a. Normal text typed in front of graphic lines
Figure 14b. The grouped lines selected as a drawing object The paragraph to which the lines are anchored will need to be in a text box in a fixed position or in a table cell with exact row height to make it possible to exit the fill-in section without filling all the lines. For your considerationIn conclusion, I will quote some of the wisdom added to my original article* by the incomparable Dave Rado:
When you are considering whether to design a form for print or for online use, the following table may be helpful.
*BackgroundTwenty years ago, when I was a Word “expert” for the now-defunct AllExperts question-and-answer service, I was invited to submit answers to frequently asked questions (FAQs) to be posted at the site. I had for some time been answering Word questions not only one-to-one at AllExperts but also one-to-many through the Microsoft Usenet newsgroups, so I had answers to many FAQs and eagerly submitted a dozen or so. One was the answer to “I’m making a form that needs to have ‘fill-in-the-blanks’ lines. What is the best way to make them?” When the Word MVPs created a website for posting such articles, I submitted all my FAQs to the webmaster, Dave Rado, who formatted them for the site, adding images and frequently adding so much valuable content that I insisted on crediting him as coauthor. In the case of the “lines in forms” article, what I sent was about 900 words; the resulting article, now archived here, is nearly 1700, plus screen shots. Although what Dave published was undeniably better than what I sent, I’m not sure it was really very good, as it still hewed to my original flawed outline. And of course a lot has changed in 20 years! I was using Word 97 and basing my advice on that version; Dave’s screen shots were taken in Word 2000. So the content is very dated. In this article, I attempt to update it for current versions, those that use the Ribbon instead of toolbars. This article copyright © 2020 by Suzanne S. Barnhill. I am indebted to fellow Word MVP Lene Fredborg, who provided several helpful suggestions for the improvement of this article. |