


|
|
Basic information on tables in Word 2007 and aboveThis article is for versions of Word that have the Ribbon. In the unlikely event that you are still using Word 2003 or earlier, you should instead see the toolbar version of the article. OverviewUsers who have come to Word from a typewriter background are used to setting up tabular material using tabs. The very word tab is short for “tabulator,” and “tabulator” stops on a typewriter are used in “tabulation,” that is, making tables. So users’ first impulse when they need to make a table in Word may be to use tabs. Sometimes this is an acceptable (or occasionally, even the best) way to go. For a simple table with short entries, and very few rows, setting tab stops can be quick and easy, and Word allows you to drag them around until the text lines up where you want it. If you do use tabs to create a “table”, be sure you use them properly: in particular, never use the built-in tab stops; always create your own. For tips on this subject, see Setting Tabs. Like other word processors, however, Word offers a very easy way to create tables that use true rows and columns as opposed to simply containing tabular text. Whenever your needs are less simple—for example, whenever the text in any column of your table might need to wrap to the next line, or you need vertical table borders, or your table might span more than one page and need a continuation header, or if you might ever conceivably need to change the column order—you should use Word’s built-in Table feature. Note that you can convert tabular text into a Word Table in one step, provided your tab stops were set properly, by selecting the text and using Insert | Tables | Table | Convert Text to Table.... See also Changing your mind.
Let’s look at what Word’s Table feature does. What is a Table?How is a Table different from a “table” of tabbed text? As you know, you can arrange tabular material using tabs. For example, you can use a combination of left-, center-, decimal-, and right-aligned tab stops, in combination with horizontal paragraph borders, to create a text-based “table” such as the following (shown with non-printing characters displayed so you can see how it was created):
Figure 1. A “table” created with tabs Notice (in Figure 2) what can happen when you add some text to one of the lines, because of the lack of support for word-wrapping:
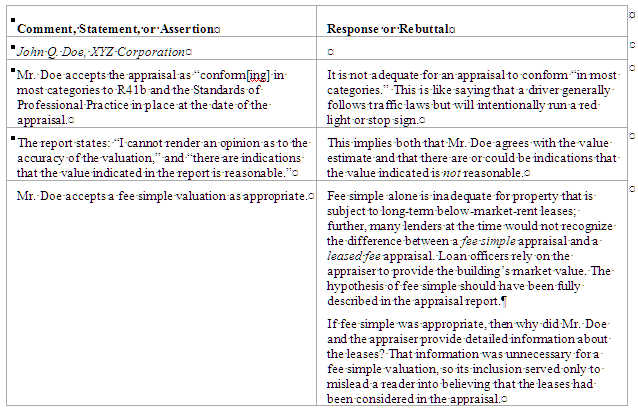
Figure 2 Selecting a single “column” is possible (hold the Alt key down while you drag with the mouse) but is much more difficult than if a Word Table had been used, and it is not possible to have a running header should the table span two pages. Now suppose the tabular material is more complex. For instance, suppose you have paragraph text to be placed in side-by-side columns, as in the following example:
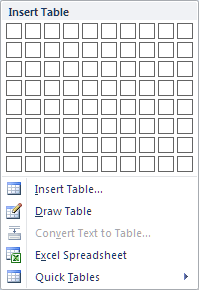
Figure 3 When you use tabs to create such a “table,” each “row” of the table (or sometimes the whole table) is a single paragraph. If you tried to type text such as the above using tabs (and I have actually seen this done!), you would have to break the paragraphs up into fragments that would fit on each line. If the text had to be edited, it would be a nightmare. But when you use Word’s Table feature to create a table, Word creates a “cell” for each intersection of a row and column. Each cell contains a separate paragraph (or can contain several paragraphs, as shown); and the text in the cell can wrap independently of the rest of the table. So whenever your tabular material contains text that must wrap to the next line, a Word table is far more satisfactory than a tabbed table. Inserting a tableInserting a table is easy. On the Insert tab of the Ribbon, in the Tables group, there is a single Table button, which opens the Insert Table menu.
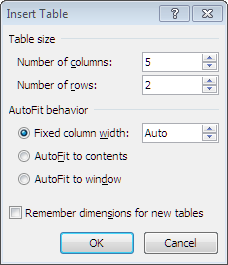
Figure 4. The Insert Table menu At the top of the menu is a 10 × 8 grid. If you want a table with 10 or fewer columns and 8 or fewer rows, you can drag to select the desired number of rows and columns. Alternatively (and if you need more columns), you can choose Insert Table... from the menu, which opens the dialog shown in Figure 5. (Don’t ever select Draw Table, for the reasons discussed below under Drawing tables.)
Figure 5. The Insert Table dialog As for the rest of the items on the menu, Excel Spreadsheet, as you might expect, inserts an Excel sheet as an OLE object. In it you can use the formulas and conditional formatting available in Excel but not (or not so easily) in Word. Quick Tables opens a gallery of preformatted sample tables including several types of monthly calendars. You may want to look at these to see whether one of them would provide a convenient starting point for your table.
No matter how you insert the table, the number of columns is all that really matters because you can add rows to the table as you go: whenever you press Tab at the end of the last row of the table, a new row is created. For this reason I usually just create two rows, one for the table headings and another for the first row of text. If applying grid borders, it’s best to start with three rows, so that you can apply one grid to row 1 and a separate grid to rows 2–3; but you would almost never need to start with more than that.
Even if you remove the border, you may still see dotted or broken lines between the table cells; these are gridlines; they are just a (very important) visual aid, and do not print. If you do not see them, select the Table Tools | Layout tab (called just Layout in Word 2019 and 2021) and click View Gridlines in the Table group. For more on borders and gridlines see Why don’t my table borders print? and Run for the border: using borders in Word.
Working in a tableYou can put almost anything in a table that you can put in normal document text, and you can format table text the same way you would ordinary text paragraphs, by applying direct font and paragraph formatting or, preferably, with styles. Note that, although you can define table styles, which specify formatting of specific parts of a table (fonts, shading, and border for the header row(s), total row(s), first and last columns, odd or even rows or columns), table styles do not permit you to specify paragraph styles. Those must be applied manually. In addition, there are just a few things that work differently in tables. TabsWhen you tab in a table, you go to the next cell (Shift+Tab takes you to the previous cell). This makes it easy to work in tables because you don’t have to use the mouse to move your insertion point. But you can still set tab stops in table cells; the trick is that you have to use Ctrl+Tab to tab to them. The exception to this rule is the decimal tab. When you set a decimal tab stop in a cell, the text aligns on it automatically (provided it is left-aligned or justified to begin with; any other paragraph alignment gives very odd results). For more on decimal and other tabs, see Setting tabs. Selecting textIf you’re used to selecting a line of text by clicking to the left of it or a paragraph by double-clicking to the left of it, you’ll find that you can’t do this in a table. Whenever you point to a cell and click, you select the entire cell. But you can still select text by dragging, and you can select a sentence using Ctrl+click or a paragraph by triple-clicking in it. And if you normally select text using keyboard shortcuts, these will still work. Margins and indentsIf you have the horizontal ruler displayed, you will see that it looks very different when you are working in a table. Instead of seeing indent markers at the page margins, you will see them at the sides of the space representing the table cell you are currently in. You can drag these as you normally would to set paragraph indents. You will also see margin markers on the ruler, representing the edge of each column – more on this later.
Figure 7. The ruler when the selection is in a table Selecting parts of a tableWhen the insertion point is in a table, Word displays the contextual Table Tools tabs on the Ribbon. In Word 2007–Word 2016, there are Design and Layout tabs under the Table Tools tab; Word 2019 and above dispense with the Table Tools label and just have Table Design and Layout. This Layout tab should not be confused with the one farther to the left (previously called Page Layout that is not contextual). On this Layout tab, in the Table group, there is a Select button that opens a menu allowing you to select a cell, column, row, or the entire table, but there are also mouse shortcuts for these tasks.
Sizing rows and columnsWhen you first insert a table, all the columns are the same size, and all the rows are an “Auto” height that will accommodate the current text size. For example, if you are using the Normal style, then the row will be high enough to accommodate 11-point Calibri with (in Word 2007 and 2010) 1.15 line spacing and 10 points Spacing After or (in Word 2013 and above) 1.08 line spacing and 8 points Spacing After. (If your table has borders, it’s a good idea to define specific paragraph styles with different spacing from your Normal style, allowing a small amount of spacing both before and after.) Because the row height is automatic, it will adjust to fit the amount of text you put into it, so you will not ordinarily need to change this unless you need empty rows of a fixed height. But you probably will need to change the width of the columns to accommodate the text they contain. On the Layout tab of Table Tools, there is an AutoFit button that offers the choices AutoFit Contents, AutoFit Window, and Fixed Column Width. By default, the first option is selected: that is, Word will automatically resize columns to fit the content. This can be very disconcerting and not necessarily satisfactory. Selecting Fixed Column Width allows you to adjust column widths manually. The AutoFit Window option is the equivalent of choosing 100% for the table width (on the Table tab of the Table Properties dialog) and can be helpful if your adjustments have resulted in a table that is wider or narrower than the margin width. There are several ways to adjust column width manually. Sizing columns using the rulerIf you click and drag the area on the ruler that represents the space between cells, you change the width of one or more of the cells. The way this change is made depends on how you drag, as follows:
Sizing columns using the cell bordersYou can also size the columns by dragging directly on the cell boundaries, and this is often much easier than using the ruler—partly because the indent markers on the ruler can make it difficult to get at the margin markers. Most people also find it more intuitive to drag the columns directly. When you hover the mouse pointer over the gridline between two columns, it will change to a double arrow (pointing right and left) with two upright parallel lines between it. When it has this appearance, you can click and drag a column boundary.
You have the same six combinations as above, but, just to be totally confusing, simple Click and drag and Shift+click and drag (and Alt+click and drag and Alt+Shift+click and drag) are reversed in their functionality. It is possible that some users actually memorize or remember what these various combinations do, but I personally just keep trying one after the other (with Undo in between) until I get the one that does what I want!
Sizing rowsYou can also adjust row height either by using the vertical ruler or by dragging the cell boundaries, but only in Print Layout view. Pressing Ctrl while you drag sets the row to an “Exact,” or fixed, height, so that if there is too much text in the cell to fit, the surplus text will be hidden (setting exact row heights is particularly useful for forms). If you don’t use the Ctrl key, the row height is set to “At least” the measurement you chose, so the row will expand in height if needed, to fit the text in the cell, but will not contract below the minimum height you set. Pressing Alt while you drag causes the ruler to display dimensions—but prevents you from setting an Exact height, even with the Ctrl key held down.
Another way to size columns and rowsThe Table Properties dialog allows you to set exact column widths and minimum or exact row heights. Access this dialog from the right-click shortcut menu or by clicking Properties in the Table group on the Table Tools | Layout tab. The dialog has four tabs:
Even distributionAn extremely useful option is the “Distribute columns evenly” command. If you select two or more adjacent columns, right-click, and choose this option, the total width of the combined columns will be divided equally among them so that they are the same width. Similarly, you can select several rows and choose “Distribute rows evenly.” These features are also available in the Cell Size group on the Table Tools | Layout tab.
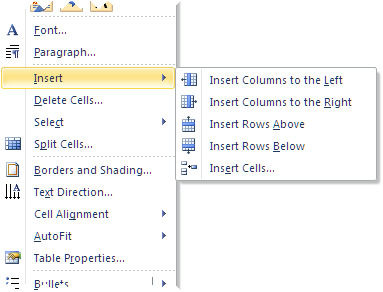
Adding rows or columnsAs you have seen, adding new rows at the end of a table is easy and automatic. But what if you want to insert rows in the middle? Or what if you have gotten too far along in your table to start from scratch when you discover you need an additional column? No problem! When the insertion point is in a table, one of the items on the right-click shortcut menu will be Insert. This opens a submenu (as shown in Figure 8) that allows you to insert rows or columns as desired.
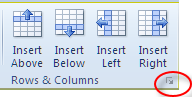
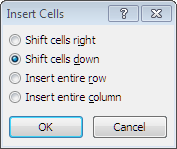
Figure 8. The Insert context menu These commands (except for Insert Cells...) are also available in the Rows & Columns group on the Table Tools | Layout tab. The dialog launcher (shown circled in Figure 9) opens the Insert Cells dialog.
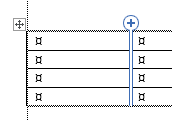
Figure 9. The Rows & Columns dialog launcher and Insert Cells dialog If you select more than one row or column when using these commands, Word will insert the number of rows or columns selected. This is an easy way to insert a lot of rows at once, even at the bottom of the table. Select the last (still empty) row and choose Insert Rows; select that row and the new row and press F4 (Repeat) to insert two more rows; select the four rows and press F4 to insert four new rows; and so on.
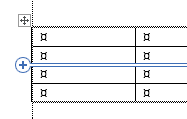
Figure 10. Row and column insert controls in Word 2013 Deleting rows, columns, and tablesTo delete a row or column, select it, right-click, and choose “Delete rows” or “Delete columns.” (You can also use Cut.) To delete an entire table, select it and either use Cut (Ctrl+X) or press Backspace. If you want to do this the hard way, click the Delete button on the Table Tools | Layout tab and choose the appropriate item from the menu. Repeating headingsIf your table is longer than one page (or continues onto a second page, regardless of length), you can make your headings automatically repeat on the following page(s). You can repeat more than one row, but they must be the top rows of the table (you can’t skip any rows). Select the desired row(s) and click Repeat Header Rows in the Data group on the Table Tools | Layout tab. (There is also a check box on the “Row” tab of the Table Properties dialog for “Repeat as header at the top of each page.”)
Positioning the tableIf your table is less than the full margin width, you may want to indent or center it. The Table tab of the Table Properties dialog allows you to specify Left, Center, or Right alignment for the entire table (you can also select the entire table and use the Left, Center, or Right alignment buttons in the Paragraph group on the Home tab or the keyboard shortcuts Ctrl+L, Ctrl+E, and Ctrl+R). The Table tab of Table Properties also allows you to set a specific left indent if you choose. Controlling text flowYou may have already learned to control page breaks in Word by using a combination of the properties on the Line and Page Breaks tab of the Paragraph dialog: “Widow/Orphan control,” “Keep lines together,” “Keep with next,” and “Page break before.” These work a little differently in tables. “Widow/Orphan control” and “Keep lines together”These paragraph properties have no effect in a table. There is a check box on the Row tab of the Table Properties dialog that allows you to specify whether you want to allow a soft page break within a given row (“Allow row to break across pages”). But if you do allow the row to break, it can break anywhere, even if the result is to leave one line of text stranded on a page. If you have more than one paragraph in a cell and would like the row to be able to break between but not within the paragraphs, you’re just out of luck. “Keep with next”This command does work, but only between rows. At a minimum, it should be applied to the header row(s), but it is also very useful for keeping a table together on one page. To do that, apply it to the text in every row but the last. If you want to ensure that the first few rows of the table always stay together (so that you don’t, for instance, ever end up with only the table header row and one more row at the foot of a page) apply “Keep with next” to the first two or three rows. “Page break before”This one is quite useful. Sometimes you will want to break a table at a certain point. But if you insert a hard page break (Ctrl+Enter), the result is to split the table, and heading rows will not repeat. But you can apply the “Page break before” property and you will get the desired page break and repeating headings. (You can also apply “Keep with next” to the preceding rows to achieve the same effect.) Performance issuesThe article “Maximising the performance of Word tables” was written for (much) earlier versions of Word, but much of it is still applicable today. One of the most important caveats is to avoid long single-row tables. Always start a new row whenever feasible, preferably at least once per page. Word becomes very uncomfortable and unpredictable when table rows get too long, and there is one particular result that can be disastrous:
Advanced techniquesAll of the above is more than enough to get you started creating basic tables, but Word allows you to do a lot of other fancy things in tables. Merging cellsRecent versions of Word allow you to merge and split cells both horizontally and vertically. To merge cells, select the cells to be merged (combined), right-click, and choose Merge Cells (there is also a Merge Cells button in the Merge group on the Table Tools | Layout tab). There are limitations. You cannot create an L-shaped cell. If two cells are merged vertically, then the combined cells cannot be merged horizontally with a single cell but only with the two adjacent cells. But even in earlier versions, where you cannot merge cells vertically, you can often create the appearance of merged cells by applying borders selectively. In Word 95 and earlier, if you merged two columns, you in effect merged the two cells in each row of the two columns; in Word 97 and later, unfortunately, you merge the two entire columns into one big cell, which isn’t very helpful! You can get around this, however, by using the Eraser tool; if you use it to erase the border between two columns, the rows remain intact.
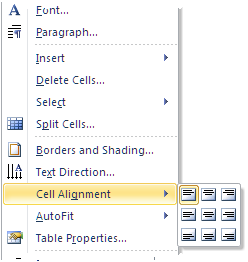
Merging should be approached cautiously and conservatively. Don’t merge cells horizontally until you are sure the column widths are final. The reason for this is that selecting and sizing columns is complicated by merged cells. And don’t merge cells at all if you don’t have to. If you can achieve the same effect by omitting borders, do that instead. Merging cells makes a table more complex and susceptible to corruption, which is reason enough to avoid it except when absolutely necessary. Vertical alignmentBy default Word places text at the top of a table cell (subject to any “Spacing Before” you have applied to the paragraph). But sometimes, as in a price list, for example, you may want to align text at the bottom of the cells. In Word 97 and earlier, you could choose Top, Center, or Bottom alignment for all the text in a given cell; this command was on the right-click shortcut menu when the insertion point was in a given cell. Later versions of Word substituted a table alignment palette that displays nine combinations of vertical and horizontal alignment, available from the shortcut menu and also in the Alignment group on the Table Tools | Layout tab (see Figure 11).
Figure 11. Cell Alignment buttons on shortcut menu and Ribbon The disadvantage to this palette is that it forces you to choose a combination of horizontal and vertical alignment for every selected cell. You can select a column or row and apply specific horizontal alignment (Left, Center, or Right) using the buttons in the Paragraph group on the Home tab or the keyboard shortcuts Ctrl+L, Ctrl+E, and Ctrl+R, but there is no simple way to select just the vertical alignment of multiple cells that may intentionally have different horizontal alignment.
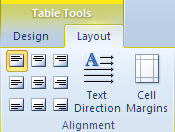
Text directionYou can rotate text in a table cell 90 degrees right or left. The text rotation is displayed only in Print Layout view and applies to all the text in the cell. This is useful when you have long headings for narrow columns. The Text Direction command is on the right-click shortcut menu when the insertion point is in a cell, as well as in the Alignment group on the Table Tools | Layout tab. When text is rotated (as shown in Figure 12), the alignment buttons are rotated accordingly, which can be a little disconcerting.
Figure 12: The Cell Alignment buttons when the selection is in a cell in which the text has been rotated Cell marginsSpace around the text in cells is achieved in several different ways. In earlier versions of Word, the left and right cell margins were determined by the “Space between columns” measurement. Recent versions of Word instead have “Cell margins” settings that can be established as a default for the entire table or specified for individual cells. Set default cell margins for the entire table in the Table Options dialog accessed via the Options… button of the Table tab of Table Properties. Set margins for a specific cell (or selected cells) in the Cell Options dialog accessed via the Options… button on the Cell tab. You can also still use paragraph indents in cells, but this should not be necessary except when you want one paragraph indented more than the rest in a single cell. The default setting for the “Space between columns” was 0.15″, or .38cm. In current versions of Word, that amount is split between left and right margins, resulting in the 0.08″ measurement displayed under Table Properties | Table | Options... if you use inches (although the true left and right margins are actually 0.075″); if you use centimeters, the measurement is displayed as 0.19cm It can be reduced to 0″ (no space between columns) or increased as desired. This setting applies to all cells in the table, but you can increase “cell padding” using paragraph indents. You can also reduce the effective cell margin in a given cell by setting negative paragraph indents; this technique should be used sparingly, however, since it can have very odd results when the column width is changed. Top and bottom margins (if any) can be created by applying Spacing Before and/or After to the paragraphs in the cell, or you can set Top and Bottom cell margins for the entire table by selecting Table Properties | Table | Options... or for individual cells with Table Properties | Cell | Options.... The Table Options dialog also includes another setting rather confusingly called “Spacing between cells.” This setting seems to be there for the sake of HTML compatibility (it is equivalent to HTML’s “cell spacing”). It creates an ugly effect whereby, instead of adding cell margins, as the cell margins settings do, it adds white space in the middle of the cell borders, splitting each border in two:
Graphics in tablesThe most straightforward way to insert an image in a table is to put it in a single cell, with the text wrapping style set to In Line with Text, but you can insert floating images in table cells. “Floating” (or wrapped) images are those with a wrapping style other than “In Line with Text” (Picture Tools | Format | Arrange | Wrap Text or Picture Format | Arrange | Wrap Text). Images that have “Behind Text” or “In Front of Text” wrapping can float freely over the table without being confined within a table cell. An image with “Square,” “Tight,” “Through” or “Top and Bottom” wrapping will be confined to a cell. If the image is resized to a larger width, the table cell will adjust to accommodate it. Having said that, though (and as discussed in the article The draw layer: a metaphysical space), it is best to use floating graphics only when they are really needed; and in long documents it is best to avoid them altogether, other than in headers or footers or on the cover page. And if you do need to use floating graphics in a table, it is usually best to ensure that their anchors are placed outside the table—see, for example, the article Floating objects in Word 2000 table cells are vertically aligned wrongly. Nested tablesYou can embed (“nest”) a table within a cell of a larger table (for an example, imagine the thumbnails of the previous and following months that might appear in the unused day spaces of a monthly calendar). Nested tables make a document much more complex and can slow Word documents down dramatically; moreover, the behavior of the tab key is changed. The existence of nested tables also complicates working with ordinary tables: because you can insert tables within one another, you may see new pasting behavior when you paste tables. There are specific rules for this behavior, but in general they are pretty logical, though usually irritating in practice. To summarize, you can paste equal numbers of cells as cells, but if you try to paste several cells into a single cell, they will be pasted as a nested table. To prevent this from happening, drag and drop your cells instead of pasting them; or select Home | Clipboard | Paste | Paste Special as Formatted Text (which is the only workaround when pasting from Excel into a Word table). Well-designed web pages would be impossible to create without nested tables, because the only way to set the width of a web “page” is to put all your text (and any tables within the text) inside a fixed width table cell; but nested tables are rarely either appropriate or useful in Word: avoid them when you can. “Text-wrapped” tables and framesYou can also turn “text wrapping” on by selecting Table | Properties, and setting the “Text Wrapping” (on the Table tab) to “Around”. This means you can wrap text around tables, or put two independent tables side by side. Despite appearances, such tables are not “floating” (that is, they are not in the drawing layer, and they can be seen in Draft view). In fact, they are in a frame, but the frame borders are hidden when the document is opened in Word 2000 and higher. If you were to open the same document in Word 97, the frame borders would become visible.
The lack of visibility of the frame borders in text-wrapped tables, combined with the ease with which you can accidentally turn text-wrapping on, makes for a maintenance nightmare, as it is often difficult to tell whether a table has wrapping switched on or not. By default, text-wrapped tables can span multiple pages, which makes it even more difficult to tell whether a given table is text-wrapped or not! Fortunately, you may be able to switch off the ability to span multiple pages:
If you do that in your templates, your new documents will pick up that setting. Or clearing the “Move with text” box in the “Table Positioning” dialog under Table Properties also switches off the ability of a text-wrapped table to span multiple pages. Text-wrapped tables, like frames and floating objects, also add a memory overhead, slow your documents down, and increase the risk of document corruption. Using text wrapping when it’s needed is one thing, but it should never be used if not needed, and therefore the ease with which wrapping can be accidentally applied is very unfortunate. So it is usually much better to do things the old-fashioned way, even in the latest versions, and insert a “proper” frame, rather than using the invisible frame that gets inserted when you turn text-wrapping on. The functionality is identical, but a visible frame makes it far easier to see what’s going on than an invisible one does; and makes for far more maintainable documents.
Tables and HTMLMost of the changes in table formatting that were introduced in Word 2000 were intended to make Word more compatible with Web documents (so that, for instance, you can paste Web documents into Word without losing any formatting); and also—a much more minority taste—to make Word more suitable for creating Web pages. Nested tables, for example, are widely used in HTML, and they persist when documents are round-tripped (saved back and forth) between .docx and HTML file format. Drawing tablesOne of the menu items under the Table button on the Insert tab is Draw Table, which turns on a pencil tool that allows you to draw a table. Once you have drawn a single cell, the contextual Table Tools are displayed, but the pencil tool is still enabled. In Word 2007 and 2010, the Table Tools | Design tab is displayed, with the Draw Table button turned on in the Draw Borders group. In Word 2013 and 2016, the Draw Table and Eraser buttons have been moved to a new Draw group on the Table Tools | Layout tab. In 2019 and 2021, this tab is just called Layout and is to the right of the Table Design tool. The premise of these tools is presumably that you can easily create custom-sized cells without the bother of merging or splitting. The reality is that you can easily get yourself into a whole pile of trouble, especially when you start trying to size the cells or use the Eraser; and also, if you use this tool, you will inevitably make your tables unnecessarily complex without realizing it. It actually takes a great deal of skill not to make a mess of your tables if you use the Draw Table tool. I have had to sort out the mess made by many users who have used it, and my advice about drawing tables therefore is: Don’t. Table stylesOn the contextual Table Tools | Design tab, you will find a gallery of Table Styles that can be used to gussy up your tables. The colors used in the table are all defined in terms of accent colors in the current color theme, so they will vary depending on the theme applied to a document from the Themes button (on the Page Layout tab in Word 2007 and 2010 and on the Design tab in Word 2013 and above).. The check boxes in the Table Style Options group determine which of the style features are applied, and the gallery thumbnails reflect those choices; some of the styles, however, don't have special formatting defined for, say, the header row or the first column, so selecting these features does not affect the display of those thumbnails. The best way to see how this works is to experiment with it yourself. Once you get the idea, you can also define a custom table style, with defined formatting for each of the table parts; choose New Table Style... at the bottom of the Table Styles gallery. Wide tablesOccasionally you will need to create a table that is just too wide to fit between the margins of a normal portrait page. In this case you have several options:
Needless to say, methods 2, 3, and 4 are offered in a purely academic spirit; in most cases the first one is what you will use. Users, especially those more at home in Excel, sometimes ask whether it is possible to split a table across two portrait pages. There is no built-in way to do this in Word. You can manually set up a broadside table to spread across two facing pages, but you have to construct it by hand, and if row heights are likely to vary, you’ll need to make them all Exact so that they will match from one page to the next. Again, this requires a lot of mental effort and manual tweaking, so generally it is better to rethink the table and either divide it into two or more tables or run it broadside on a landscape page or pages. Narrow tablesSometimes you will have a long, narrow table that would be much more efficiently displayed in two or more columns. There is no reason not to do this. It is generally easier if you set up the column formatting before inserting the table so that the inserted table will be the width of the column rather than the full margin width. You can create a multi-column section manually, by inserting section breaks and then applying the desired column formatting to each section, but you can also get Word to do the work for you. At the end of the text preceding the multi-column section, press Enter twice to create two empty paragraphs. Select the first one and use (Page) Layout | Page Setup | Columns to select two or more columns. Word will insert the necessary Continuous section breaks above and below this paragraph, where you can now insert your table.
When you have a table divided across multiple columns, you will find that heading rows repeat at the top of each column. But you may wonder how to force table rows into the next column. If you insert a column break (Ctrl+Shift+Enter or Page Layout | Page Setup | Breaks | Column), the headings will not repeat, and there is no “Column break before” property for paragraphs. In this situation you will have to apply “Keep with next” to the rows you want to move to the next column. If your table is very well defined and there is no possibility that you will need to add or delete rows, and if all the rows are of uniform height, you can create the appearance of a multi-column table without actually using snaking columns. Just create a table with twice as many columns as you need, plus one. Use the centermost column (with borders removed if you’re using borders on the rest of the table) as the “gutter” between your “columns” and fill the two sides of the table just as if the “table” on the right were a continuation of the one on the left. Changing your mindSuppose you start making a simple table using tabs and are pretty far along when you realize you really need to use a Word table. You could insert a table and drag the bits of text into the cells, but Word provides an easier way: Convert Text to Table. If you already have a table set up with tabbed columns, you can select it and choose this command from the menu under the Table button in the Tables group on the Insert tab. In the resulting dialog, make sure that Word is planning to separate the text at the tabs and that the number of rows and columns it expects to make is correct. When you click OK, your tabbed table will be converted to a Word table; Word even does a pretty good job of setting column widths. You’ll still have some formatting to do (beginning with removing the automatic grid border), but it’s sure quicker than starting from scratch! This article copyright © 2001, 2017, 2023 by Suzanne S. Barnhill. This Ribbon version is based on the original toolbar version, which benefited considerably from screen shots, technical editing, and additional detail provided by Dave Rado, webmaster of the original Word MVP site (now archived at http://wordmvp.com), when he edited this article for publication. I am also grateful to fellow Word MVP Jay Freedman, who reviewed this article and made several helpful suggestions. |

.png)
