|
|
|
Recent versions of Word have made inserting a table of contents (TOC) increasingly (perhaps even deceptively) easy. Unfortunately, Word makes it extremely (one might even say unreasonably) difficult to modify either the content or the format of a TOC once it has been inserted. For instructions on the basics of inserting a TOC, see Word MVP Shauna Kelly’s article “How to create a table of contents in Microsoft Word.” If you have never used a TOC before, I highly recommend that you read Shauna’s article before reading this one. This article builds on the basics to deal with intermediate issues of content and formatting.
Some specific TOC effects can be achieved only by editing the TOC field that Word inserts. My article on “Customizing your table of contents with switches” describes the specific switches that can be inserted in the field to achieve these effects. Some of the tricks detailed in the present article also require editing the TOC field; if you have never edited a Word field, you can find instructions for editing any field later in this article. Here's what you'll find in this article: Controlling what goes into the TOCOne way or another, you can generate a table of contents that includes exactly what you want to include and nothing more, but this is much easier to do if you give some thought to the TOC when you are creating the document itself. Because Word by default builds a TOC based on Word’s built-in heading styles, inserting a TOC will be most straightforward if you have used these heading styles in the way they were intended to be used: Heading 1 for the title of the highest division you want included (which may be a part, section, or chapter), Heading 2 for the title of the next-lower division, and so on. There are also many other good reasons for using Word’s built-in heading styles.
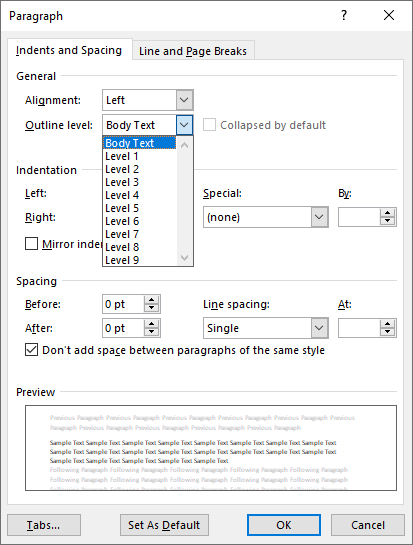
Using heading styles and outline levelsBy default, Word creates a TOC based on Headings 1–3. It also includes other built-in styles that have an outline level of 1, 2, or 3, such as the Title (Level 1) and Subtitle (Level 2) styles (Word 2003 and earlier only). To see the outline level of any given paragraph, look in the Paragraph dialog. To access the Paragraph dialog:
Figure 1a. The Paragraph dialog in Word 2003 showing outline levels
s Figure 1b. The Paragraph dialog in Word 2021 showing outline levels The outline level of paragraphs in Word’s built-in heading styles cannot be changed; if you look at the Paragraph dialog for a paragraph in one of these styles, you’ll see that the outline level box is disabled. The outline level for any other style or paragraph can be changed, so that theoretically it is possible to have paragraphs in the same style (Normal, for example) with different outline levels. I don’t recommend this, as it seems to me unnecessarily confusing, but in theory it is possible to have an entire document in Normal style with certain paragraphs marked as Level 1, 2, or 3 rather than the default Body Text. The default TOC field will pick up these paragraphs and include them in the TOC. One way to assign these outline levels to paragraphs is to use Outline view. By default, if you promote a Body Text–level paragraph to, say, Level 1, Word will accomplish this by applying the Heading 1 style. But you can also change the level without changing the style. I repeat that I do not recommend this. Using the TOC OptionsFigure 2 shows the Table of Contents dialog with the default settings in a Blank Document based on the Normal template (Normal.dot in Word 2003 and earlier; Normal.dotm in Word 2007 and above). Most of the settings affect the appearance of the TOC rather than the content (this will be discussed later). Only the “Show levels” box affects the content. To access the Table of Contents dialog:
Figure 2. The Table of Contents tab of the Index and Tables dialog Only rarely will you want to insert Word’s default TOC, without making any changes. To change which headings are included, you need to click the Options… button to open the Table of Contents Options dialog. There are two basic parts of this dialog: three check boxes and a list of styles. By default, the boxes for “Styles” and “Outline levels” are checked, and the box for “Table entry fields” is not. If you scroll through the styles list, you will see a number beside certain styles. This number represents the level at which this style will appear in the TOC. Which styles are listed will depend on which styles are “available” (or “in use”) in your document, but you will see at least a number 1 by Heading 1, 2 by Heading 2, and 3 by Heading 3 (if you have selected more levels in the Table of Contents dialog, you will see these numbered as well (4 for Heading 4 and so on). In Word 2003 and earlier, if the Title and Subtitle styles are available in your document, they will be numbered 1 and 2, respectively.
Figure 3. The Styles list showing heading styles and levels What many users don’t realize is that all of these numbers can be changed. You can delete the numbers that are there (if you don’t want the built-in heading styles to appear in your TOC), and you can put whatever number you want beside any style in the list. If you have used custom heading styles, you can of course type numbers beside these styles in the Table of Contents Options dialog, but if you selected the appropriate outline level in the Paragraph dialog when you created the style, these numbers will already be inserted automatically. Having the “Styles” box checked ensures that every style with a number beside it will appear at that level in the TOC. Later we will see how these numbers can be manipulated to play tricks with the TOC. Having the “Outline levels” box checked also ensures that any paragraph to which you have assigned an outline level (regardless of what style it is) will be included in the TOC at that level. If you have not assigned outline levels to specific paragraphs in styles that don’t have a built-in outline level, it doesn’t matter whether this box is checked or not, but if you have, this box will control whether those paragraphs are included in the TOC or not.
TOC entry for part of a paragraphIn structured documents, sometimes a heading is “run in”—that is, the first part of the paragraph is the heading, and the rest of the paragraph is just ordinary body text. The heading part is all you want in your TOC. There are several ways to accomplish this, as described in my article “Creating Run-in Sideheads,” but the best way, if you have a recent version of Word, is to use a “style separator.” This more-or-less invisible character separates part of a paragraph in a heading style from the rest of the paragraph in a body text style. Only the part that has the heading style will appear in the TOC. To use the style separator you must prepare your content in two separate paragraphs.
If you have nonprinting characters displayed, after step 2 you will see a pilcrow (paragraph mark or ¶) at the end of each paragraph. After step 3, you will see the style separator at the end of the heading part. It looks like a pilcrow with a dotted line around it. TOC entries that don’t appear in the documentThe third check box, “Table entry fields,” refers to TC fields. TC fields were once the only way to build a TOC (just as an index is still built on XE fields). Now it is usually unnecessary to deal with them, but there are times when you can use TC fields to generate TOC entries that you could not achieve any other way. A typical situation is one where you want to include text in the TOC that does not actually appear anywhere in the document itself or that is somewhat different from what appears in the document. For example, a client of mine had compiled an anthology of travel columns that he hoped to publish as a book. As a marketing strategy, he wanted the TOC to include not only the title of each article but also a brief blurb about each to give readers an idea of what to expect (see Figure 4). He did not, however, want these blurbs to appear in the articles themselves.
Figure 4. TOC with descriptive blurbs This was accomplished using TC fields, as shown in Figure 5.
Figure 5. TC field in the document In another example, a book’s chapters had no titles, and each began only with the chapter number as a large Arabic numeral. This would have resulted in a TOC that had just a chapter number followed by nothing, so I used a TC field to have the TOC instead say “Chapter One,” “Chapter Two,” and so on. Figure 6 shows these examples.
Figure 6a. Chapter number as it appears on the printed page
Figure 6b. TC field used to generate the TOC
Figure 6c. The result in the TOC A TC field can be inserted in several ways:
Figure 7. Mark Table of Contents Entry dialog Any one of these methods is pretty labor-intensive, and it will certainly make you appreciate how easy it is to create TOCs based on styles and outline levels, but using TC fields can be a lifesaver whenever you want to include something in the TOC that doesn’t appear in the document. Note that each TC field can have a switch that indicates which TOC level it represents (the default is 1). In the example in Figures 4 and 5, the blurbs were at Level 3. Note also that a TC field can have a “table identifier.” If you want certain entries to appear in a specific TOC and others in a different one, you can create TC fields with different identifiers; these entries will then appear only in the table of contents whose TOC field has a matching identifier. For more on TC fields, see Word’s Help topic “Field codes: TC (Table of Contents Entry) field.” A TOC for part of a documentWe’ve already seen that a document can contain more than one TOC and that these TOCs can contain different heading levels. But what if you want your document headings divvied up by location rather than level? That is, suppose you want a TOC for each chapter in addition to one for the entire book? Although this is easy enough to accomplish, it cannot be done through the TOC dialog: you have to edit the TOC field by hand to add the \b (bookmark) switch. Insert a bookmarkThe general principle here is that you have to have some way to tell Word what part of the document you want each TOC to cover. To do that, you select the text you want included in the TOC (an entire chapter, for example) and insert a bookmark.
The bookmark name can be any text you like, but it can’t contain spaces. So, for example, you can’t use “Chapter 1,” but you can use “Chapter1” or “Chapter_1.” Insert a TOC fieldAfter you have created the bookmark, you insert a TOC field at the desired place (at the beginning of the chapter, say).
Edit the TOC fieldAfter you have inserted the TOC (which at this point will contain many more entries than you want), you will have to edit it by hand. So press Alt+F9 to toggle the display from field results to field code. If you have not changed any of the default options except the levels as described above, the field you have inserted will look like this: { TOC \h \z \u \t "Heading 2,1,Heading 3,2" } If you want this TOC to cover your first chapter, which you have bookmarked as “Chapter1,” then you will type “\b Chapter1” into the field so it looks like this: { TOC \b Chapter1 \h \z \u \t "Heading 2,1,Heading 3,2" } Press Alt+F9 again to toggle back to the field results, then F9 to update the field, which should now show only the headings from Chapter 1. Repeat the process for each additional chapter TOC: insert a bookmark, insert a TOC, and then edit the TOC to add the \b switch and the bookmark name. As a shortcut, you can copy the field code that includes the bookmark for Chapter 1 and, after bookmarking Chapter 2, paste the copied field at the beginning of the chapter and edit it to change the bookmark name. Controlling how the TOC looksOnce you have mastered the art of getting the desired content into your TOC, you’ll want to fine-tune the way it looks. Some settings can be changed in the basic TOC dialog. These include whether or not to include page numbers, what kind of leader (if any) to use with the page numbers, how many levels to include, and (in Word 2002 and above) whether or not to hyperlink each entire entry (as opposed to just the page numbers). You can also choose among a variety of preset formats, as shown in Figure 8. Maybe you’ll find one of these that you really like, but they’re not that great (there’s not one that you can’t easily replicate), and using them can cause confusing problems if you try to modify the TOC styles. So I recommend sticking with the “From template” option.
Figure 8. The Table of Contents tab of the Index and Tables dialog showing available formats TOC entries use a set of styles ranging from TOC 1 up to TOC 9. As you might expect, TOC 1 is used for Level 1 entries, TOC 2 for Level 2 entries, and so on. By default, the TOC styles are very bland. They are based on the Normal style, which means that, unless you have modified Normal, this is what you'll get:
Finally, when you generate the TOC, Word dynamically adds a right tab stop at (or close to) the right margin. If you’re using the default Blank Document, which has 1.25″ left and right margins, resulting in a 6″ text width, the tab stop will be at 5.99″ (in Word 2007 and above, which have 1" left and right margins, the tab stop will be at 6.49"). This tab stop does not adjust automatically; if you change the margins, you will have to manually change the tab stop in all the TOC styles, so it is advisable to change margins (if you plan to) before inserting the TOC (think about this especially if you plan to have the TOC in more than one column: create the columns before you insert the TOC). In some cases, this plain-vanilla TOC is adequate; in most cases, however, you’ll want to embellish it somewhat. You do this by modifying the TOC styles.
Modifying TOC stylesAll versions of Word make it dangerously easy to modify TOC styles (intentionally or accidentally) by automatic updating, and recent versions of Word (2002 and above) make it unreasonably difficult to modify them any other way. Automatic updatingAll TOC styles in all versions of Word by default have “Update automatically” enabled. This means that if you make a change in the formatting of one TOC entry, this change will be applied to the style itself and propagated to all other entries in that style. So if you select one TOC 1 entry and make it 14-point Arial Bold with 12 points Spacing Before, a hanging indent, and “Keep with next” enabled, this formatting will be applied to all the Level 1 entries in the TOC and to the style as well. This works for changes you apply using keyboard shortcuts, toolbar buttons, the ruler, and formatting dialogs (such as the Font, Paragraph, Tabs, and Bullets and Numbering dialogs), though it seems to work more reliably for paragraph formatting than for font formatting. There are, however, situations where you may want to be able to access the Modify Style dialog to make changes directly. This is especially important if you are applying outline numbering. The Modify Style dialogSucceeding versions have made access to the Modify Style dialog successively more difficult, with some easing in more recent versions. Here's the rundown:
The Table of Contents dialogIf you have had experience with TOCs and know how you want to modify the TOC styles while you are still in the process of creating the TOC, you can click the Modify… button in the TOC dialog (see Figure 2) to open a Style dialog that includes only the TOC styles. You can select one of these and click Modify… to open the Modify Style dialog. A frustrating glitchThere is one change that apparently can’t be made through the Modify Style dialog (no matter how you access it): if you want to remove the period leader before the page number (or change the leader character), you cannot use Format | Tabs in the Modify Style dialog as you would expect. For one thing, the dialog will not display any tab stops! Presumably this is because the right-aligned tab stop for the page number is set dynamically based on your margin width, but even after the TOC has been inserted and the tab stop has been set, it doesn't show up in the Tabs dialog when it is accessed through Modify Style. [Another factor may be the general inability of the TOC field to handle leader characters: as detailed in the section titled “A really useless switch” in my article on TOC switches, there is a switch in the TOC field that is supposed to determine the leader character for the whole TOC. It not only doesn’t work but, even if it did, assumes that you want the same leader for all levels.] You might try to access the Tabs dialog indirectly (by double-clicking on the tab stop, for example). This will display the tab stop setting, but if you change the leader and click OK, you will find that the change is applied only to the single entry at the insertion point. If you then update the style, the change will be applied to the rest of the entries at that level, but when you update the TOC, it will be applied to all the entries. Other approaches can result in the tab stop being entirely removed from other levels. There seem to be myriad ways to get this wrong! The only method I have found that works is to change the tab stop first—but not through the Tabs dialog. Instead, drag the tab stop marker to the left a little. You will see this change immediately propagated to the rest of the entries at that level as the style automatically updates. Double-click on the tab stop to open the Tabs dialog and remove the leader. Then drag the tab stop back where it belongs. While this will appear to have worked, as soon as you update the TOC, you'll see that the leader has also been removed from the entries at other levels. Again, the only apparent way to fix this is to repeat the process (drag the tab stop, restore the leader, drag the tab stop back) for each TOC level. This is so much trouble that you may well conclude that you can be satisfied to either have leaders for all levels or to omit page numbers for a single level (as described below). Indents and tab stopsOne of the most common ways of modifying TOC styles is by adding indents. If your entries are long enough to wrap to a second line (especially if they are numbered), you may want to add a hanging indent to the TOC style. For entries that wrap to a second line, it is even more important to add a right indent to keep the entry from overrunning the page numbers. The ruler in Figure 9 below shows that a right indent has been added to the TOC style to make entries wrap well short of the page number column.
Figure 9. TOC entries with right indent If you have used line breaks in your headings to wrap the text at a specified point and want to preserve these same breaks in the TOC entries, you will need to edit the TOC field to add the \x switch, which “preserves newline characters within table entries.” Without this switch, a line break is rendered as a single space, so be sure you don’t have a space before the line break or you’ll end up with two spaces between words in your TOC entry. If most of your TOC entries are fairly long, or if the text line is fairly short, so that there is not much distance between the end of the entry and the page number, you may want to omit the period leaders for a cleaner look. If you do need to use leaders, the TOC will present a much more attractive appearance if the leaders all end in the same place, somewhat short of the longest page number (see Figure 10).
Figure 10. TOC with truncated leaders Unfortunately, Word does not offer any easy way to do this, but there are two possible approaches:
Effect of direct formattingI have said that by default Word’s TOC styles are very plain. If you haven’t changed them in any way and you see text that is different, then this is coming from your headings. TOC entries do not reflect any formatting that is part of a heading style, but they can pick up any font formatting that is applied directly. So, for example, if your Heading 1 style is defined as 16-point Arial Bold and your Heading 1 paragraph is 16-point Arial Bold, then the TOC entry for that paragraph will still be 12-point Times New Roman or 11-point Calibri. But if you change the formatting of part of the heading, making one of the words italic, for example, then that change will be reflected in the TOC entry. Usually this is what you want. For example, if your heading includes words italicized for emphasis or because they are a book title, you will probably want them to be italicized in the TOC as well. Where users often get into trouble, however, is with UPPERCASE and All Caps formatting.
Omitting page numbersOccasionally you’ll want to omit page numbers from all levels of a TOC; as shown above, that is easily accomplished in the TOC dialog, by clearing the “Show page numbers” check box. But what if you want to omit page numbers for just certain levels? For that you will again have to edit the TOC field by hand. How to edit a fieldTo edit any field, you must display the field code. Shift+F9 will display the code for a selected field, but Alt+F9 will toggle all the fields in your document, and I find this easier to remember. The field code is displayed as text between two field delimiters that look like braces (curly brackets) but can’t be entered from the keyboard (to create a field you have to press Ctrl+F9 to insert these braces). You can edit the text within the field code just as you would any other text—adding or deleting material as needed. When you have finished, press Alt+F9 to toggle the display back to the field results and (Very Important!) press F9 to update the field (until you do this, it won’t appear to have changed). Omitting page numbers for two or more levelsThe field switch used to omit page numbers is the \n switch. Suppose you want to have page numbers for just Level 1 and omit them for Levels 2 and 3. If you have accepted the default TOC settings, the field code you will see when you press Alt+F9 is: { TOC \o "1-3" \h \z \u } To this field you must add the \n switch followed by the numbers of the levels you want to omit page numbers from: { TOC \o "1-3" \n 2-3 \h \z \u } Omitting page numbers for a single levelA much more common requirement, however, is to omit page numbers for just Level 1 (especially if the TOC 1 style is centered) and keep them for Levels 2 and 3, as shown in Figure 11. You might think that the appropriate switch would be “\n 1,” but in fact this won’t work. The secret is that the \n switch requires a range of inclusive levels even when there’s only one, so the correct field code is: { TOC \o "1-3" \n 1-1 \h \z \u }
Figure 11. A TOC with centered, unnumbered TOC 1 entries
Omitting page numbers for noncontiguous levelsSuppose you have want to have centered part titles without page numbers (TOC 1), chapter titles with page numbers (TOC 2), and some other text (subheadings or a blurb like that in Figure 4) without page numbers (TOC 3). In other words, you want to omit page numbers from TOC 1 and TOC 3 and include them for TOC 2. You can’t have more than one \n switch, and there’s no way to include 1–3 without including 2, so you might think this can’t be done—and it can’t, at least not that way. You just need to be devious! The trick is to swap styles. You need to use TOC 2 for Heading 1 and TOC 1 for Heading 2, and omit page numbers for TOC 2 and 3. In the Table of Contents Options dialog, type 2 beside Heading 1 and 1 beside Heading 2. Clear the check box for “Outline levels” (because you haven’t changed the outline levels of these styles). Insert the TOC, then edit the field code to add the \n 2-3 switch. This will give you the following: { TOC \o "3-3" \n 2-3 \h \z \t "Heading 1,2,Heading 2,1" } Now swap the formatting of TOC 1 and TOC 2; that is, make TOC 2 centered and TOC 1 left-aligned, to match the heading levels to which they are assigned. You’ll get something that looks like Figure 12.
Figure 12. A TOC with unnumbered Heading 1 and Heading 3 entries Adding numbering to unnumbered headingsMany highly structured documents are created with outline-numbered headings. When you create a TOC based on these headings, the TOC entries are also numbered. Figure 13 shows the result if you use one of Word’s built-in outline numbering formats (without any customization) and generate a TOC based on the outline-numbered headings. For the type of document for which this type of numbering is suitable, presumably this type of TOC is also suitable.
Figure 13. Outline-numbered headings and TOC Often, however, you want something more creative. For example, if you are numbering chapters (which may be the only numbered headings in your document), you may want the chapter number to be on a separate line from the title, as shown by the examples in Figure 14.
Figure 14. Examples of chapter number on separate line There are several ways to accomplish this. For example, you can specify “Nothing” as the character to follow the paragraph number, then manually insert a line break after the number. But if you want more space between the chapter number and title than between lines in the title (if it wraps to a second line), then you’ll have to enter multiple line breaks, fiddle with the font size, or accomplish this with some other workaround. Moreover, if you want different margins or paragraph alignment for the number and title, you will probably find this impossible (or at least very difficult) to accomplish in a single paragraph. A better way is usually to make the chapter number and chapter title separate paragraphs and styles entirely. You’ll probably want to use Heading 1 for either the number or the title. Which one you use it for depends on whether or not you need to use the number in captions, page numbers, or other headings.
If the chapter number must be included in caption numbers (for example, if the figures in Chapter 1 are numbered Figure 1‑1, Figure 1‑2, etc.), then you will have to use Heading 1 for the chapter number. The same is true if you are restarting page numbering in each chapter and including the chapter number in the page number. And of course, if you’re using outline numbering, as in the example in Figure 13, you will have to use Heading 1 for the chapter number. In such cases, you will define a Chapter Title style to use for the title. If you don’t have to worry about captions, page numbers, or subordinate headings, define a Chapter Number style for the number. You can still use auto numbering—anything from a simple numeral to a fancy “Chapter One”—just be sure to set “Follow number with” to “Nothing.” In this case, you will use Heading 1 (or some other built-in heading) for the chapter title. Regardless of which style you have used Heading 1 for, you will use the chapter title style in your TOC. If you’ve used Heading 1 for the chapter title, it will be included automatically. If you’ve used Chapter Title, then you must remove the 1 from beside Heading 1 in the Table of Contents Options and add a 1 beside Chapter Title. Here’s where the fun starts! You must now add numbering to the TOC style (assumed to be TOC 1). See the section on modifying TOC styles for instructions on accessing the Modify Style dialog. In that dialog, select Format | Numbering. In the Bullets and Numbering dialog, select the Numbering tab, select the first numbering format, and click Customize. Although you can use this numbering style out of the box, it will look nicer if the numbers are right-aligned, so set the “Number position” to right. You may also want to remove the period, increase the indent, or customize some of the rest of the formatting to your taste. This will give you a TOC that looks like Figure 15.
Figure 15. TOCs with numbered TOC styles You may be wondering why (or how) the titles of the front matter sections (“Preface,” “Acknowledgments”) in the examples in Figure 15 are not numbered. This is easily accomplished. For the titles of your front matter sections, use a different style from the one used for chapter titles. It can look just like the chapter title style, but it should have an outline level of 2 (if you’re not using Heading 2 for anything else, it’s a good choice since it automatically has an outline level of 2). Then format the TOC 2 style to look just like TOC 1, but without numbering (that is, give it the same indent and other formatting). The front matter titles will then use TOC 2 and look just like the TOC 1 chapter title entries, but without numbering. Adding chapter numberingIf you restart numbering in each chapter or division of a work, then you probably add the chapter number to the page number, so that Chapter 1 begins with page 1-1, Chapter 2 with 2-1, and so on. Assuming you have added these numbers using the "Include chapter number" feature as described in this article, then the chapter numbers will be reflected in the table of contents, though this is not really very helpful since every chapter starts with page 1. Often, however, you will have a requirement to "number" the chapters with letters. This is often done for appendixes (Appendix A, Appendix B, and so on). So long as you are using a normal alphabetic sequence, you can do this with ordinary numbering, as described in "How to number headings and figures in Appendixes." But what if you want to use "random" letters (not in alphabetical order)? For example, suppose you have a glossary at the end, and you want all the page numbers to begin with G, and the endnote pages should begin with N and the index pages with I. If all you want is for the letters to appear on the pages, you can just type them into the header or footer before the PAGE field, but if you want the letters to appear in the TOC as well, this is a very special case, but it can be handled by using the \s switch in your TOC. Credit is due to Word MVP Stefan Blom for realizing the potential of this switch, which is intended to pick up numbering applied to headings using a SEQ field. The method is rather finicking, and again, unless these "chapters" contain subdivisions that would be listed in the TOC, there is little point in including them (since all the starting pages would be 1). If you are determined to do it, however, here's how:
Saving your workA table of contents can be viewed as having three components:
Naturally, the TOC entries will vary from one document to another, based on the headings contained in that document, but there is no reason you can’t save the rest of the work you’ve done to customize your TOC. This will allow you to easily create an identical TOC in another document. As you gain more experience in creating TOCs, you will be more likely to have created something worth saving for reuse. You can save your TOC field as an AutoText entry. If you insert it into a blank document, it will give an error message until you add some headings in the styles the TOC field is expecting, but once you have added headings, the field will function just the same as it did in the original document. It will include the same number of levels, omit page numbers from the same levels (if any), be hyperlinked or not, as you chose, and so on. The TOC styles can be saved in a template. If you are working on a document based on a specific template other than Normal.dot, you may want to go to the Modify Style dialog and check the “Add to template” box to save your style customizations to that template. Or you can create a new template by saving the document as a template. You can either delete all the content (the style definitions will remain) or delete everything but the TOC, which will preserve the TOC field as well. You can also use the Organizer to copy styles from one document or template to another. Moreover, you can copy and paste an entire TOC from one document to another, though it may not work correctly if the target document does not contain the styles the TOC is looking for.
Note that the TOC field and the TOC styles are separate, so you can theoretically combine content and formatting in a variety of ways. But note also that styles and content can conflict. As we have seen, it is possible to have a TOC style that is centered. It is also possible to omit numbering for one or more levels of a TOC. When a style is centered, it must omit numbering. If you try to combine a set of TOC styles that includes centered entries with a TOC field that doesn’t allow for omitting numbering at the relevant level, you’ll be in trouble. Special considerations for Word 2007 and aboveWord 2007 and above provide a gallery of prebuilt TOCs (References | Table of Contents | Table of Contents). For the purposes of most of the techniques in this article, you will want to ignore those and use Insert Table of Contents to get to a Table of Contents dialog that looks very similar to the one in Figure 2. From there you can follow most of the instructions above. Editing the TOC field is also the same in Word 2007 and above. There are, however, a few differences and possible pitfalls:
Add TextWord's Help file claims that you can use the Add Text button to add selected text to the TOC at the desired level. You might think that this would accomplish something similar to a TC field, but it does not. What it does, at minimum, is apply a given outline level, but not just to the selected text but rather to the entire paragraph it's in (even if it's at the beginning of the paragraph). Even worse, what it does in many cases is actually apply the heading style for that level—Heading 1 for Level 1, Heading 2 for Level 2, or Heading 3 for Level 3. This may be what you want, but, if it is, it's just as easy to apply the headings from the Quick Styles gallery or Styles pane. Additionally, you might think that using "Do Not Show in Table of Contents" on this menu would remove a heading from the TOC without removing its heading formatting (something you often want to do for the Table of Contents heading itself). Alas! no, it doesn't work that way; instead, the heading style is removed and the paragraph reverts to Normal.
NumberingNumbering also works a little differently in Word 2007 and above. It is relatively easy to apply numbering to TOC styles using the Numbering button in the Paragraph group on the Home tab, but, unless you have previously created a number format with the desired indents, you'll just get the out-of-the-box numbering, and the Adjust List Indents command will not be on the shortcut menu. It does, however, appear that you can use the ruler to adjust the indents; even though these are in conflict with those defined for the number format, they do seem to survive an update of either the style or the TOC. Alternatively, you can add Adjust List Indents to the Quick Access Toolbar (QAT). The numbering is unstable in other ways, however, so you may want to use the Define New Multilevel List to select your numbering and indents and link Level 1 to your TOC 1 style. AutoTextWord 2007 and above do still have AutoText (as part of the Building Blocks), and you can certainly still save your TOC field as an AutoText entry if you wish: select it, press Alt+F3, choose a name for your entry, and select "AutoText" as the gallery to save it in. A better alternative, however, is to save it in the Table of Contents gallery. Another way to do this is to select the TOC and then click Save Selection to Table of Contents Gallery on the Table of Contents menu, which opens the exact same dialog, but with "Table of Contents" already selected. When you do this, your TOC will appear in the gallery that appears when you click Table of Contents on the References tab. Get creative!Once you understand how TOC fields work, you can get more creative about both content and formatting. Rarely is it impossible to create a TOC that does exactly what you want it to do and looks just the way you want it to look. This article copyright © 2006, 2008, 2011, 2014, 2023 by Suzanne S. Barnhill. |