How to create a thumb index for a Word document
Word users often ask how to create a “thumb index” in a
document. This is sort of a loaded question, for two reasons:
-
A real “thumb index” (like a real “watermark”) is not
just something printed. Look at a dictionary or other large reference book
and you’ll likely see carved indentations like a quarter of a sphere; at the
bottom of each is a glued-on label. Clearly this is not something you can do
with Word and your desktop printer.
-
Even if what you mean by a “thumb index” is just a
series of stacked “tabs” on the edge of the page (as described and
illustrated below), you probably won’t be able to achieve all of what you
want for these, either, because most desktop printers cannot print to the
edge of the page.
If, however, you are creating a document to be sent to a
commercial printer (perhaps as a PDF) to be printed on oversized paper and
cropped (the only way even commercial printers can print “full bleed”), then the
methods below will allow you to do so. You can also adapt them to create a thumb
index just clear of the unprintable area of your printer.
There is, as they say, more than one way to skin a cat, and
doubtless there are other ways to create “thumb indexes” or page tabs, but the
following method is one way to do it.
How it works
We are going to assume that you want one tab for each of
several divisions in a document (chapters, alphabetical sections, etc.) and that
you want the tab on the first page of the section, which will be a recto
(right-hand) page, or on all the recto pages. We’ll also assume that you want
each tab to be black or a dark color, with white text reversed out of it.
The tabs will be created as a tall, skinny (single-column,
multi-row) table anchored to the document header.
The table will be the same in all the sections, but in each section a different
row will be highlighted and have text in it (see Figure 1).
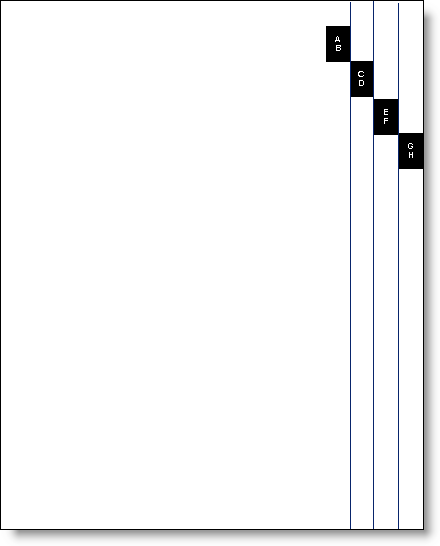
Figure 1. Pages with “thumb index” tabs
Prepare the document
-
Go to File | Page Setup and choose the Layout
tab. If you want your tabs on just the first page of each section, check the
box for “Different first page,” and make sure that it applies to “Whole
document.” If you want the tabs on all the right-hand pages, check the box
for “Different odd and even.” Note that you may need both boxes checked for
reasons that have nothing to do with these tabs—for example, if you have
different running heads on odd and even pages and no running head on the
first page of a section. If you have little experience working with headers,
you may want to read "Making the most of headers
and footers" before proceeding further.
-
At the beginning of each division (that is, each place
that you want a tab), go to Insert | Break and select Odd page
under Section break types, then click OK.
-
Double-click in the header of the document to open
the header pane. On the contextual Header & Footer Tools | Design
tab there are check boxes for “Different First Page” and “Different Odd
and Even.” If you want your tabs on just the first page of each section,
check the box for “Different First Page.” If you want the tabs on all
the right-hand pages, check the box for “Different Odd and Even.” Note
that you may need both boxes checked for reasons that have nothing to do
with these tabs—for example, if you have different running heads on odd
and even pages and no running head on the first page of a section. If
you have little experience working with headers, you may want to read "Making the most of headers
and footers" before proceeding further.
-
Close the header pane by double-clicking in the
document body.
-
Select the Layout (or Page Layout) tab. At the beginning
of each division (that is, each place that you want a tab), click
Breaks in the Page Setup group and choose Odd Page.
Insert the table
Word 2000 and above support “wrapped” tables, that is,
tables that are not In Line With Text and can be placed anywhere on the page. So
it should be possible to use a wrapped table for this exercise. Sadly, it’s not.
For whatever reason, a wrapped table in a document header can’t be made to
extend beyond the vertical midpoint of the page. Since you’ll want your tabs
spread out down the length of the page, this obviously won’t work. So you’ll
need to put the table in a text box or frame. A frame is a little easier to deal
with, but most users are more familiar with text boxes. I’ll give instructions
for both.
Note: If you have enabled both
“Different First Page” and “Different Odd and Even” headers and footers, you will need to insert a text box or frame in both
the First Page Header and the Odd Page Header.
Insert a text box
-
Open the header pane by double-clicking in the header
area. (In Word 2003 and earlier, if the header doesn't already contain
content, you will need to use View | Header and Footer to open the
header pane.)
Make sure you are in the correct header: click Show Next or Show
Previous on the Header and Footer toolbar or Next/Previous
in the Navigation group on the Header & Footer Tools | Design
tab as needed to get to the
First Page Header or Odd Page Header.
-
Draw a text box
anchored to the header. Don’t worry too
much about the size; you can fine-tune that later.
-
Word 2003 and earlier: Click Text Box on the Insert menu or the
Text Box button on the Drawing toolbar and draw the text box.
-
Word 2007 and above: Open the Text Box gallery/menu on the Insert
tab and select Draw Text Box from the bottom. The sizing handles
will look different from those in Figure 2, but the text box should
behave the same
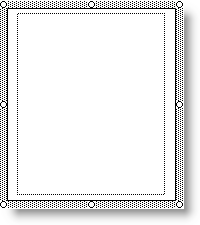
Figure 2. A simple text box (note dotted border and
circular white sizing handles)
-
Access the text box formatting tools:
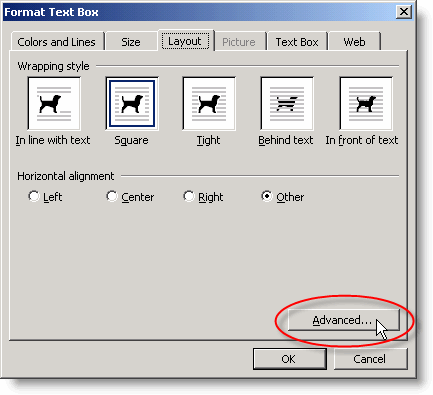
Figure 3a. The Format Text Box dialog, showing the
Layout tab
-
Word 2007: Just selecting the text box will display
the contextual Text Box Tools | Format tab on the Ribbon. Most of
the tools you need to carry out the steps below appear on that tab
(Figure 3b), but you can also open a Format Text Box dialog pretty
much identical to the one in Figure 3a by clicking the dialog launcher
in the bottom right corner of the Size group.

Figure 3b. The Text Box Tools | Format tab in Word 2007
-
Word 2010 and above: Selecting the text box displays
the contextual Drawing Tools | Format or Shape Format tab, which also has most of
the same tools. Clicking the dialog launcher in the bottom right corner
of the Shape Styles group opens the Format Shape dialog
(in Word 2013 and above, this is a task pane),
which provides access to more controls.

Figure 3c. The Drawing Tools | Format tab in Word 2010
-
Remove the line border from the text box:
-
Word 2003 and earlier: On the Colors and Lines tab
of the Format Text Box dialog, select “No Line.”
You may also want to select “No Fill,” though this is not vital.
-
Word
2007: In the Text Box Styles group, click Shape Outline
and choose No Outline. You may also choose No Fill for
Shape Fill.
-
Word 2010 and above: In the Shape Styles
group, click Shape Outline and choose No Outline. You may
also choose No Fill for Shape Fill.
-
Set the desired height and width for your strip of tabs.
Those in Figure 1 are 0.5″ wide and 0.75″ high. To determine the required
height, decide how much of the page you want your tabs to occupy and then
divide that space by the number of tabs needed. If you like, you can add a
little bit for the empty paragraph that Word will insist on adding below the
table, but if you don’t, it won’t matter. In Word 2003 and earlier, you will
use the Size tab of Format Text Box dialog; in Word 2007 and
above, the size can be set from the Ribbon.
-
Set all the internal text box margins
to 0″. (The dotted lines inside the text box in Figure 2 represent the
default internal margins.)
-
In Word 2003 and earlier, this is set on the
Text Box tab of the Format Text Box dialog.
-
To access this control in Word 2007, you
will need to click on the dialog launcher in the bottom right corner of
the Size group, which will open the Format Text Box
dialog. Select the Text Box tab.
-
To access this control in Word 2010 and above, you
will need to click on the dialog launcher in the bottom right corner of
the Shape Styles group, which will open the Format Shape
dialog or task pane. Select the Text Box tab.
-
Set the wrapping to “Square.”
-
Word 2003 and earlier: Select the Layout tab
of the Format Text Box dialog.
-
Word 2007: Use the Text Wrapping button in the
Arrange group on the Text Box Tools | Format tab.
-
Word 2010 and above: Use the Wrap Text button in the
Arrange group on the Drawing Tools | Format or Shape
Format tab.
-
Set the correct location for your text box. This may
require some trial and error, but both vertical and horizontal settings
should be “Relative to Page.” If your tabs will extend the full length of
the page, then you can use “Top Relative to Page” for “Alignment”;
otherwise, you will need to use the “Absolute position” settings for both
horizontal and vertical alignment. The horizontal setting will be the width
of your paper minus the width of your text box (note that “Right Relative to
Page,” contrary to expectation, places the text box just outside the right
margin rather than at the right side of the page).
-
Word 2003 and earlier: On the Layout tab of
Format Text Box, click Advanced. In the
Advanced Layout dialog (Figure 4), set the correct location for your
text box.
-
Word 2007 and above: Click Arrange | Position,
then More Layout Options... on the Text Box Tools | Design
or Drawing Tools | Design tab.
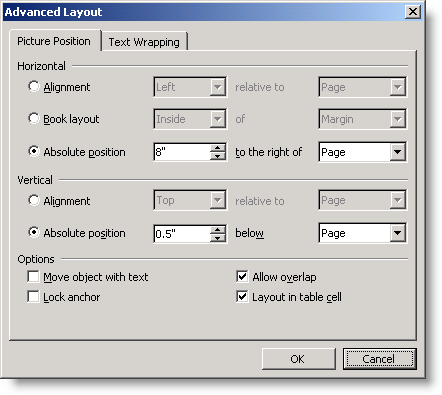
Figure 4. The Advanced Layout dialog
-
Click OK to close any open dialogs.
Alternatively, insert a frame
-
Open the header pane by double-clicking in the header
area. (In Word 2003 and earlier, if the header doesn't already contain
content, you will need to use View | Header and Footer to open the
header pane.)
Make sure you are in the correct header: click Show Next or Show
Previous on the Header and Footer toolbar or Next/Previous
in the Navigation group on the Header & Footer Tools | Design
tab as needed to get to the
First Page Header or Odd Page Header.
-
Draw a frame
anchored to the header. Don’t worry about
getting the size exactly right; you can fine-tune it later. For complete
instructions on inserting a frame in all versions, see the section “Insert
and format a frame” in this article.
-
Word 2003 and earlier: You can use the
Insert Frame button on the Forms toolbar. You won’t find
Frame on the Insert menu unless you are using an older version of Word (earlier
than Word 97) or have customized your Insert menu to include it,
but if you later find that you have a frequent use for frames, you can
use
Tools | Customize to add it
(you may find it labeled “Horizontal Frame” or just “Horizontal”). Also, if you have
inserted a text box but decide a frame would be better, you can click
the Convert to Frame… button on the Text Box tab of the Format Text Box dialog.
-
Word 2007 and above: You can add the Insert Frame button to the
Quick Access Toolbar by selecting Horizontal Frame from the All Commands category in the Customize Quick Access
Toolbar dialog.
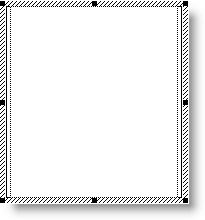
Figure 5. A simple frame (note hashed border and square
black sizing handles)
-
Click on the frame border to select the frame. Remove
the border;
-
Word 2003 and earlier: In the Format | Borders and Shading dialog, select
None, or choose No
Border from the flyout palette that appears when you click the arrow
next to the Borders button on the Formatting or Tables and
Borders toolbar.
-
Word 2007 and 2010: On the Home tab, in the
Paragraph group, click the arrow beside the bottom
right button (by default its tooltip will display “Top Border,” but it
changes to reflect the most recently used button) to the Borders
menu; select No Border.
-
Word 2013 and above: On the Home tab, in the
Paragraph group, click the arrow beside the Borders button to
open the Borders menu and select No Border.
-
Double-click on the frame border to open the Format
Frame dialog. As you can see from Figure 6, it is much simpler than the
Format Text Box dialog.
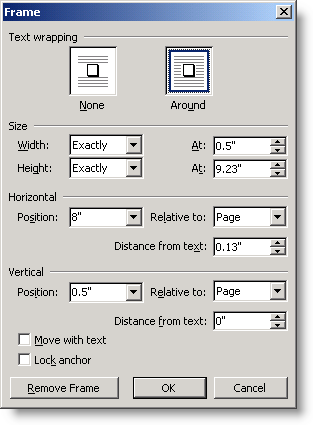
Figure 6. The Format Frame dialog
-
The wrapping will probably already be set to Around;
if it’s not, change it.
-
For the frame width, chose “Exactly” and enter an
amount. The height may be left as “At least” or changed to “Auto” or an
exact measurement as desired. For height and width determinations see the
instructions above for text box sizing.
-
As with the text box, you’ll need to set the position
Relative to Page. Again, use Top for the vertical setting if your
tabs span the entire side of the document; otherwise enter a specific
measurement; the horizontal setting will be the width of the paper less the
width of the frame.
-
Click OK to close the dialog.
Insert a table and text
-
In your text box or frame, insert a table with one
column and the required number of rows. The table will automatically fill
the width of your text box or frame. Depending on your default Table
AutoFormat or table style settings, you may need to remove a border from the
table as well. A quick way to do this (all versions) is the shortcut
Alt+Ctrl+U.
-
Select the entire table and go to Table Properties.
(In Word 2007 and above, many of the controls mentioned below are on the
Layout tab of Table Tools, which are active when a table is
selected.)
-
On the Row tab, set the exact height you have
determined for the tabs.
-
In each cell, type the text for one tab. Use Format |
Text Direction to rotate the text if desired (see Figure 7). (In Word
2007/2010, the Text Direction command is in the Alignment
group on the Layout tab of
the contextual
Table Tools.)
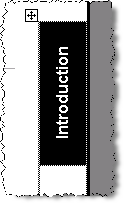
Figure 7. Tab with rotated text
-
When you have inserted the text for all the tabs, select
the entire table and use the Font Color button on the Formatting
toolbar (or Format | Font: Font Color) to color the text white. (In
Word 2007 and above, right-click to display the mini-toolbar, which contains
the Font Color button.) All
your text will disappear!
-
If you inserted a text box or frame in both the First
Page Header and the Odd Page Header, repeat steps 1–5 for the other header.
Make the separate tabs
At the beginning of this exercise, you inserted section
breaks between your chapters or divisions. Until now, however, you have been
working on a text box or frame and table inserted in the First Page Header (or
Odd Page Header, or both) for all the sections. Now you will unlink them and
create the separate tabs.
-
Make sure you are at the beginning of the document.
Click the Show Previous button on the Header and Footer
toolbar (Previous Section on the Table Tools tab in Word
2007, Previous in Word 2010 and above) until the Header pane says “First Page Header – Section 1” or “Odd
Page Header – Section 1.”
-
On the Header and Footer toolbar, click Show
Next twice (or three times if you have checked the boxes for both
“Different first page” and “Different odd and even” on the Layout tab
of Page Setup) to get to the next First Page Header or Odd Page
Header.
-
Click Link to Previous (or Same as Previous)
on the Header and Footer toolbar (Design tab of Table Tools
in Word 2007 and above) to turn it off (the button is not
highlighted), which will unlink this header from the
previous First Page Header or Odd Page Header.
-
Repeat steps 2 and 3 until you reach the last First Page
Header/Odd Page Header in the document, then return to the beginning
(Section 1).
-
Display the Tables and Borders toolbar (Figure 8).
(In Word 2007 and above, these tools are on the Design or
Table Design tab of the contextual Table Tools.)

Figure 8. The Tables and Borders toolbar
-
Select the first row of your table. Click on the arrow
beside the Shading Color button and choose black or the desired dark color
from the palette. Your white text will now show on the first tab.
-
Go to the First Page Header/Odd Page Header in Section
2, select the second row of the table, and fill it with the desired color.
If you’re using colors other than black, you may want to make each tab a
different color; just be sure they’re dark enough for the white text to show
up well.
-
Repeat until you have shaded one table row in each
section.
-
Close the header pane. You’re done!
Important Note: Because you have created these
tabs in the header, their shading/color will be dimmed when you activate the
document body. You can see their actual appearance in Print Preview. A
sample document containing representative tabs is available upon request.
This article copyright © 2006, 2008,
2011, 2014, 2023 by
Suzanne S. Barnhill.
|
