|
Word users are often troubled by various kinds of lines
where they are unexpected and unwanted. This article will address various causes
of these lines, how to remove them, and in some cases how to prevent them from
occurring in future.
Just to be clear, the lines we’re talking about here are
straight lines not associated with specific text, as opposed to red, green, or
blue wavy underlines (which are related to spelling and grammar) or dotted text
underlines, which indicate Hidden text. The lines we’ll discuss are:
There are two kinds of gridlines in Word, and they cause
confusion both individually and together (because users looking for a button to
control one kind often stumble upon the control for the other).
Table gridlines
Table gridlines are probably the most commonly seen. If a
table does not have borders (lines between cells that will print), then it is
helpful to display gridlines in order to see the cell boundaries (if you have
“Text boundaries” enabled, you will see cell boundaries in Print Layout view
even without displaying gridlines). Here’s how to turn them on or off:
-
Word 2003
and earlier: On the Table menu, click Show Gridlines to
display them, Hide Gridlines to turn them off.
-
Word 2007
and above: With the insertion point in a table, so that the contextual
Table Tools tabs are displayed, select the Layout tab. In the
Table group (far left), click View Gridlines to toggle the
display (the button wording does not change, but its appearance does). Note
that Word 2019 and above do not have the Table Tools tab, and
the Layout tab for tables is to the right of the Table Design
tab.
Drawing grid
The drawing grid is one of the most perplexing problems for
some Word users because it seems to appear without warning. One can only
speculate that a user may have enabled it in an attempt to display table
gridlines. It makes the document background look like graph paper, with a ⅛-inch
grid covering the page.
To turn the drawing grid on or off:
Note: If you actually want to display the drawing
grid, you can also set the grid interval and origin. Note that the grid
interval affects the placement of “click stops” (default intervals) for tab
stops on the horizontal ruler, so you may want to adjust the grid interval
to facilitate tab stop insertion (the tab stop interval can also be changed
in the Tabs dialog).
-
Word 2007
and above: On the View tab, in the Show/Hide or Show
group, check
or clear the box for “Gridlines.” The fact that this setting is available
even when the insertion point is not in a table may explain why the drawing
grid is so often enabled in error.
-
Word 2010
Starter: The Starter version of Word doesn’t have a View tab, so
a more roundabout method is required. On the Page Layout tab, in the
Arrange group (far right), click Align, then View Gridlines
(to turn it on or off). The Grid Settings menu item opens a dialog
that allows you to set the grid interval and origin (see note above).
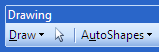
Drawing lines rarely cause problems in documents because
usually they can be selected and deleted without issue. A drawing line is
selected when you get the four-headed arrow shown below.

Be aware that a drawing line may be anchored to the header
or footer. In such cases, you will need to access the header/footer story (by
double-clicking in the header area) in order to select the line.
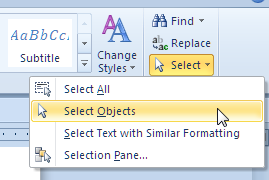
In other cases, a line cannot be selected because the
text wrapping style has been set to Behind Text. In such instances, it is
necessary to use the Select Objects tool, which selects objects in the
drawing layer without affecting text. Here’s how to access the Select Objects
tool:
By default, Word separates footnotes and endnotes from the
body text with lines of various lengths. In Word 2010 and earlier, the
Footnote/Endnote Separator is a line 2″ wide extending from the left margin. The
Footnote/Endnote Continuation Separator, which appears on pages where a footnote
or endnote is continued from the previous page, is a line from left to right
margin. Word 2013 and above, while they maintain the Footnote/Endnote Continuation
Separator for backward compatibility, actually use only the Footnote/Endnote
Separator (even on pages with continued notes) in newly created documents.
Generally speaking, if you see one of these separators, it
will be because the page contains footnotes or endnotes, and the reason for the
line will thus be pretty obvious. Occasionally, however, a separator may remain
when notes have been deleted. This can happen if you delete the footnote or
endnote text manually instead of removing the note by deleting the note
reference mark in the document body. In such cases, the only way to get rid of
the separator is to remove all vestiges of the notes themselves.
To find and delete the unwanted note reference mark:
-
Word 2010
and earlier: Click on the Select Browse Object
button, which is the round button between the two double arrows at the
bottom of the vertical scroll bar. Select Browse by Endnote or
Browse by Footnote as appropriate. The function of the “browse arrows”
becomes “Previous Endnote/Footnote” and “Next Endnote/Footnote,” and you can
use them to skip through the document from one reference mark to the next
until you find the one that doesn’t have a note associated with it. Select
and delete it.
-
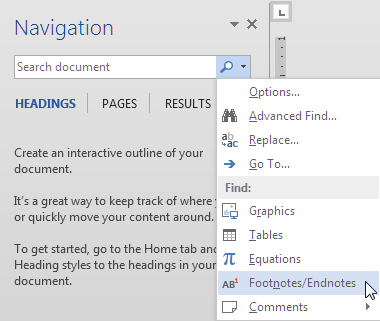
Word 2013
and above:
Beginning with Word 2013 (most of) the Select Browse Object functions have
been moved to the Navigation pane. If this pane is not open, press
Ctrl+F to open it. Then click on the arrow beside the search button
(magnifying glass icon). Select Footnotes/Endnotes. You will see that
the box now says “Find: Footnotes/Endnotes,” and there are up and down
buttons to search backward and forward in your document. Use these buttons
to skip through the document from one reference mark to the next until you
find the one that doesn’t have a note associated with it. Select and delete
it.
Occasionally you may want to edit the note separator(s), either
because a specific style manual requires a different appearance or just out of
personal preference. For instructions on editing note separators, see “Customizing
and troubleshooting footnote and endnote separators.”
The most troublesome lines in Word documents seem to be
paragraph and page borders, especially when they have been applied by another
user or by Word’s AutoFormat As You Type feature.
Paragraph borders
The distinctive feature of these lines is that you can
select them and move them up and down, but you can’t delete them. When you
select them, instead of getting the four-headed Move arrow that you get with
graphic lines, you get a double-headed arrow with lines between.
To remove a paragraph border, place the insertion point in
the paragraph above the border and proceed as follows:
-
Any
version: Press Ctrl+Q. This resets the paragraph formatting to
the default for the style, which presumably doesn’t include borders. Note,
however, that this will also remove any other direct paragraph formatting as
well as the border, so you may prefer one of the following version-specific
procedures.
-
Word 2003
and earlier: Go to Format | Borders and Shading and click the
preset picture for None. Alternatively, click the arrow beside the
Borders button on the Formatting or Tables and Borders
toolbar and click the No Border button in the flyout palette.
-
Word 2007
and 2010: On the Home tab, in the Paragraph group, the
bottom right button is for borders. If you have not previously used it
during a Word session, its tool tip will say “Bottom Border.” Click the
arrow beside it to open the Borders menu and select No Border.
-
Word 2013
and above:
On the Home tab, in the Paragraph group, click beside the
Borders button to open the menu and select No Border.
When you have removed the border from a given paragraph with
one of the procedures above, you may find that the border has “moved” to the
paragraph above. This can result when you have previously pressed Enter
several times trying to get rid of the line. Every time you press Enter,
you create a new paragraph formatted the same as the previous one, which has
acquired a Bottom Border. This won’t be obvious because, when several
consecutive paragraphs have the same “Bottom Border” formatting applied to them,
the border appears below only the last of them (Word takes “bottom” very
literally). When you remove the border from the last paragraph, it then “moves
up” to the previous paragraph with that formatting. In order to remove the
border completely, you need to select all the affected paragraphs and
either press Ctrl+Q or choose No Border.
You may wonder how you got this line in the first place. For
this you can probably thank Word’s AutoFormat As You Type feature. By default,
if you type three or more hyphens (-), underscore characters (_), equals signs
(=), asterisks (*), tildes (~), or hash signs (#) and press Enter, Word
will apply a thin, thick, double, broken, zigzag, or thick-and-thin border to
the bottom of the previous paragraph (see image below). If you are a writer who
customarily separates text with a row of three asterisks, you will perhaps have
encountered this phenomenon.
Fortunately, it is easy to disable this feature:
-
Word 2003
and earlier: Go to Tools | AutoCorrect Options | AutoFormat As You
Type and clear the check box for “Borders” or “Border lines” under
“Apply as you type.”
-
Word 2007:
Go to Office Button | Word Options | Proofing | AutoCorrect Options |
AutoFormat As You Type and clear the check box for “Border lines” under
“Apply as you type.”
-
Word 2010
and above: Go to File | Options | Proofing | AutoCorrect Options |
AutoFormat As You Type and clear the check box for “Border lines” under
“Apply as you type.”
Page borders
If your mysterious line appears in the header or footer
area, it may be a paragraph border applied to the header or footer text, but it
may also be a partial page border. You would probably recognize a page border if
it appeared in the margins on all four sides of the page, but it can be
confusing when it appears on just one side (and of course this could be the left
or right as well as the top or bottom). If a line appears in the margins and you
can’t select it at all, whether focus is in the document body or in the
header/footer story, then most likely it is a page border. To remove it:
-
Word 2003
and earlier: Go to Format | Borders and Shading and select the
Page Border tab. Click on the preset picture for None, then OK.
-
Word 2007
and 2010: On the Layout tab, in the Page Background group,
click Page Borders. In the Page Borders dialog, click on the preset
picture for None, then OK.
-
Word 2013
and above:
On the Design tab, in the Page Background group, click Page
Borders. In the Page Borders dialog, click on the preset picture for
None, then OK.
In the Borders or Page Border dialog of Word 2010 and
earlier (see image above), you may have noticed a button marked “Horizontal
Line…” If you click this button,
you will get a dialog that offers a variety of plain and fancy lines. These are
actually clip art pictures (which you can find in the clip art collection by
searching for “divider”). If you insert one and then select it, you’ll see it’s
surrounded by the same sort of sizing handles that you would expect with a
picture. Most likely you would recognize the fancy lines as clip art, but the
simplest line is just that—a line, so you might not realize that it is actually
a “picture.” Fortunately, when you select one of these, you can remove it by
pressing Delete, though be aware that the paragraph it was anchored to,
an empty, unnecessary paragraph, will remain.
In Word 2013 and above, the Horizontal Line feature has been removed
from the Borders and Page Border dialogs but is still present in the Borders
dropdown in the Paragraph group on the Home tab.
This feature doesn't offer clip art—just plain lines—but if
you right-click on one and select Format Horizontal Line, you get a
dialog in which you can select the color, weight, length, and position (left,
center, or right) of the line. Like the lines described above, it can be
selected and deleted, but an empty paragraph will remain.
Although this article is primarily intended to discuss
horizontal lines, it may be appropriate also to deal with some common sources of
vertical lines.
Page borders
As noted above, a page border can be applied to any one or a
combination of the four sides of the page. A line in the left or right margin
that extends beyond the top and bottom margins, but not all the way to the top
and bottom of the page, is probably a partial page border. See the page border
section above for instructions.
Drawing lines
As noted above, drawing lines are usually easy to select and
delete, but if your document has a line, extending from top to bottom of the
page, in the side (usually left) margin of every page, then it is most likely a
graphic line anchored to the header. This is a technique commonly used to add a
rule to legal pleadings. To remove this line, access the header by
double-clicking in the header area, and then you will be able to select and
delete the line.
Change bars
If the vertical lines are short lines in the left or right
margin, perhaps several of varying lengths, then they are probably change bars
or “changed lines” indicating where changes have been made in a document in
which Track Changes is enabled. You can change the view of the document to hide
these lines or get rid of them altogether by accepting the changes. For more,
see “How
does Track Changes in Microsoft Word work?”
Bar tabs
Bar tabs are an ancient legacy feature of Word so rarely
used that most users would not recognize them. They aren’t really tabs in the
usual sense, though in recent versions of Word they can be set from the
horizontal ruler the same as any other tab stop. When you set a bar tab, you get
a thin vertical line at the tab stop position in each line of a paragraph. You
don’t actually have to tab to it; it’s there all the time, and it extends to the
full height of the text line, making a solid line throughout the paragraph (for
more, see “Setting
tabs”). They can be a quick way of creating the appearance of columns
without using a table; the illustration below shows the use of bar tabs with
paragraph borders to create a grid for a printed attendance register.
To remove these tabs, you can drag them off the ruler or
delete them from the Tabs dialog.
Markup area
If your document contains ‟markup” (tracked changes or
comments) and you have chosen to display revisions and/or comments in balloons,
Word will add a ‟markup area” on one side of the page (the right side by
default). In Word 2010 and earlier, this area is grey, but in Word 2013 and
above it is the same color as the page, separated from the page by a vertical
line. Even though your document may contain markup only on certain pages, the
markup area will be displayed on all pages and will be completely blank on some
of them, which can be puzzling if you're not familiar with it (for example, if
you receive a document from someone else that opens in All Markup view).
Style area
This one is a real long shot because it is displayed only in
Normal/Draft and Web Layout views, and it is something you have to expressly
choose to display. Among Word’s options (found at Tools | Options | View
in Word 2003 and earlier and in the Display section on the Advanced
tab of Word’s Options in later versions) is the option to set a width for
the style area. When this is set to a value more than zero, a narrow column is
displayed at the left of the page (separated from the page by a vertical line)
in which the style for each paragraph is displayed. This can be very helpful
when you’re editing or troubleshooting a document to make sure styles have been
used correctly and consistently.
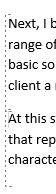
Unsaved text indicator
Since I don’t use SharePoint, I can describe this only vicariously, using an
image posted by a Microsoft Community forum user. Apparently these dotted lines
to the left of paragraphs indicate text that has been edited since the last
save. Saving makes them go away, but of course they will return as soon as you
start editing again.
In Word 2010 and earlier, you may see a dotted line
indicating the margin of the page. In Word 2003 and earlier, this will be
associated with angle marks at the corners, as shown below.
These are “text boundaries” and “crop marks” (note that
these corner marks are not real crop marks, which can be created as described in
“How to Create Crop Marks”). By default, text
boundaries indicate the page margins, but they also show the outline of a text
box (even when it is not selected) and the cell boundaries in a table when table
gridlines are not displayed. In Word 2007 and above, text boundaries and crop
marks are toggled independently. To turn them on/off:
-
Word 2003 and earlier: On the Tools
menu, click Options.... On the View tab, under “Print and Web
layout options,” check or clear the box for “Text boundaries”; crop marks
will also be displayed. (Note that crop marks may be displayed independent
of text boundaries if you have an Asian language enabled, as described in “Margin
marks or crop marks appear on each corner of the page when you open a
document in Word.”)
-
Word 2007: Go to Office Button | Word
Options and select the Advanced tab. Under “Show document
content,” you can toggle “Text boundaries” and “Crop marks” separately.
-
Word 2010: Go to File | Options and
select the Advanced tab. Under “Show document content,” you can
toggle “Text boundaries” and “Crop marks” separately.
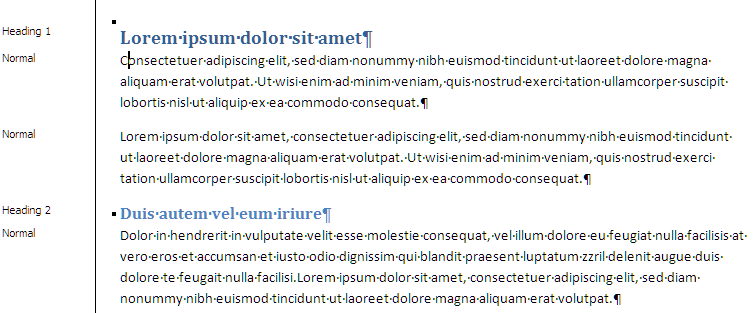
Although text boundaries and crop marks are toggled in the
same way in Word 2013 and above, the display of text boundaries is quite different
and is more likely to cause confusion (and considerable consternation) even for
users who habitually display text boundaries. In these versions, the boundaries
surround every unit of text, which for practical purposes means every paragraph,
as shown below:
Not only are the extra lines intrusive, users also lose the
display of page margins on a page that is only partially filled.
Since this line appears only in Normal (Word 2003 and
earlier) or Draft (Word 2007 and above) view, most users today will never see
it, but that also means that, when they do see it, they may not recognize it for
what it is. It's a short, thick line that appears below the last paragraph of
text and indicates the end of the document.

Needless to say, it does not print. It can, however, be a
useful clue to what will print. If the line is not immediately below the
last line of text, then you can be sure, even without displaying
nonprinting characters, that there are empty
paragraphs after the last text paragraph. If there are enough of them, they may
push the content over the end of the page, resulting in a blank page when you
print.
There may be many other causes of unexplained lines, but the
only other one I’ve run across turned out to be a text box (with line border)
that had been collapsed to the point that it looked like a line. Even more
likely would be a frame with a top or bottom border (borders can be applied to
individual sides of frames; border lines on text boxes are all or nothing).
This article copyright © 2013, 2014,
2016, 2018, 2023 by
Suzanne S. Barnhill.
|