|
|
Run for the border: using borders in Word
You can create a wide variety of special effects in Word using paragraph and table borders. Use of borders, however, is often misunderstood. This article will attempt to clear up some misunderstandings and provide useful tips for using borders effectively. Borders can be applied to: If you have no experience with borders, it will be helpful to read the section on paragraph borders first, since the later sections build on it. Paragraph bordersUsers sometimes create a text box or frame when they want a paragraph or paragraphs to appear to be in a box, but a better approach is to apply a box border to the paragraph(s). Borders can be applied to all four sides of a paragraph or to only one or more sides, as desired. The simplest way to apply a border or borders to a paragraph or paragraphs is to use the Borders button on the Formatting toolbar.
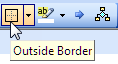
Formatting toolbar showing Borders button The default button face for this button is Outside Border, and when you mouse over it in, it will display the “Outside Border” ScreenTip. If you click on this button when one or more paragraphs are selected, you will apply an outside border to the selection (that is, a border on all four sides).
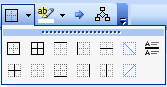
Borders button showing ScreenTip If you click the arrow beside this button, you will get the following flyout palette:
Borders flyout palette
If you click on any of the other buttons on the menu, it becomes the default, and the ScreenTip of the button will change to reflect your choice. The dotted lines at the top of the flyout indicate that it can be torn off to become a floating toolbar, which makes all the buttons available (without having to click to open the flyout) until you close the toolbar. This can be handy if you are applying borders selectively to a number of paragraphs. (Although the toolbar is floating, it can be dragged to any side of the window to dock it.)
Floating Borders toolbar You can see in this screen shot that clicking the Outside Border button also turns on the Top Border, Bottom Border, Left Border, and Right Border buttons. Clicking any one of these buttons allows you to remove the border from that specific side (so if you want a border on three sides, it’s quicker to apply it to all four with the Outside Border button and then remove just the one border). And of course you can equally well click just one button to apply a border to one side, perhaps the top or bottom.
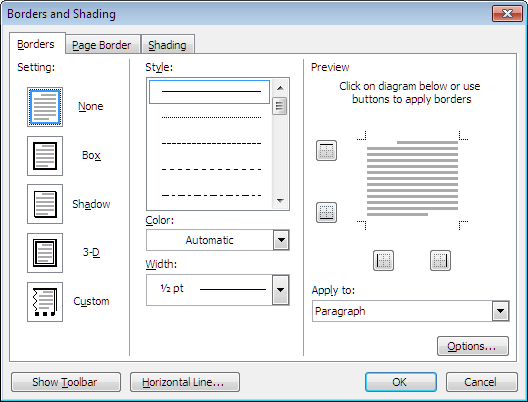
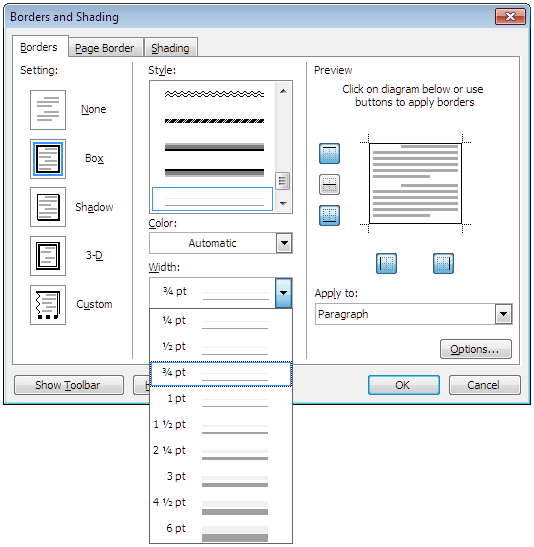
As I said, this is a simple way to apply borders, but, like many simple things, it is limited. By default, Word applies a ½-point single line, color Automatic (that is, in most cases, black). If you want anything fancier, you need to use Borders and Shading dialog, where you can select the line style, weight (“width”), and color. Open it by clicking Borders and Shading… on the Format menu.
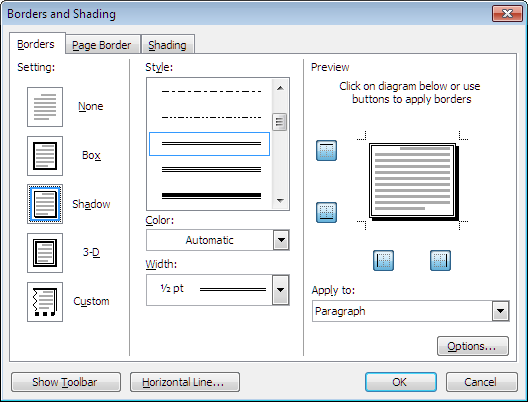
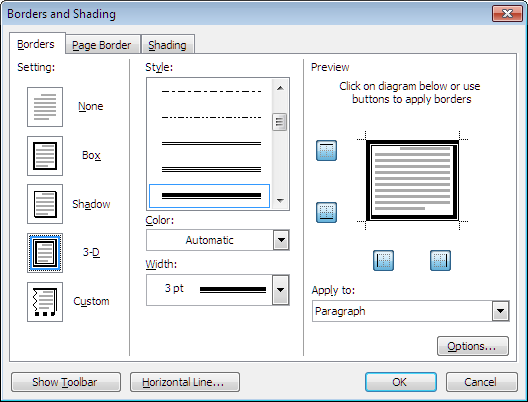
Borders and Shading dialog for a single paragraph PresetsThe operation of the dialog is pretty straightforward. There are several “presets” that, except for Box, are rarely useful. The Box preset applies the default (½-point single black) border to all four sides of your selection. If the None preset is selected and you change the line style, Word will automatically apply a Box border, which you can see in the Preview. Note that all four buttons (Top, Bottom, Left, and Right) are enabled. The Shadow preset appears to apply the currently selected line and weight to the top and left sides of the paragraph and a heavier weight to the right and bottom sides. In fact, if you choose one of the dashed or multiple or thick-and-thin styles, you can see that a shadow is actually applied.
Shadow border The 3-D preset is applicable only if you have selected one of the thick-and-thin line styles. All it does is reverse the thick and thin borders on the right and bottom sides. It’s not very impressive.
3-D border The last “preset” is Custom. This button will automatically be selected if you begin to select and apply different settings for various sides of the paragraph. We’ll get to that in a minute. First, though, let’s see what the dialog looks like when you have more than one paragraph selected:
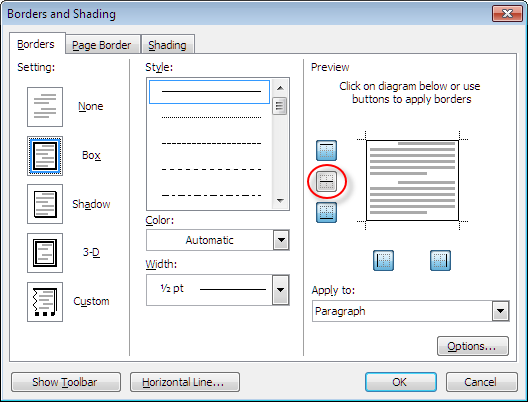
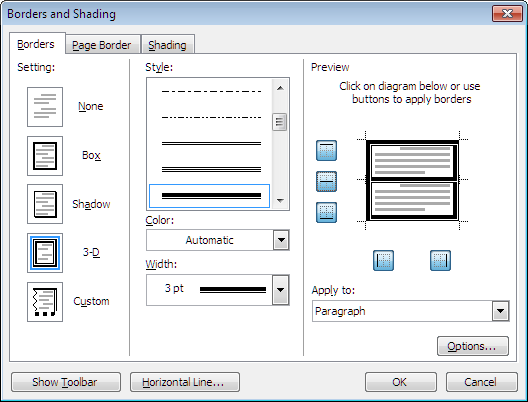
Borders and Shading dialog for multiple paragraphs In this version of the dialog you can see that a button has been added between the Top and Bottom buttons. This is the Inside Horizontal Border button. (Although there are no ScreenTips for the Preview buttons, you can see the names of the buttons in the ScreenTips on the Borders flyout and toolbar.) If you apply a Box border to several paragraphs, the border will surround all of them, as shown above. If you want a border between paragraphs, you must click the Inside Horizontal Border button (or click between the paragraphs in the preview). You can do the same with the other presets, but the results are not very pleasing.
3-D border on multiple paragraphs
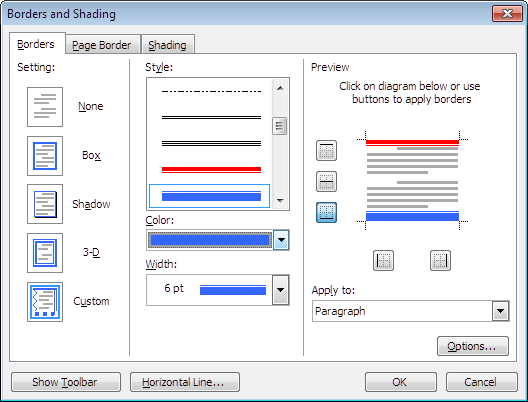
Custom bordersAt this point you’ve probably figured out that you can apply or remove any given border by clicking in the Preview diagram or clicking the corresponding button. There’s just one further secret to applying custom borders: Whenever you click on the Preview, you get the line that is currently selected, so you must select the line style, weight, and color you want before clicking on the Preview picture or one of its buttons. So let’s say you want borders just at the top and bottom of the paragraph, but you want them to be the opposite thick-and-thin rules, one heavier than the other. For purposes of illustration, we’ll make one red, 3 points (the default weight for this style), and the other blue, 6 points. So we select the line we want for the top border (it will be 3 points by default) and select the color, then click on the top border in the preview (or the Top Border button). Then we select the opposite line style, change the color to blue, change the weight to 6 points, and click on the bottom border (or the Bottom Border button). The Preview shows these results.
Custom borders If you make this experiment, you will find two things:
Line stylesIf you scroll through the Style scroll box, you’ll see that there are, toward the end, several styles that you are unlikely ever to use. In particular, the last two styles don’t appear to do anything at all (they seem to apply a Box border). Their default color is Automatic, but if you expand the Width dropdown (the default weight is ¾ point), you’ll see that all the lines appear grey. That could be because they’re not applicable to text paragraphs; they have a function only in tables, which will be discussed later.
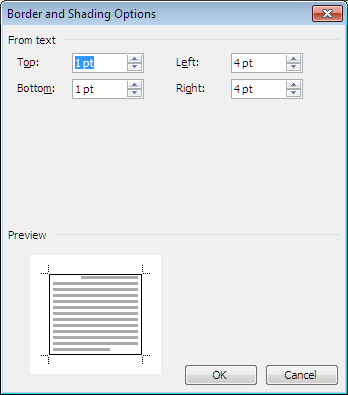
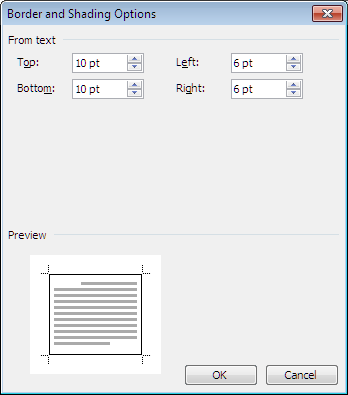
Borders and Shading dialog showing unusable line styles Border optionsIn many, perhaps most cases, borders (especially Top and Bottom borders) will be closer to the text than you want. If you apply Spacing Before/After to the paragraph, it is added outside the border, which helps with spacing the bordered paragraph relative to those around it but doesn’t add any “breathing room” for the text inside the border. In the bottom right-hand corner of the dialog is the Options… button. Clicking it opens the Border and Shading Options dialog, in which you can set the “From text” distance for each border individually. As you can see, the defaults are 1 point top and bottom and 4 points left and right. The maximum for any setting is 31 points (not quite half an inch).
Border and Shading Options dialog with default settings As you change the settings, the Preview shows the results.
Border and Shading Options dialog with custom settings Some “gotchas”
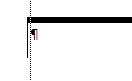
Uneven indents result in separate Box borders
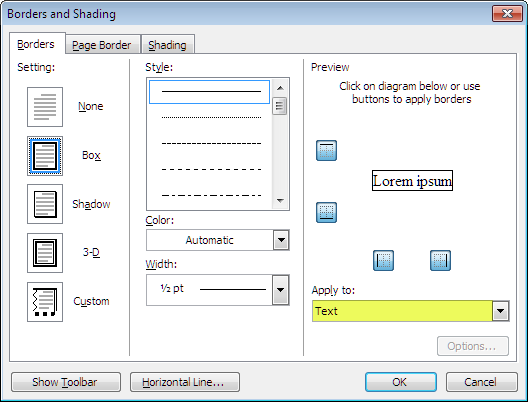
Paragraph showing zero side “From text” setting Text bordersIf you select just part of a paragraph before opening the Borders and Shading dialog, the “Apply to” setting will be set to “Text” instead of “Paragraph.” Although the presets are the same, only Box, Shadow, and 3-D can be used. You can select Custom, but as soon as you click on any of the buttons in the Preview, all are turned on or off. In other words, this border is all or nothing, though at least you do get the same selection of line styles, colors, and weights.
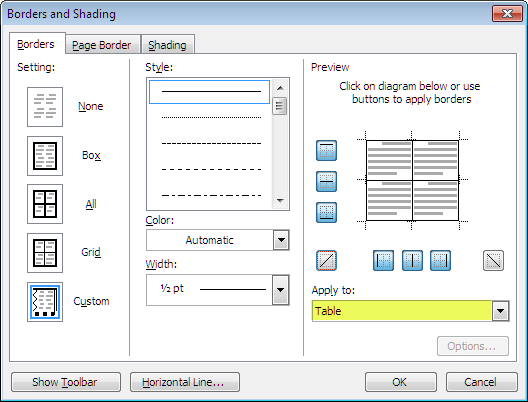
Borders and Shading dialog for selected text You will also see that the Options… button is disabled, meaning that you cannot adjust the border’s distance from the text. If you want to apply a border to just one or more sides of the text, see this article. Table bordersWhen the selection is in a table, the Borders tab of the Borders and Shading dialog has a different appearance from what you saw when adding paragraph or text borders, providing additional options.
Borders and Shading dialog for a table
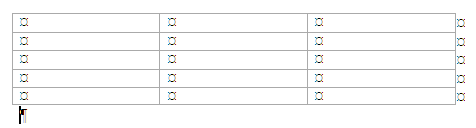
Table showing gridlines
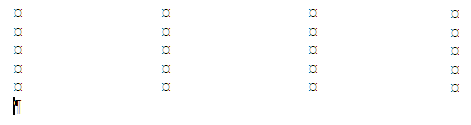
Table showing text boundaries
The Apply to setting in the dialog will vary depending on whether you have the insertion point in a table (or have the entire table selected), as in the first screen shot above, or have only one or more cells selected. The Preview will also reflect the selection of a single cell, two cells horizontally or vertically, or four or more cells.
Borders and Shading dialog for selected cells
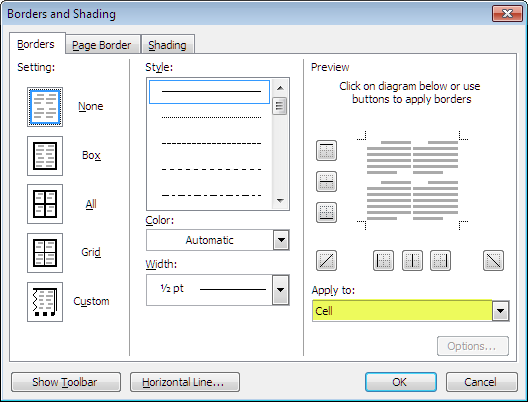
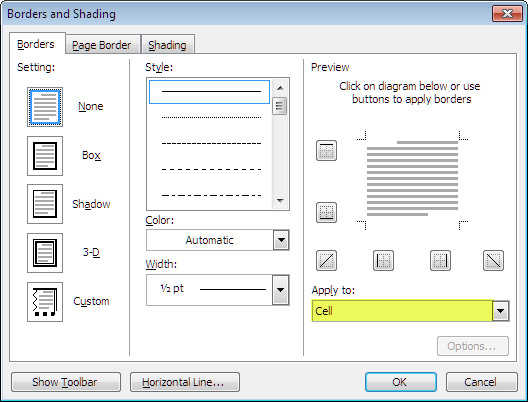
Borders and Shading dialog for a single cell The biggest difference, however, is in the available presets. As shown, when a single table cell is selected, they are the same as for a paragraph. But when the entire table or more than one cell is selected, the presets change to None, Box, All, Grid, and Custom. None and Custom are self-explanatory, and Box works the same as for paragraphs: whether applied to a cell or cells or an entire table, it puts a box border around the entire selection. All is also pretty straightforward: it applies a border of the currently selected style, weight, and color to every cell in the selection. The Grid preset is a little confusing, however. If you haven’t changed any of the default settings, it appears to do the same thing as All: it borders every cell with a line of the same weight. But if you select a heavier line weight before applying the Grid preset, you will get that heavier line around the outside of the table (or selection) and the default ½-point line inside, just as the preset picture implies. The real fun comes if you want the inner borders to be something other than ½ point. If you change the line weight to ½ point, then you get that for all the borders again (effectively All). Instead, you must first select one of the inside borders (horizontal or vertical), which will give it the same weight as the outside border, select the new weight, and then click the same border again. At that point you can click the other inside border to apply the same weight. You may have noticed that the Borders and Shading dialog for tables includes two buttons that aren’t in the dialog for paragraphs. On the Borders flyout and toolbar, they are labeled Diagonal Up Border and Diagonal Down Border, and they are the two buttons that are disabled when the insertion point is in paragraph text because they are usable only in tables. What those buttons do is create diagonal lines that intersect your text like this:
They do not actually split your cell diagonally; they just create the appearance of doing so. If you want to further this deception, you will need to format text accordingly:
Table border optionsThere aren’t any! You will have noticed that the Options… button is disabled. That’s because the “Distance from text” in tables is determined by Spacing Before/After (which is applied to the text inside the cell) and left/right indents. You can also add cell padding (which Word calls “cell margins”) through the Table Properties dialog (in the Table Options dialog for the whole table or the Cell Options dialog for individual or selected cells). Some “gotchas”
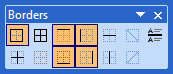
Shadowbox border The Tables and Borders toolbarYou may have noticed in all the screen shots above a button labeled Show Toolbar. If you click this button or the corresponding Tables and Borders button on the Standard toolbar, you will open the floating Tables and Borders toolbar.
Standard toolbar showing Tables and Borders button
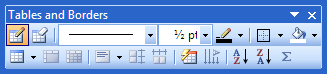
Tables and Borders toolbar Although this toolbar is by default floating, you can, if you like, dock it at the top or bottom of your screen to get it out of the way. (Docking it at the side is not recommended; if you do that, the dropdown list boxes become buttons that bring up the Borders and Shading dialog.) Although some of the buttons on the toolbar are specifically for working with tables, there are some tools that can also be used for paragraph borders. With this toolbar you can accomplish many of the same things you can do in the Borders and Shading dialog, although for most purposes, the Borders and Shading dialog works better. You can choose a line style, weight, and color and, using the Borders palette, apply borders to an entire table (or paragraph) or selected cells. (You don’t have access to the Options tab, but this is unavailable in tables, anyway.) The Borders palette has ten buttons you can use to apply Inside, Outside, Top, Bottom, Left, or Right borders or a grid (All) or to remove borders entirely (No Border). You can also remove borders selectively by clicking “on” buttons to turn them off. The border applied by the buttons on the Borders palette defaults to the most recently selected style, weight, and color, which is displayed on the toolbar. If you will be applying many borders of the same weight to selected sides of selected table cells, you may find it more convenient to display the Borders palette alone. In the same way as with the Borders button on the Formatting toolbar, you can tear off the palette by dragging on the dotted lines. You can then close the Tables and Borders toolbar, leaving the Borders palette floating. This little toolbar doesn’t really get in the way, but you can dock it on any side of your screen if desired. One thing the toolbar is good for is applying fills; in Word 97 and above, when you apply a fill using the Borders and Shading dialog, it often changes your borders in unexpected ways. Unfortunately, there are also some disadvantages to using the Tables and Borders toolbar:
Drawing tablesAs mentioned above, the Draw Table button on the Tables and Borders toolbar is automatically turned on when you display the toolbar. This may tempt you to try to create your table by “drawing” it on the page. Please don’t! I have yet to find a table that could not be effectively created using Insert Table and then adjusting cell widths and merging or splitting (and/or applying borders selectively) as needed. And I have seen (and corrected) some horrible messes made by inexpert users using Draw Table (actually, even for expert users, it is very difficult to avoid making a mess of your tables if you use this tool). Care should also be taken using the Eraser. When you click on a cell boundary with this tool, the result is to merge the two adjacent cells. That result can also be achieved by selecting the two cells, right-clicking, and choosing Merge Cells. What the Eraser tool is best suited for is merging columns. If you select two columns and use Merge Cells, the two columns become one big cell. If you want each row of the two columns to be preserved, then you can activate the Eraser button and carefully drag it over the boundary between the two columns.
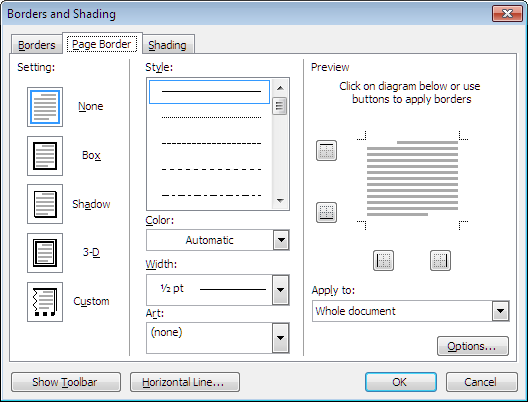
Page bordersCompared to text and table borders, page borders are relatively straightforward. They are applied through the Page Border tab of the Borders and Shading dialog.
Page Border tab of the Borders and Shading dialog The presets are the same as for text paragraphs (None, Box, Shadow, 3-D, and Custom) and the borders are applied to some or all of the sides in the same way as to text paragraphs, using the presets or the Preview buttons. There are, however, two aspects in which page borders differ from paragraph borders. Page border optionsBy default, a page border is 24 points (⅓″) from each side of the page. For printers, especially inkjet printers, that can’t print that close to the edge (especially on the trailing edge—bottom of a portrait page or one side of landscape), this means that one side of the border will be cut off (see “The bottoms of my pages don't print”). The Options… button in this dialog opens a new dialog that, like the one for paragraph borders, is titled Border and Shading Options, but it has specific settings for page borders.
Border and Shading Options dialog for Page Borders As with paragraph borders, the range of distance settings is from zero to 31 points, so the largest setting, which is less than half an inch, may still not be enough to get the border out of the nonprintable area. The trick is to change the setting from “Edge of page” to “Text.” This setting is a little misleading because the distance is not actually measured from the text itself but from the page margins (which define the outer limits of text). When you change this setting, the default measurements also change:
Border and Shading Options for Page Borders (from text) As can be seen, the default distances are the same as the default for text paragraphs: 1 point top and bottom, 4 points left and right. Again, you can set them as high as 31 points (almost half an inch from the margins). The Border and Shading Options dialog also includes four check boxes. Three of these are available only when “From text” is selected:
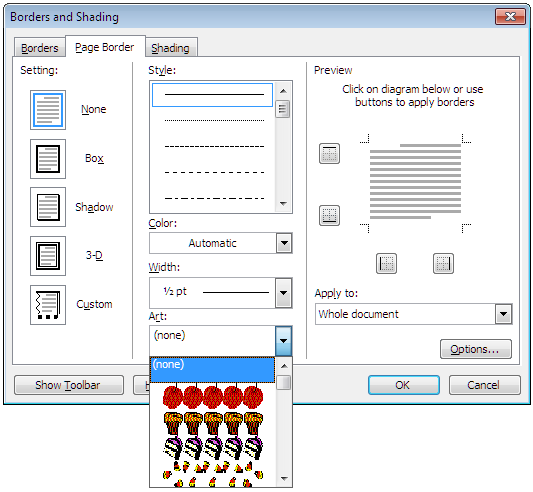
The fourth option, “Always display in front,” which is always available, determines whether a graphic in the margin area displays behind or in front of the page border. Border artBorder art originated in Microsoft Publisher. It seems to have been there pretty much from the beginning, offering 160 “art” borders that could be added to any text frame or graphic; it was introduced to Word in Office 97 but (thank goodness!) only for page borders. You may not have a burning desire to surround your page with apples or maple muffins or slices of cake or candy corn (the “art” shown below), but if you persevere through the dropdown of all 160 styles, you will find that there are a few that are actually useful and attractive. And, unlike in Publisher, where art borders are all-or-nothing, you can apply Border Art to a single side or several, not just all four.
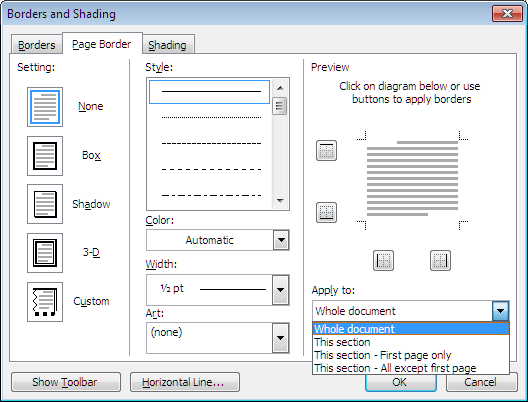
Borders and Shading dialog for Page Borders showing Border Art On the other hand, the selection of Border Art in Word is limited. Unlike in Publisher, you cannot create custom Border Art. If you want a border using different pictures, you will have to create the border manually, anchored to the page header, as described in my article on “Creating Custom Page Borders.” Where the page border appearsAs shown in the screen shot above, the default is for a page border to apply to the entire document and appear on every page. But the dialog does offer other options:
“Apply to” settings for page borders Not really a border at allOne additional button in the Borders and Shading dialog is Horizontal Line, which opens this dialog:
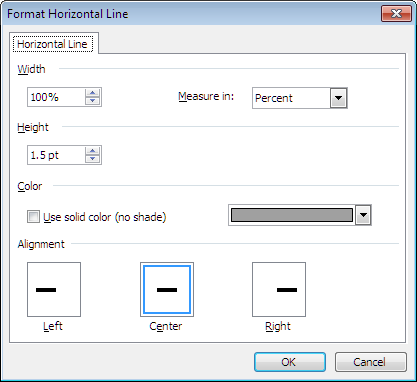
Horizontal Line dialog This dialog offers a selection of plain and fancy lines that are actually graphic objects (the same graphics can be found by searching the clip art collection for “divider”). The default Horizontal Line is a thin grey line from margin to margin.
If you right-click on the line and select Format Horizontal Line, you get this dialog:
Format Horizontal Line dialog As you can see, you can adjust the length and width (although in fact you can actually do this by dragging the sizing handles that appear when you select it). If you have inserted the default grey line, you can change the color; this option is not available for the “fancy” lines. Since the object is In Line With Text, you can adjust its position using Spacing Before/After in the Paragraph dialog. This feature is really just a shortcut to inserting a piece of “divider” clip art. [1]This shortcut runs the TableUpdateAutoFormat command. “Table AutoFormat” is the previous name for what is now called a “table style.” The default table style is Table Grid, and when you run this command, that style remains in effect. If you reapply it, you have borders again, so the style itself has not been updated. It is therefore not clear what this command is really doing except removing the default border, which is what you want.
This article copyright © 2017, 2023 by Suzanne S. Barnhill. This article was originally published on the Word MVP FAQ site and was enhanced with screen shots added by Webmaster Dave Rado. A few of these screen shots have been reused here. |


.png)
.png)