|
|
How to set up a letter templateWhether you use Word in an office or in your home, one of the tasks you probably use it for most often is writing letters. If you’re in a big corporate or law office, you probably have fancy preprinted letterhead and a template set up by some corporate IT person. But if your office is small or you’re a home user, you are the IT person, and you need to know how to set up a template for creating letters.1 This article will explain how to set up such a template, either for printing on preprinted letterhead or to print the letterhead along with the letter.
Letterhead for a one-page letter Letterhead for a multi-page letter More complex letterhead (different margins on first page) Letterhead for a one-page letterIn this section you will learn to create or use letterhead that looks like the example below:
Figure 1. A simple letterhead New users often begin by typing a letterhead at the top of the document body. But the default 1″ top margin may put this letterhead too far down, and if you change the top margin, it will be too small on page 2. Moreover, when you create a new document, the insertion point will be at the beginning of the letterhead instead of where you want to begin the letter. The proper place for the letterhead, therefore, is in the document header. Any text you put in a header appears on every page of the document, and you won’t want the letterhead on your second sheets. Luckily, Word allows you to have a different header just for the first page of any document, and a little later we’ll see how to do that. For now, here’s how to set up a letter template for short (one-page) letters using Word’s default margin settings (1″ top and bottom, 1.25″ left and right, and 0.5″ header and footer). Printing your own letterhead
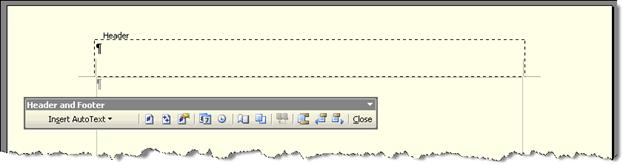
Figure 2. Header pane and Header and Footer toolbar
Figure 3. Typical letterhead for a small law firm
Creating a header for preprinted letterheadIf your letter will be printed on headed letter paper (preprinted letterhead), all you need to do is assure that the body of your document will not overlap the printing. If the letterhead is confined to the top (header) and bottom (footer) of the paper, this is relatively simple. If the letterhead includes elements at the sides of the page, see “More complex letterhead” below. For one-page letters, you might find it easiest to increase the top margin enough to clear the letterhead. There is nothing wrong with this method except that it is not what you will want to do when you have longer letters. So you will be better advised to follow the procedure that follows. On a sheet of the preprinted letterhead paper, measure from the top to the point below the printed portion where you want your letter to begin; be sure to allow some “breathing room” because the letter will start at the top margin you establish. Let’s say that measurement is 2″. The default header margin in Word is 0.5″, and the default top margin is 1″. This allows half an inch for a header, but a header can be as deep as you want it to be; it will push the document body down to make room for itself. (But a deep header on page 1 will not affect the top margin on page 2, where your header may be only one line deep.) So what you want to do is add enough Spacing After to the Header paragraph to make it push the top margin down to the 2″ mark (Format | Paragraph and use the spinner beside Spacing: After: or type directly into the box). This may require some trial and error, but it helps if you know that there are 72 points in an inch. The Header paragraph (in Word 2000 and above) is in 12-pt type and is already half an inch from the top. So if you multiply 1.5″ by 72 and subtract 12, you get 96 points, which turns out to be about right. Test by returning to your document and looking at the status bar to see what the “At” measurement is for the top line. If there is printing at the bottom of your letterhead that requires a larger bottom margin, use the same technique to increase the footer: add Spacing Before to the Footer paragraph to push the document body up. Note, however, that a 1.5″ bottom margin is conventional on business letters, and this is adequate to accommodate most preprinted footers. Letterhead for a multi-page letterWhether you’re using preprinted letterhead or creating the letterhead as part of your letter, you may run into the problem of what to do when your letter is more than one page long. Whether you have inserted your letterhead in the header or just allowed a deeper margin to accommodate it, you don’t want the letterhead or deeper margin on the second page. Users sometimes go to extraordinary lengths to work this out, but the procedure is really quite simple. The following steps will outline the most efficient way to do it, which is not necessarily the way you will want to do it the first time you try (I’ll address that at the end).
Figure 4. Header and Footer toolbar showing Insert Page Number button
John Doe 2 March 19, 2004
Figure 5. Header and Footer toolbar showing Page Setup button
Figure 6. Layout tab of Page Setup dialog
I acknowledged that this order of creation is unintuitive because it requires you to start with page 2. Beginners are often skeptical about or confused by this. If you doubt that your Header has been saved, enter a manual page break (Ctrl+Enter) and View | Header and Footer or view the page in Page Layout/Print Layout view to reassure yourself that the Header is still there (be sure to Backspace to remove the page break before saving your template). Or you may be more comfortable starting out with two pages of text so you can see how it will look with the headers and footers in place. For this purpose you may want to insert some dummy text. More complex letterheadAs you’ve seen, having a different header and footer on the first page allows you to, in effect, create a different top and/or bottom margin on the first page. But what if you need a larger left or right margin to accommodate letterhead elements at the side of the page? This is where you have to get really creative. The standard method of accomplishing this is a borderless3 text box or frame in the margin, anchored to the header paragraph. In other words, while the insertion point is in the header pane, draw a text box or frame at the side of the page. For this purpose, it won’t make much difference whether you use a text box or a frame; use whichever you are more comfortable with. You don’t have to get the size and position exactly right when you first insert it; you can fine-tune these using Format Text Box or Format Frame. The idea is to make the text box or frame overlap the document body area just enough to push the letter text out of the way of the printed letterhead. This may require some trial and error. Text will automatically wrap around a frame; to make it wrap around a text box, you may have to change the wrapping on the text box from “In Front of Text” or “None” (the default in some versions of Word) to “Square” (Layout or Wrapping tab of the Format Text Box dialog). Note that the text box or frame will, by default, have a border or outline. To remove this:
Once you have removed the outline from a text box or the border from a frame, it will be invisible except when selected. To make it easier to see and work with, you may want to display text boundaries by checking the box for “Text boundaries” at Tools | Options | View. If you’re replicating actual letterhead with elements at the side, then you will need to be more precise in sizing and placement of your text box or frame and formatting the text inside it. You will also have to be more careful in setting the “Distance from text” to allow space between this text and the letter body. With some practice you can get results such as those shown in Figure 7.
Figure 7. Example of a letterhead with side elements One caveat about this type of layout: In most versions of Word, left indents and hanging indents either will not work at all or will not display properly (but may print correctly) when used next to the text box or frame. Again this will require some trial and error. Another approach to this type of layout, then is to use indented styles (instead of the text box/frame) on the first page of the letter, reverting to normal, unindented styles on page 2. This would require always allowing a paragraph break between the two pages, however. Body of the letterWord contains a number of built-in styles that you can use in your letter. These include Date, Salutation, Body Text, Closing, and Signature, which you can customize as you like. You may want to add Inside Address, Subject Line, Copy List, and Enclosures. You can save yourself a lot of work by setting these styles up carefully. Since the body of your letter is going to have a single empty paragraph in it anyway, apply the Date style to this. If you send most letters the same day you compose them, you can save even more time by inserting a CreateDate field in this paragraph (see “Making a date”). Whether you leave the paragraph empty or have Word fill the date in for you, you can make Word set up your next paragraph for you. Go to Format | Style, press Modify…, and change the “Style for following paragraph” to Inside Address (or whatever you have called the style you use for this purpose). Now, when you press Enter at the end of the Date paragraph, you will be in a new paragraph formatted with the Inside Address style. In similar fashion, set the following style for Inside Address to be Salutation (or Subject Line if your letters usually include one). The following style for Salutation should be Body Text. You may want to create empty paragraphs in all these styles that you can just click and type in. Whether you do this or not, you may want to type in your complimentary close (Closing style) and signature (Signature style), followed by an empty paragraph formatted in the Enclosures or Copy List style if you use these often. __________________ 1If you have never created a template of any kind, you may want to first look at this article, which explains the basics. 2If you have changed your left and right margins, you will need to move these tab stops so they are in the center and at the new right margin. 3To remove the border from a text box, go to the Colors and Lines tab of the Format Text Box dialog and select No Line for the line color. To remove a border from a frame, choose None in the Borders and Shading dialog or No Border on the Borders palette on the Formatting toolbar. This article copyright © 2002, 2004, 2008, 2014 by Suzanne S. Barnhill. |