|
|
Making the most of headers and footers
I’m often surprised to find that certain Word users are completely unaware of the headers and footers feature in Word. In part, this is because, in earlier versions, Word’s designers hid it in an unintuitive location; in Word 2007 and above, users have no such excuse, since the tools appear both on the Insert tab of the Ribbon and on the contextual Header & Footer Tools | Design tab that appears when you access the header. Users who come straight from a typewriter to Word don’t think of using headers and footers because they’re used to manually typing text at the beginning or end of a page. It may not occur to them that there is a better way. But the header/footer feature in Word is one of its most useful tools, one that users need to learn how to take advantage of. When should I use a header or footer?There are two situations in which you should immediately realize that a header or footer is required:
Repeated textOne of the most common elements of a header or footer is a page number. Word makes it deceptively easy to insert page numbers. On the Insert tab of the Ribbon, in the Header & Footer group, are buttons to insert page numbers, a header, and/or a footer. What is not made clear is that most of the selections in the Header, Footer, and Page Number galleries are building blocks. If you insert a Page Number building block and then decide you want to add header content, you will find that inserting a Header building block will replace the Page Number (and vice versa). Those fancy building blocks can be effective once you learn to bend them to your will, but they are best avoided by beginners. Text that stays putThe most common example of text that belongs in a header is a letterhead. You want to put that at the beginning of a letter, and you want it to be out of the way of other text you will add, so that it doesn’t get pushed down the page. Usually you don’t want it repeated on every page, so you use a special kind of header for it. This is discussed briefly below and in detail in “How to set up a letter template.” Another example is text you want to stay at the end of a document, no matter how much text you add to the document. You can put that in a footer. Again, you don’t want it repeated on every page, but there is a way to achieve that, too, as will be detailed below. Accessing the header or footerHeader: The easiest way to access the header for editing is to double-click in the header space at the top of the page. If you don’t see this space, it may be that you have “white space between pages” hidden; double-click the area between pages to display it. Footer: The footer cannot be accessed directly by double-clicking, but:
When the header and footer are active, you will see the contextual Header & Footer Tools | Design tab of the Ribbon, which contains tools specifically for working with headers and footers (see Figure 1). Note that Word 2019 and above have simplified this tab to just Header & Footer.
Figure 1. The Header & Footer Tools | Design tab At the far right of the tab is a button to Close Header & Footer, but you can accomplish the same thing just by double-clicking back in the document body area.
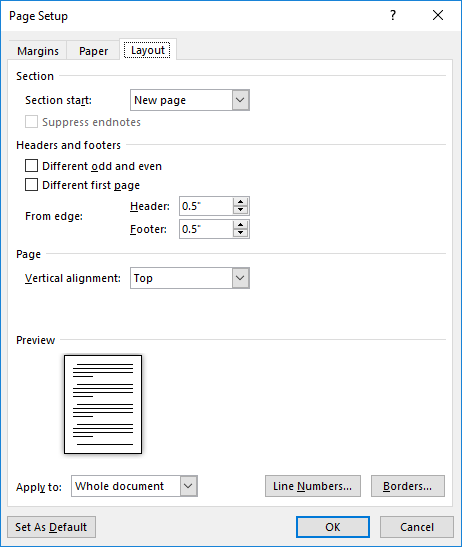
Setting header and footer marginsYou may think your document doesn’t have a header or footer because you haven't created any content for them, but Word is reserving space for them. This called the header/footer margin, and it is defined separately from the top and bottom margins. Logically the header and footer margins should be smaller than the top and bottom margins, and in fact the default is 0.5″ for header and footer and 1″ for top and bottom.1 If you have already opened the Page Setup dialog to set page margins (on the Margins tab), you can switch to the Layout tab to set the header and footer margins (see Figure 2)
Figure 2. The Layout tab of the Page Setup dialog showing default header and footer margin settings. If you have already accessed the header area, you will see the contextual Header & Footer Tools | Design tab, which allows you to set these margins in the Position group (see Figure 1). Creating a header or footerIf you have nonprinting characters displayed, you will see a paragraph mark (¶) in the header or footer pane indicating the empty Header or Footer paragraph. This is where you will type. By default, the Header and Footer styles have a center tab stop at the center of the line and a right tab stop at the right margin. (If you are unfamiliar with these terms, see the article “Setting tabs.”) You can use these built-in tab stops to place text at the left, center, and right of your header. If you have changed the side margins of your document, you will need to move these tab stops so they will be in the true center and at the new right margin. The easiest way to do this is using the ruler. Alternatively, you can use center- and right-aligned “alignment tabs,” which can be inserted from the Position group of the Ribbon; find more information about them here. As mentioned, the Header & Footer Tools | Design tab provides buttons for inserting many of the elements you might want to put in a header or footer.
What you can put in a header or footerAnything. Really! Most of the time you’ll be putting plain text (and fields that create text), but you can also insert graphics, tables, and almost anything else you can put in the body of the document. Moreover, you are not confined to the header/footer area. If you change the wrapping of graphics, text boxes, or WordArt from “In Line With Text” to “Behind Text” (or some other wrapping style), you can place them anywhere on the page. This allows you to create, for example, a watermark that appears behind the text in the middle of every page, or a page number or other text that floats in the side margin rather than at the top or bottom. When you use Page Layout | Page Background | Watermark in Word 2007 or 2010 or Design | Page Background | Watermark in Word 2013 or above, this is what Word is doing behind the scenes. For more detail on adding content that is not limited to the header/footer area, see “How to put a header anywhere on a page.”
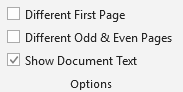
Types of headers and footersWhen you first access the header or footer, you will find yourself in a pane labeled “Header” or “Footer.” These are sometimes referred as the “primary” header and footer. You can, however, have up to three different kinds of header and footer in a given document or section. On the Header & Footer Tools | Design tab, in the Options group, there are check boxes for “Different First Page” and “Different Odd & Even Pages” (see Figure 3). As shown in Figure 2, the same check boxes are found on the Layout tab of the Page Setup dialog.
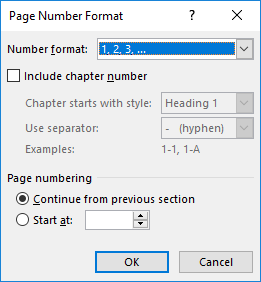
Figure 3. The Options group of the Header & Footer Tools | Design tab showing the “Different First Page” and “Different Odd & Even Pages” settings One very common use for the “Different First Page” setting is letterhead. What happens when you have more than one sectionOften you will need more than three different headers or footers. Perhaps you want to restart numbering, or you may want a special (or blank) First Page Header at the beginning of every chapter or section. In this situation, you will need to insert a section break (Page Layout | Page Setup | Breaks). The type of section break you insert will depend on the situation. Perhaps you’ll want an Odd Page break to start a new chapter on a recto (odd, right-hand) page, but often a Next Page break or even a Continuous break will suffice. Whenever you insert a section break of any kind, however, you get a new header/footer (or set of headers/footers if you’ve checked one or more of the boxes for different ones). By default, these are linked to the corresponding header(s)/footer(s) in the previous section, and in many cases you will not need to unlink them. You can restart page numbering and even change the number format without unlinking them: this is done in the Page Number Format dialog (see Figure 4), which you can access by selecting Format Page Numbers... from the Page Number dropdown in the Header & Footer group on the Insert tab or the contextual Header & Footer Tools | Design tab (Header & Footer in Word 2019 and above).
Figure 4. The Page Number Format dialog You can even have a different running head in every chapter if you use a StyleRef field to pick up the chapter title (see Word’s Help under “Field codes: StyleRef field” for more information about this; for still more, see “Useful StyleRef Tricks”). Whenever you do want to create a header or footer that is entirely different from the one in the previous section, however, you need to unlink the header or footer. You do this by clicking on the Link to Previous button in the Navigation group on the Header & Footer Tools | Design tab (Header & Footer in Word 2019 and above) to turn it off. Note that this can be done independently for each separate type of header and footer. For example, you can unlink the Odd Page Header in Section 2 from the one in Section 1 and leave the Even Page Headers linked. Unlinking the Footers doesn’t affect the First Page Footers. And so on.3 TroubleshootingWhen your document has more than one section, you can quickly cycle through all the headers or footers in the document using the Previous and Next buttons in the Navigation group on the Header & Footer Tools | Design or Header & Footer tab (in Word 2007, they’re labeled Previous Section and Next Section). This can help sort out difficulties caused by inappropriate linking or unlinking of consecutive headers/footers. Where it is not helpful, however, is when some of the sections have no visible header or footer. This is the case when there are Continuous section breaks in the middle of a page (such as when you have a multi-column section between two single-column sections). Since the header and footer of this “buried” section are inaccessible, numbering problems that arise there can be more difficult to solve. For example, say that you have restarted numbering in Section 2. If you then insert Continuous section breaks around a multi-column section on page 3 of Section 2, you have created Sections 3 and 4, with numbering restarting in each (because each new section inherits the formatting of the previous one). Sorting this out can be very frustrating but can be approached in one of two ways:
Clever tricks with headers and footersI mentioned that a common use of the First Page Header is for a letterhead or other text you want anchored to the beginning of a document. What about text you want to appear only at the end? For example, users sometimes want to put the filename and path just at the end of the document, not in the footer on every page. Unfortunately, Word doesn’t have a separate Last Page Header/Footer, but you can trick it into acting as if it did. What you need for this purpose is a “conditional header/footer” created with an IF field. Using the above example, if you wanted to put the filename and path in the footer on just the last page of the document, you could insert the following field in the footer (or both the Odd Page Footer and Even Page Footer if you have them): { IF { PAGE } = { NUMPAGES } { FILENAME \p } } This field tells Word that if the page number is equal to the total number of pages, the filename and path should be printed. Here’s how to insert the field:
You can use the same type of field to insert any text you want to appear on just the last page. Use the following format: { IF { PAGE } = { NUMPAGES } "Text you want to appear on the last page" } The “Text you want to appear on the last page” can be anything: several paragraphs of text, graphics, tables, an AutoText field—anything! Just type it, Copy it, and Paste it into the field. Header and Footer building blocksWord 2007 introduced the concept of “building blocks,” premade chunks of text and graphics than you can insert with a single click from a gallery of similar items. Among the building blocks are a number of attractive headers, footers, and page numbers. Although these can be a quick and easy way to dress up a document, some care is required in using them.
Creating headers and footers from scratchAlthough the building blocks make it easy for you to create a well-designed header or footer that matches other elements in your document, it can be awkward to modify their default content or design; you may want more complete control over what goes into your header and footer. There are basically two ways to start from scratch: (1) just open the header and start typing and (2) use the Blank or Blank (Three Columns) building block. If you have worked with headers and footers in previous versions of Word, you will know that the Header and Footer styles include a center-aligned tab stop at the center of the line and a right-aligned tab stop at the right margin. Unfortunately, if you have changed the document side margins from the default 1″, the tabs will not be correctly placed unless you modify these styles. The Blank (Three Columns) building block, however, has content controls aligned left, center, and right according to your current margin settings, and they will adjust if you change the margins. This might be a good reason (if you want this type of layout) for using the building block instead of just typing text in the empty header.
Other changes from previous versionsAs noted above, access to the header and footer, as well as to the Page Number Format dialog, are easier in Word 2007 and above. But users of previous versions may find themselves occasionally wishing for some of the features of the Header and Footer toolbar, such as the dedicated buttons for Insert Page Number and Insert Number of Pages, as well as the AutoText menu that included “Filename” and “Filename and path.” Although AutoText still exists in Word 2007 (and AutoComplete was restored for AutoText in Word 2010), there is nothing on the Header & Footer Tools | Design (or Header & Footer) tab that is exactly comparable to the AutoText menu on the Header and Footer toolbar. Its functions are replaced as follows:
More informationThis article has scratched the surface of several subjects covered in greater depth in other articles.
____________________________ 1The header margin determines where the top of the header will be; the header then extends downward from that point, pushing into the document body if necessary. Similarly, the footer margin determines the baseline of the bottom line of text in the footer, with additional lines extending upward toward or into the document body. This isn’t altogether obvious from Word’s display: the dotted line around the header encloses an area from the header margin to the top margin of the document, which makes sense, but the dotted line surrounding the footer extends from the top of the footer to the bottom of the page, which can be misleading. Once you have gained some experience of how headers and footers work, however, you will no longer find this disconcerting. [Back] 2Many of these buttons insert fields that will update automatically. For example, the PAGE field shows a different page number on every page, and the NUMPAGES field (which inserts the number of pages) changes as you add pages to the document. What you might not realize is that the Date and Time are also fields that will update every time the document is opened. If you want the date the document was created (a date that will not update), use the CREATEDATE field instead (for more on date fields, see “Making a date”). [Back] 3One caveat about multiple headers and footers in a section: the “Different first page” setting may be selected for each section individually, but the “Different odd and even” setting affects the entire document; if you check it for one section, it will be enabled for all. If you want the odd and even headers/footers in a specific section to be the same, you will just have to copy the text from the Odd Page Header/Footer into the Even Page Header/Footer (or vice versa). When you do this, make sure you haven’t introduced an extra paragraph. No matter how carefully you select the material to be copied (omitting the paragraph mark) and the paragraph to paste it into (including the paragraph mark), you will inevitably get an extra, empty paragraph that you will have to delete. If you don’t, the header/footer will be higher or lower on one page than on the other. [Back] This article copyright © 2004, 2008, 2011, 2014, 2018, 2023 by Suzanne S. Barnhill. |
.png)