|
|
Getting started in Microsoft WordThis article was written in 2001, so, unsurprisingly, a lot of it is obsolete. This material is being left in for the sake of nostalgia but distinguished by a different text color (purple). Is this article for you?If you’ve used a previous version of Word and are getting started in a new oneIf you’re an established Word user, this article is not for you. Although there may be much you can still learn about using Word, what you mostly want to know about is the new features in your upgrade. In Word 2000 and above, you can ask the Office Assistant “What’s new in Microsoft Word?” In Word 97, ask the Office Assistant or select the Contents tab in the Help file, click on Key Information, then any one of the sections of that chapter. Every one of them has a link to the “What’s new in Word 97?” article. It’s unlikely that you have one of the versions mentioned in the above paragraph, but the principle is still the same. In recent versions, you can ask Help “what’s new,” and you'll be pointed to an article on, say, “What’s new in Word 2021.” For older versions that are out of support, you can still google for the exact version—for example, “What’s new in Word 2010,” and be pointed to a relevant article. If you’re a former WordPerfect user migrating to WordThis article is not for you either, but there are several articles from the Word MVPs’ FAQ site that you may find helpful. These include “How Word differs from WordPerfect” and “Some tips and ‘gotchas’ for those who are new to Word, especially if migrating from WordPerfect.” Also see “Is there life after ‘Reveal Codes’?” If you’ve never used a word processing application beforeThis article is for you! Perhaps you’ve just bought your first computer, which came with some version of Microsoft Office installed on it. Unless you have explicitly purchased the latest version of Office (the perpetual-license edition) or a subscription to Microsoft 365 that includes “the latest desktop versions” of Office applications (some education licenses do not), what you have on your computer may be just links to the online versions of the applications. While many of the principles explained in this article will still apply, some features may not be available. So say that you do have an installed version of Office or Microsoft 365. You’ve figured out how to start Word, but now you don’t know what to do with it. If Word came with your computer, most likely you didn’t get any kind of manual; if you did get a “manual,” you may have concluded that it’s more a promotional document than an instruction book: it says a lot about all the wonderful things Word can do but is very vague about how to do any of them. That’s because Microsoft expects you to get help from the Help file (for more on this, see “Where’s the Paper Manual, Dammittt?!?!?!?”). Although you may find some helpful tips in this article, for a more methodical approach to learning Word, see Word MVP Shauna Kelly’s article “Basic Concepts of Microsoft Word.”
Using HelpHelp is one of the features that has changed most in recent versions of Word, so some of what follows may not apply to the version you have. The most dramatic changes occurred between Word 97, which used compiled Help, and Word 2000, which initiated the use of HTML Help. In Word 2002 and above, Help appears in the task pane, beside the Word window, instead of in a separate window on top of your document. In Word 2007 and above, Help will almost always take you to a web page; there is no local Help file. If you have the Office Assistant enabled, your first
question may be how to avoid Help rather than how to get it. The Office
Assistant is the cheerful fellow (his default persona is a talking paperclip
named Clippie) who pops up and offers to help you do what he thinks
you’re trying to do. If it’s not what you’re trying to do, or if you know
perfectly well how to do it, and you’d like to get rid of him, see “How
can I tame the Office Assistant?” for instructions on disabling him. If you
haven’t disabled him, you can summon him by pressing the
Figure 1. Type your question into this box to get Help in Word 2002 and 2003 If you have disabled the Office Assistant, F1 will
bring up the Help dialog (you can also access this directly through Help |
Contents and Index). The Help dialog in earlier versions has three tabs:
Contents, Index, and Find. The Contents tab is set up like a book, with
Help articles listed under chapter headings; this is the closest thing Word
offers to a paper manual, though you still can’t turn the pages and read from
one page to the next; you have to keep clicking on different subjects. The
Index tab has the Help topics listed in alphabetical order; sometimes it
takes a little ingenuity to figure out just the right way to look something up,
but the index is fairly complete. If all else fails, you can use Find,
but the first time you do this, Word will have to take some time to create an
index of the entire Help file so it can perform a full-text search. Word 2003
Help has dispensed with the index, and you won’t see any way to access the table
of contents unless you click the
In recent versions of Word (Word 2007 and above), Help can still always be accessed with F1. In addition, in every version there is another way to access Help. In Word 2007–2013, there is a button with a question mark on it above the Ribbon (top right corner). Word 2016 added a Help tab to the Ribbon (present in all later versions) and a “Tell me what you want to do” search box above the Ribbon (abandoned in Word 2021). For a look at the Ribbon in all versions from Word 2007 to Word 2021 (plus Word Online), see “The Ribbons of Microsoft Word.” One of Word’s greatest strengths, however, is context-sensitive Help. In most dialogs you will see a button with a question mark on it (usually in the upper right corner next to the X button that closes the dialog). If you click on this button and then on something you have a question about, you will usually get a popup box with some helpful information.1 Sometimes (as in the Insert | Field dialog) you’ll get an entire Help topic. So don’t be afraid to ask! Basic assumptionsFor the purposes of this article, I’m going to assume that you know how to create a new document (or use the one Word presents you with), save it, and later find and open it again (either from the Recent Documents list on Word’s File menu, through Word’s Open dialog (for which you can add a button to the Quick Access Toolbar), or in Windows Explorer/File Explorer). Different users have different ways of working. The first thing I do when I turn my computer on in the morning is start Word, and I leave it running all day, so it is easiest for me to find and open Word documents through Word’s Open dialog (in Word 2003). If you don’t use Word very often, you may find it more convenient to find the document in Windows Explorer/File Explorer and double-click on it there. All of these methods work equally well for opening native Word documents. If you want to open in Word a file created in another application, see “Importing files into Word.” I’m also going to assume, since you were smart enough to get online and find this website, that you have mastered Windows basics: how to open, close, and otherwise deal with windows; how to choose menu items and handle dialogs. I’ll assume that you know how to use a mouse to move your insertion point and select text and that you know how to move around in your document. In other words, I’m going to assume that you know how to use a Windows application in general and are here looking for specific tips on how to get the most out of this particular application. One of the first things required of you, therefore, is that you abandon old ways of thinking about creating documents. Word is not a typewriterIf you’ve never used a word processor before, chances are you’re either quite young (and still in school) or—shall we say—“mature.” If you’re a student, you’re probably getting adequate instruction from your teachers. What are you doing here, anyway? Stop goofing off and get back to your studies! But if you are getting started in word processing at a more advanced age, chances are you have some experience with a typewriter. When you first start using Word, you may be tempted to treat it like a typewriter. After all, the computer keyboard looks very much like a typewriter keyboard, and you already know how to type. But getting the most out of Word (or any word processing application) requires a number of adjustments to your working method. Ration your use of the Enter keyIf you have moved up from an electronic typewriter, you may be used to “automatic return” or “word wrap,” but if you have been used to an ordinary electric or even a manual typewriter, you may be accustomed to pressing Return or using the carriage return lever at the end of each line. In Word you don’t have to do this, and there are good reasons for not doing so. You can see a good example of why this is not a good idea if
you Suppose you start with the default blank document in Word, which has 1-inch left and right margins. When you reach the end of the page, you realize that you have just a little more to add. If you reduce the left and right margins just slightly, you can get everything on one page, but if you have pressed Enter (inserted a paragraph break) at the end of each line, your text will not spread out to the new margin width and reflow naturally. This is usually not a very difficult habit for new users to learn. No matter how long you have been using a typewriter, it is very easy to become spoiled by Word’s word wrap and get used to letting Word do the work. The important thing to remember is not to press Enter except when you want a new paragraph. And it is important to realize is that a paragraph is a very special thing in Word. It is a container with its own specific formatting, including indents, tabs, line spacing, space before and after, and so on. For this reason, you may sometimes want to begin a new line without beginning a new paragraph (you’ll learn more later about the reasons for this). For such situations, Word has the “line break,” which you can insert with Shift+Enter. Be sparing with the Tab key, tooNo matter how sophisticated your typewriter, you probably had to press Tab to get a first-line indent. You also had to set tab stops and press the Tab key to align tabular material. Even when you have broken yourself of the habit of pressing Enter at the end of each line, it may still be second nature to press Enter and then Tab to begin a new paragraph and indent it. Once again, Word can save you the trouble. If you want your paragraphs to have a first-line indent, you can add this to your paragraph formatting. In the Format | Paragraph dialog, under “Indentation: Special,” select “First line” and enter the amount of indent you want (an easier way to do this is with the ruler). Now every time you press Enter, your paragraph will automatically be indented by the amount you specified.
Figure 2. Format Paragraph dialog showing first-line indent setting When you set a first-line indent, you may be tempted to make it half an inch. Word’s default tab stops are set half an inch apart, so that’s the indent you get if you use the Tab key, and that may be what you’re used to using on a typewriter. But if you are using Word’s default font, Times New Roman, you will probably find that a smaller indent is adequate and indeed looks better. For more information on such typographical considerations, see “Typographical Tips from Microsoft Publisher.” You can also use Format | Paragraph or the ruler to set a hanging indent (that is, the first line is flush left and the remaining lines are indented) or indent the entire paragraph from the left and/or right. You should never need to use the Tab key to indent a paragraph, and only rarely to indent a single line. As for tabular material, you can still use tabs for simple tables, but for heaven’s sake don’t use the built in tab stops! Set tab stops just where they are needed, as discussed in “Setting tabs.” For complex tabular material, however, you’re much better off using Word’s Tables feature (for more on this, see “Tables, creating, Create a table” and “Tables, About working with tables” in Word’s Help file in Word 97; in later versions, see “Create a table”). For more information, see “Word Table Basics (Toolbar)” or “Word Table Basics (Ribbon),” as appropriate. Don’t be liberal with spaces, eitherMost likely the typewriter you used printed evenly spaced characters, using what in computer terms is called a “monospaced font,” such as Courier New. Since every character was the same width, a period or colon was as wide as the widest capital letter, and it made sense to put two spaces after one to make it clear where a sentence ended. But if you’re using Times New Roman or another “proportional font,” you will find that a single space is adequate, and using just one space after a period or colon will help prevent “rivers of white” in your text. For more on this, see “Typographical Tips from Microsoft Publisher.” Don’t press Enter twice between paragraphsIf you are single-spacing your text, you will probably want a double space or “blank line” between paragraphs. On a typewriter, you’re used to achieving this by pressing Return twice. But pressing Enter in Word creates a paragraph, and there are good reasons for avoiding “empty paragraphs.” If you work with nonprinting characters displayed, you will see each paragraph represented by a pilcrow or paragraph mark (¶), and a bunch of empty paragraphs makes a very busy and unattractive page, which should be enough incentive to avoid them! Another good reason is that they are not suppressed at the beginning or end of a page, and so you may have extra space at the top of a page that you don’t want. Worse still, if you insert an empty paragraph between a heading and the following text, the heading, which is formatted to stay with the following paragraph, will stay with the “blank line” but not with the text paragraph after it. The correct way to add space between paragraphs (as much or as little as you want) is to use Spacing Before and/or Spacing After. You can select this in the Format | Paragraph dialog (see Figure 2). Although the spin boxes advance in increments of 6 points (1/12 inch), you can type any measurement you want into the boxes (from 1 point to 1,584 points); you can even enter measurements in inches, and they will be converted to points. One good reason for adding Spacing Before or After is that you really don’t need an entire line space between paragraphs. Although you can easily add 12 points before a paragraph by pressing Ctrl+0 (zero), this is usually overkill; 6 points is normally plenty. If you use the Body Text style for your ordinary text paragraphs, you will see that its default formatting includes 6 points Spacing After. But what if you have Spacing Before or After your paragraph and you need to end a line short and begin a new line? If you press Enter, there will be space between the paragraph you just ended and the new paragraph you just began, when you really want these short lines to be part of the same paragraph. That is when you use a line break (Shift+Enter). It begins a new line without beginning a new paragraph. An example of when you might want to use this is in typing poetry: the verses in each stanza probably end short of the margin, but you don’t want to press Enter because you have added space between paragraphs (stanzas); so press Shift+Enter at the end of each verse and Enter at the end of each stanza. Avoid all caps and underlined textIf you had an electronic typewriter, you may have been able to create bold type; you may even have had a choice of two or more type sizes. But if you had an old-fashioned electric or manual typewriter, the only way you could add emphasis or make text more important or bigger was to put it in all caps or underline it. You also had to underline titles that in printed text would be italicized. In working with a computer you will find that the underlining in many fonts is too close to the text to be very attractive, so you probably won’t want to use it very often—and you won’t need to. In Word, you can use italics where they are needed (for emphasis and for titles of complete works), and you can also use bold for emphasis. For titles and headings that need to be more important, you can use larger type. When you make type larger, you usually do not even need to make it bold to make it more important. Many users don’t realize what a range of type sizes they have at their disposal. The dropdown font list on the Formatting toolbar lists font sizes from 6 to 72 points (there are 72 points in an inch, so these sizes range from 1/12 inch to one inch in height). But Word can scale type from 1 point to 1,638 points (22 inches, Word’s paper size limit) in half-point increments. To get a size that is not listed, click in the font size box; this selects the size that is currently entered. Type in the size you want, and press Enter. For example, if 11-point type is Too Small and 12-point is Too Big, type in 11.5, press Enter, and you will have the size that is Just Right! Word makes applying font formatting easy. There is an entire toolbar devoted just to character and paragraph formatting, with buttons for bold, italic, and underline (you can also add buttons for small caps, double underline, strikethrough, etc.). But it is easier still if you learn some basic keyboard shortcuts, such as Ctrl+B to toggle bold, Ctrl+I for italic, Ctrl+U for underline, and Ctrl+Spacebar to remove all direct font formatting. In Word 97, if you want to bold or italicize an entire word, you need only click in the word; only if you want to format a portion of a word or more than one word do you have to select the text first. In Word 2002 and 2003, this doesn’t work unless you have “When selecting, automatically select entire word” checked on the Edit tab of Tools | Options, but you may not want to enable that option since it makes it impossible for you to select just part of a word. When applying font formatting, you can double-click to select a word, triple-click to select a paragraph, or Ctrl+click to select a sentence (or what Word thinks is a sentence). Note that, if you want to be able to apply formatting to just part of a word, you do need to disable “When selecting, automatically select entire word” at File | Options | Advanced: Editing options. Learn to use stylesOne of the most powerful features of Word—better even than automatic footnotes and endnotes, cross-references, and tables of contents, as magical as these may seem to the beginning user—is styles. Although styles are the most efficient way to apply formatting, most beginning users have no idea what styles are or that they are even using a style. When you start Word and begin to create a document, unless you explicitly choose another template from the File | New dialog, your document is based on the Normal.dot template (Normal.dotm in Word 2007 and above). And if you don’t choose any other style from the Styles dropdown list, Quick Styles Gallery, Styles pane, or you are using Normal style (left-aligned, single-spaced, no space before or after, no indents). And if you don’t make any changes to the character formatting, you are using the Normal font. This is plain-vanilla Word. If you want to get an idea of some of the other possibilities available, open the Styles pane (press Ctrl+Alt+Shift+S or use the dialog launcher in the bottom right corner of the Styles group on the Home tab) and click on the Options... button. Set the Style Pane Options to show “All styles” and select Alphabetical order. You can see that Word has built-in styles for almost every purpose. Some of them are used automatically: The Header and Footer styles are automatically used in the header and footer, the Footnote Text and Endnote Text styles are used for footnotes and endnotes, with Footnote Reference and Endnote Reference for the reference numbers, the index uses Index styles, the table of contents uses TOC styles, etc. If you create a document based on a template other than Normal, you may find that there are additional styles suited to the purpose of the template. For example, in a letter you might have special styles for the date, inside address, salutation, body text, complimentary close, signature, and so on. If you choose a different template of the same type (a different letter template, for example), you will see that it has styles with the same names but different formatting. That’s what a style is: a defined set of paragraph and font formatting. Recent versions of Word also have different themes and style sets that can be applied to a document that result in different formatting for the same styles. The reason styles are so powerful, though, is not only that you can apply a whole constellation of paragraph and font formatting with one click but that you can easily change the formatting, and all the paragraphs formatted with that style will change. For example, suppose that you are typing a typical term paper or thesis with several heading levels, some body text, some block quotations, and so on. You start out in Normal style, and you never apply any other style; you apply all the formatting directly. You make your #1 heads left-aligned and all caps, say, and your #2 heads left-aligned and bold. The body text paragraphs you give a first-line indent and some space after. Now suppose that after you’ve typed 50 pages your instructor or thesis advisor or graduate program thesis czar tells you that the #1 heads must be centered and the #2 heads underlined instead of bold, and that the body text must be double-spaced, with no extra space between paragraphs. Woe is you! You’re going to have a lot of reformatting to do. But suppose that you had applied Heading 1 and Heading 2 styles to your #1 and #2 heads and Body Text style to your body text, defined as you wanted them (for instructions, see “How to apply a style in Word”). When you learn that you have to change the formatting, you need only modify the style, changing the formatting as necessary, and watch all your headings and body text change accordingly! Moreover, when it comes time to generate a table of contents, Word can’t do this without some clues. If you’ve used the built-in heading styles, this is very easy, but you can still build a TOC with user-defined styles provided you’ve used them consistently. There is much more that can be said about styles and templates, and it’s been said elsewhere. To learn more, see “Creating a Template” and “Creating a Template (Part II).” Familiarize yourself with your toolsThere is a saying, “If all you have is a hammer, every problem looks like a nail.” In a pinch, you might be able to use a hammer in place of a screwdriver or wrench, but you can be much more efficient with the correct tool. One of the most confusing aspects of Word is that there is often more than one way to do a given job. Sometimes one is clearly superior; at other times it may be hard to decide which is best (often the ramifications of your choice will not become evident until much farther down the line when you have invested too much time and effort in your decision to change it). The best way to prepare yourself for such decisions is to become familiar with the tools that are available to you; you will certainly never decide to use a feature you are unaware of. That is why I always suggest to new users that, whenever they have a little free time, they explore and experiment. As you become more comfortable in Word, you may want to customize it. ExploreInvestigate every menu, every dialog. Get in the habit of asking yourself, “What does this mean?” “What is this for?” “What does this do?” “What could I do with this?” As mentioned earlier, most dialogs provide context-sensitive help (the question mark button at the top right). Click on that button and then on the feature you don’t understand. Even if the popup help doesn’t tell you everything you need to know, it may use terminology that will help you find a fuller explanation in Word’s Help file (or online, using a search engine or by asking questions in the Microsoft Community forums). You can also browse in the Help file (perhaps using the Contents view for a more organized ramble) to discover new features. One Word feature that is very helpful is ScreenTips. When you hover your mouse over a toolbar or scroll bar button or status bar section, a popup box will tell you (briefly, sometimes even cryptically) what the button or control does. If you are not seeing these tips, open the Customize dialog (by choosing Tools | Customize or by right-clicking on the menu bar or any toolbar and choosing Customize or by double-clicking on an empty space on any toolbar). On the Options tab of the Customize dialog, be sure the box for “Show ScreenTips on toolbars” is checked.
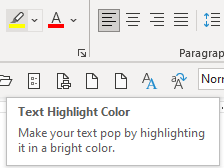
Figure 3. ScreenTip for Print Preview button Word 2007 introduced a new wrinkle with ScreenTips. In addition to the ScreenTip itself, you can get a brief explanation of what it does. Here's an example from Word 2021.
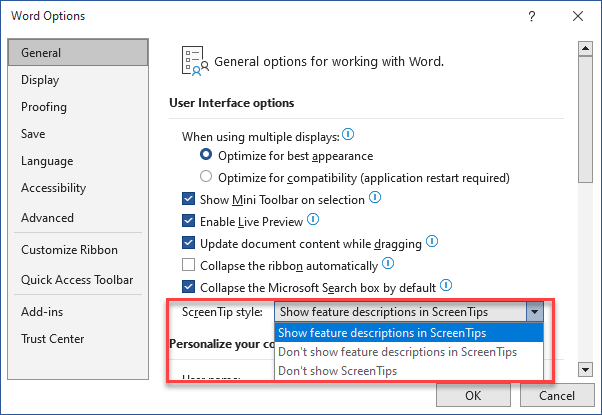
Figure 4. ScreenTip for Text Highlight Color This display is probably enabled by default, but if not, or if you want to change it, the setting is at Office Button | Word Options | Popular in Word 2007 and File | Options | General in later versions.
Figure 5. ScreenTip style setting in Word 2021 ExperimentWhen you have some idea what a feature is supposed to do, try it out. Don’t be afraid to experiment with Word’s features. Most beginning users are afraid to get in over their heads, and certainly it is possible, indeed easy, to make a really big mess in Word by not knowing what you’re doing. But it is very difficult to do anything in Word that can’t be undone and almost impossible to “break” Word. You stand a much better chance of not messing up an important document if you have experimented with features ahead of time in a throwaway document. There are just three important principles to remember:
All the above apply to working with documents. Some changes you make in Word cannot be Undone. You can get an idea what they are by looking at Word’s Undo list (click the arrow beside the Undo button to drop down the list).
Figure 6. The Undo list Save and Print, for example, are commands that can’t be called back, but you can protect yourself from the effects of injudicious saving by checking the box for “Always create backup copy” on the Save tab of Tools | Options; this guarantees that the previous version will always be available. In Word 2007 and above, this setting is at Office Button | Word Options | Advanced: Save (Word 2007) or File | Options | Advanced: Save (later versions). Changes you make to Word’s default template, Normal.dot, such as AutoText entries, toolbar customizations, changes in styles, and so on, although they appear to be implemented immediately, are actually not saved until you quit Word. Check the box for “Prompt to save Normal template” on the Save tab of Tools | Options (in Word 2007 and above, this setting is “Prompt before saving Normal template,” and it’s in the same location as “Always create backup copy”). That assures that Word will not save without asking you. If you have any reason to feel you have made changes you don’t want to keep, you can always “Just say no.” And you can get a fresh start at any time by renaming the Normal.dot file (for instructions, see “Why is my ‘Blank Document’ not blank?”). CustomizeAs you work more with Word, you will probably find that there are some features you use a lot and others you will probably never use. If you have Word 2000 or above and have not disabled the “adaptive menu” feature, you’ll find that the commands you use have gradually risen to the top of the menus, so they’re easy to find. But you may still want to perform some surgery on your toolbars to remove some buttons and add others. This is not the place for a lesson in how to use the Customize dialog, but you can find help in the articles “How to assign a Word command or macro to a toolbar” and “How to assign a Word command or macro to a menu” (for Word 2003 and earlier only) or “How to add a command or macro to the Quick Access Toolbar” (for Word 2007 and above). You may also want to look at “How to assign a keyboard shortcut” (creating keyboard shortcuts) and “How to change the default settings for Word documents.” Importing files into WordIf you want to open in Word a file created in another application (such as WordPerfect), you will need to do it through Word’s File Open dialog. The reason for this is that Windows associates the .doc extension (which is applied to all Word documents whether you have it displayed or not) with Word documents. When you click on, say, Filename.doc file on the Documents menu or double-click it in Windows Explorer, Windows knows to use Word to open it. But if you double-click on, say, Filename.wpd, Windows is going to look for WordPerfect to open it (or just not know what to use). This doesn’t mean you can’t open the document in Word; you just have to do it from within Word. In order to open Filename.wpd in Word, however, you have to be able to see it. By default, Word displays only its own files. In the File Open dialog, you may see that “Files of type” is set to “Word Documents (*.doc)” or “All Word Documents (*.doc; *.dot; *.htm; [etc.]).” In order to see Filename.wpd, you will have to change the setting to “All Files (*.*).” Word can open files from a number of word processors as well as some spreadsheets and other applications. Most of the time it will do this without a hitch. If it can’t figure out which converter to use, it may pop up a dialog asking you what sort of animal this is, and you can choose from the list it presents. If you want to have this option whenever you open a foreign file, check the box for “Confirm conversion at Open” on the General tab of Tools | Options. __________________ 1Word 2003 has dispensed with most context-sensitive help. Clicking the Help button in a dialog will open the Help task pane with a topic related to the entire dialog, not a specific item. This article copyright © 2001, 2004, 2017, 2023 by Suzanne S. Barnhill. |